Page 1 of 1
Build your own Easy Flange
Posted: Fri Nov 28, 2008 8:43 pm
by RumBull
--Mod Edit--
This topic is about creating your own sankey keg / triclover clamp flange. Lots of pictures and different ideas, to suit different skill levels and tool availability.
Here is how to make a copper sankey adapter...
I use 6 gage bare copper grounding wire purchased at Lowe's for $.86 a foot. I foot will make two if they are generous like they were with me. You also need 2" copper pipe.
Start by hammering the wire into square. Medium raps down the length of wire for about 7". Turn on it's side and repeat down the legth to make your round wire square. Now hammer your square into a wedge by hammering at an angle along the length on one side only. This will begin to curve the wire as well.

- wire into wedge
- st1.JPG (34.51 KiB) Viewed 102744 times
Now I use vise grips to help bend the wire around the pipe.

- forming around pipe
- st3.JPG (20.65 KiB) Viewed 102726 times
This will take some time to get a good tight fit.

- getting closer
- st5.JPG (21.12 KiB) Viewed 102685 times
One it is close, it is time to cut the excess off. I use wire cutters and a file to clean up the ends.

- the ring is cut loose
- st6.JPG (11.11 KiB) Viewed 102673 times
It will take more tweeking to get a good fit.

- fitting on the pipe
- st7.JPG (14.13 KiB) Viewed 102655 times
Re: Super Sankey Scotch Style Still
Posted: Fri Nov 28, 2008 8:58 pm
by RumBull
Now you clean the pieces well, apply flux and reassemble. Time to solder. Stand it on it's end and apply a heavy bead of solder.

- time to solder
- st9.JPG (25.3 KiB) Viewed 102677 times

- soldered
- st10.JPG (16.63 KiB) Viewed 102643 times
Use a file to make sure the bottom is nice and flat.

- 2" tri-clover clamp
- st11.JPG (20.66 KiB) Viewed 102581 times
It is now ready to go on the keg. Use a cork gasket!

- bottom
- st13.JPG (22.17 KiB) Viewed 102624 times
Clamp it down.

- finished
- st12.JPG (16.85 KiB) Viewed 102559 times
Re: Super Sankey Scotch Style Still
Posted: Sat Nov 29, 2008 8:36 pm
by RumBull
decoy wrote:it wasent to soft after silversoldering..?
nice ans sturdy..
I tested the strength before adding the adapter to the new still head. I made the first one on the end of a 4' stick of copper. I was able to pick up the keg and tilt it around putting alot of side and lifting pressure on the flange. I did it again with this one I made last night. Here is a picture to demonstrate that it is a strong piece.

- stress test
- P1010060.jpg (22.32 KiB) Viewed 102298 times
Re: Super Sankey Scotch Style Still
Posted: Thu Dec 04, 2008 11:18 am
by RumBull
I think that haveing a wedge shape is important to getting a good tight seal with the tri-clover clamp. As the clamp squeezes tighter, the wedge creates the down pressure on the gasket. I suppose with flour paste it may not be needed.

- sanitary tri-clover fitting, notice wedge shape
- P1010062_edited.JPG (4.48 KiB) Viewed 102043 times

- copper sankey adapter with wedge shape
- P1010063_edited.JPG (4.01 KiB) Viewed 102017 times
Re: Easy flange
Posted: Tue Feb 10, 2009 9:22 pm
by SuperDavid
Its a great idea by Old dog! He showed me this the other day and I think it's a great way to make the flange thick enough for the tri clamp to bite down on.
I still have to flange the end of the 2inch but thats how I'll be doing it.
Thanks olddog!!
Re: Easy flange
Posted: Fri Feb 13, 2009 6:59 am
by SuperDavid
It took me the better half of an hour, but I've got my copper flanged out...it's a little rough, but I think it will do the trick. I might need to use a cork gasket between the flange and the keg because of my rough metal working skills(or lack of). Gotta get a wire brush onto the top side of the flange since the sand paper can't get into the rough bits or the solder won't stick.
Thanks again olddog! great idea!
Re: Easy flange
Posted: Fri Feb 13, 2009 8:55 am
by SuperDavid
She's ugly!! and I've got some more shaping to do....but this is where I'm up to with olddogs easy flange.
Re: Easy flange
Posted: Fri Mar 20, 2009 2:57 pm
by eternalfrost
heres a spec drawing for a 2" flange

- 4322K213L.GIF (16.22 KiB) Viewed 90530 times
Re: Easy flange
Posted: Tue Aug 04, 2009 6:19 pm
by cob

half an hour, a piece of steel, a hammer, and a piece of wood with 2 grooves in it.

i cut one groove in a stump with an electric chainsaw' skill saw or chisel will work

second groove was cut with a wood chisel is 1/4x1/4 v groove, the tool in the second picture is 1/8x3/4 steel bar radiused to inside diameter and pointed like a chisel but very blunt.i annealed about 3/4" of 1 1/2" tube and placed it over the v groove and bulged the tube about 3/8 inside the end, go around a couple times and hit it hard. then moved to the chainsaw groove and bulged it more. at this point the tube will flair out then back in. in second picture you see that flair back in flattened in to be the gasket surface. these pictures are the result of 1/2 hour total work the flange works as is in a clover clamp, it could be refined a little the inside of the gasket face is rough not the gasket surface just the inside diameter. like i said half an hour, a hammer, a piece af steel, and a block of wood. and only annealed once. cob
Re: Easy flange
Posted: Sun Feb 28, 2010 9:08 pm
by ct1870
Re: Easy flange
Posted: Sun Feb 28, 2010 9:30 pm
by ct1870
Re: Easy flange
Posted: Mon Mar 01, 2010 2:26 pm
by sasha18
I'm trying to make an easy flange. I successfully soldered on some thick gauge wire onto a 2" fitting. But there is one very small gap between the wire and the pipe. When I try to put more solder on the joint, the flame just blows the molten stuff around the joint.
You guys all seem to be able to get the solder to "build up" to make a good thick joint.
Am I using the wrong solder (it's lead free), heating it too much? Any other things I'm doing wrong here. Sorry there aren't any pictures.
Thanks.
Re: Easy flange
Posted: Mon Mar 01, 2010 4:18 pm
by Fester
sasha18 wrote: When I try to put more solder on the joint, the flame just blows the molten stuff around the joint.
put the flux where you want the solder to be when you are done. get the metal hot and move the flame away from the joint. don't melt the solder with the flame. the heat from the metal must melt the solder. with practice you won't get it too hot as i did when i first started learning to solder.
Re: Easy flange
Posted: Mon Mar 01, 2010 5:02 pm
by LWTCS
Look for the flame that is bouncing off of your copper to turn green.
Once the flame is green, pull the heat away and touch your joint with the solder. Should get a nice capillary draw of solder into the joint.
Butt joints need just enough heat to get your solder to collapse.
Apply heat and solder as needed.
Re: Easy flange
Posted: Tue Mar 02, 2010 10:08 am
by ct1870
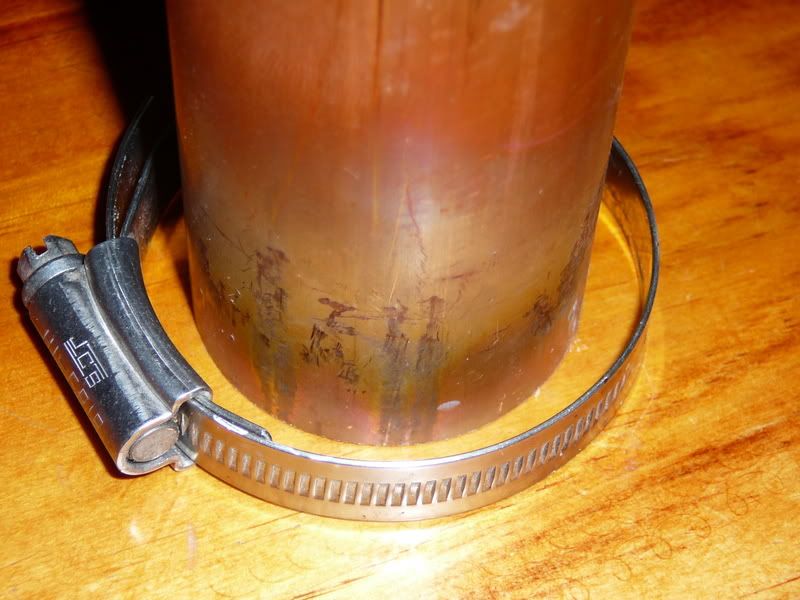
But there is one very small gap between the wire and the pipe.
After I wrap the wire around the tube and cute it, I grind the tips down flat with the grinder. I may have to do it once or twice. You want the ends to touch and there should not be any gaps between the wire and the tube. I use a clamp to tighten the wire around the tube. I sand the wire and tube, put flux on both pieces and clamp the wire to the tube. With the tube on end and heating it, work the solder around the tube. the flux will pull the solder from top to bottom.
 Viewed 80083 times")
- tight fit with the ends touching not gaps
 Viewed 80087 times")
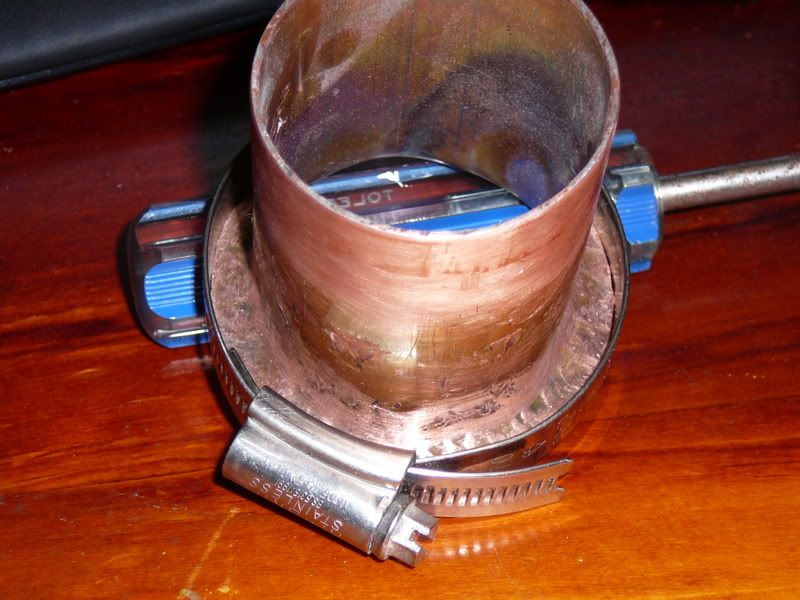
- this is the joint where the ends touch
 Viewed 80090 times")
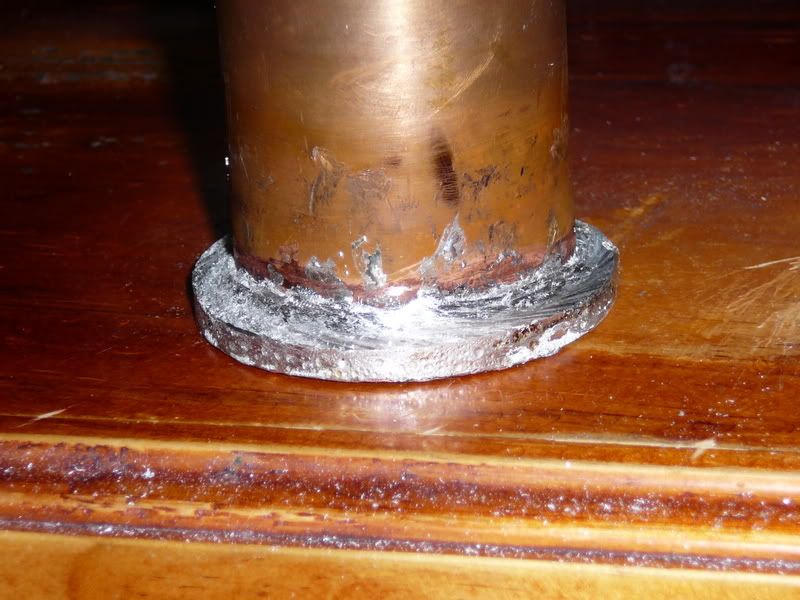
- solder levels out with the bottom of the tube
A belt sander would work great to completely flatten the bottom, but I don't have one. I use flour paste to sill the joint, and I haven't had a leak yet, knock on wood.
Re: Easy flange
Posted: Sat Jun 11, 2011 4:02 am
by myles
I just made my first one of these. Couldn't find heavy copper wire so I used 4mm brass rod instead. I used the version where the copper tube is hammered out into a flange so the brass rod is not in vapour contact.

I wound the brass rod around a lenth of iron pole (smaller than 2" tube) and then eased the coils onto a bit of 2" tube. Scored a line down the coil and then took it off and cut the coil into individual links. The links are a tight fit on the tube but I used the hose clamp to get it tight and soldered it on.
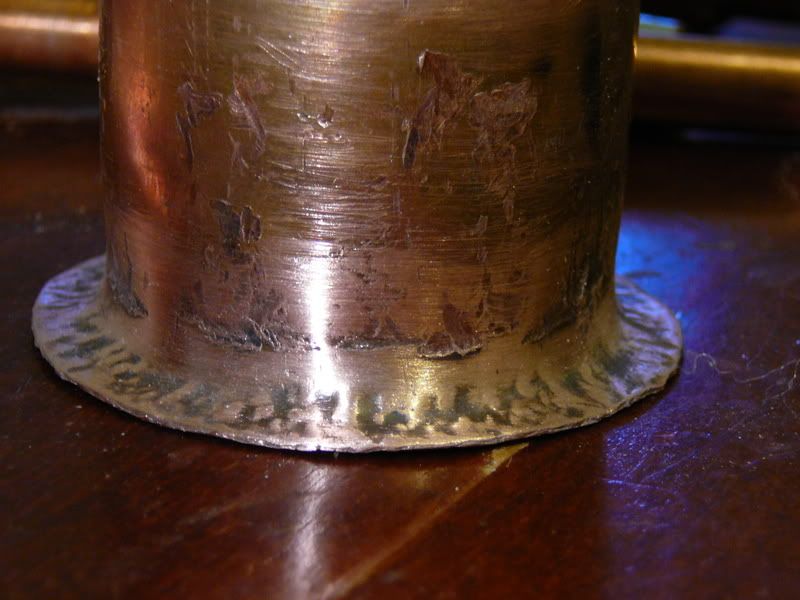
I left 1/4" of tube protruding and went round this with a hammer after soldering to make the flat copper flange.
It seemed to work OK.

I was thinking - may have been mentioned before as this is a long post - that if you built these onto a straight copper slip connector instead of tube, you could make them self centering. Have the tube stick 1/4" past one easy flange and on the mating one pull it 1/4" back into the slip connector. You could cut 1 slip connector in half to make 2 easy flanges so it wouldn't be that much more expensive than just using tube.
Re: Easy flange
Posted: Sat Jun 11, 2011 12:34 pm
by myles
Thanks for the link.
Here is a better picture of the brass version.

The score marks on the tube are because I used a steel edge instead of wood to support the hammer work. Will fix that next time.
Re: Easy flange
Posted: Mon Jun 13, 2011 5:39 pm
by olddog
pumpman wrote: Is the chuck not open through the back?
It is but you can only put something 1" or less through, it's only a $500 mini-lathe.
Anyway I started with a fitting like this.
I turned off the thread and the hex fitting, and using a boring tool, I turned the center to 2" all the way through, and then turned the flange angle and ended up with this.
038.JPG[attachment]
The copper 2"tube passes all the way through the fitting, so the brass contact will be none or very little when I make the PTFE gasket for it.[attachment=1]039.JPG
Here is the end product, a $5 fitting and an hours work, and I have a tri-clamp fitting that fits perfectly on my keg.

OD
Re: Easy flange
Posted: Mon Jun 13, 2011 6:00 pm
by palinkagus
Re: Easy flange
Posted: Mon Jun 13, 2011 6:01 pm
by palinkagus
 Viewed 77715 times")
- And here is your finished product. Tri-clamp draws ends in tight and compresses gasket nicely.
Re: Easy flange
Posted: Fri Nov 18, 2011 2:07 pm
by myles
I am still playing with the brass rod flanges, even though they are a bit harder to work with. I turn the end of the copper tube over to make the mating surface. I am trying to grind a bevel into the brass to make it fit the clamp better as the 4mm rod plus the copper tube thickness is a bit too much for the clamp.
This one is just roughly ground down on the bench grinder as I am going to have to build a jig to finish it off. It is a bit rough still, but shows potential. Besides I like the look of the brass with the copper as an alternative to all copper.

Re: Easy flange
Posted: Sun Nov 20, 2011 4:52 am
by myles
I have a bit of a problem with these flanges in that I find it dificult to keep them aligned when tightening up the clamp. It is because there is no grove and ridge type arrangement in the gaskets and flanges.
Anyway I built one on a straight slip coupling to see if that would help. The other half will be put 1" from the end of the tube with a gasket trapped between the 2 flanges.


The alignment shouldn't be an issue as the slip coupling is still in use, but getting it appart again could be a problem. Don't know if anyone else has had a go at this yet. There is a slight gap in the flange but it is not an issue at this time. I just wish to see if the idea will work. The flange will just fit inside the clamp when it is built on the slightly wider tube of the coupling.
Re: Easy flange
Posted: Sun Nov 20, 2011 8:09 am
by myles
Finished joint will be assembled like this.

The flange is set 1mm back from the end of the slip coupling so the nice true machine made edge will be in contact with the gasket. The gasket should be trapped between the 2 flanges and forced down onto the surface of the tube. I am still a bit concerned that the slip coupling might be difficult to disassemble after it has been in use for some time. Possibly a thin smear of some safe lubricant before assembly? PTFE paste perhaps? Don't know - it might be OK as it is.
Don't know its just an idea besides which it is only good for tube to tube joints, not tube to keg.
Re: Easy flange
Posted: Wed Nov 23, 2011 2:26 am
by myles
Thanks Samohon. I made up a mandrel so that I could spin it in a pillar drill and finished off grinding down the brass rod with abrasive paper on a wood stick.

I know you can't see it when the clamp is on, but I like it. It ended up being fitted to the spiral riser that is going on my copper double boiler.

Re: Build your own Easy Flange
Posted: Sat Dec 12, 2020 2:02 pm
by Bee
Remember to anneal the copper before you work with it and after you pound on it. Unlike steel, copper is hardened by work and needs to be annealed to make/keep it pliable. When copper is unannealed, it is very springy, it has lots of memory. Annealing it makes it "dead" and much easier to bend. Annealing can also keep copper from cracking if you are expanding it.
Re: Build your own Easy Flange
Posted: Sat Dec 12, 2020 3:22 pm
by ismbardbrunel123
That's nearly a ten year gap....
Re: Build your own Easy Flange
Posted: Sat Dec 12, 2020 6:25 pm
by cob
this is still a great thread with lots of good information, and good tutorials. personally one of the not so obvious things
I learned from this thread is that if you host your pictures on outside servers they can disappear and be lost forever.
Re: Build your own Easy Flange
Posted: Sat Dec 12, 2020 8:23 pm
by The Baker
Many a good tune has been played on an old fiddle.
Geoff
Re: Build your own Easy Flange
Posted: Sun Apr 30, 2023 11:50 am
by Whotan
Did you use brazing (hard solder ) or soft solder?
Re: Build your own Easy Flange
Posted: Sun Apr 30, 2023 1:40 pm
by cob
Whotan wrote: ↑Sun Apr 30, 2023 11:50 am
Did you use brazing (hard solder ) or soft solder?
I used a hammer, But anything lead free will work.
