Hello everyone.
I recently found an old 6gal stainless steel milk can that has inspired me to build Insted of buy.
I have decided to build a Liebig condenser based off everything I read.
It will be primarily a pot still for whiskey's and such.
It will be build with a 1"x 1.5ft head that will be detachable from the condenser so I can build a worm in the future.
Than after the 90° and 45° bends reduce to 1/2" pipe.
The 1/2" will be jacketed with 3ft of 1".
Any other tips about building?
Thinking about adding a spiral inside the water jacket to help the cooling.
First Liebig build.
Moderator: Site Moderator
-
StillerBoy
- Master of Distillation
- Posts: 3387
- Joined: Thu Dec 01, 2016 6:27 pm
- Location: Ontario
Re: First Liebig build.
Is there a reason why you are going with 1", why not go with 1.5", it will be much easier to dial in..FussyShine wrote:It will be build with a 1"x 1.5ft head that will be detachable from the condenser so I can build a worm in the future.
May I suggest going with 3/4" outer instead of 1", with a 14 gauge wire around the 1/2"FussyShine wrote:The 1/2" will be jacketed with 3ft of 1"
Just some thought
Mars
" I know quite certainly that I myself have no special talent. Curiosity, Obsession and dogged endurance, combined with self-criticism, have brought me to my knowledge and understanding "
– Albert Einstein
– Albert Einstein
-
GrassHopper

- Site Donor

- Posts: 1389
- Joined: Thu Feb 12, 2015 6:35 pm
- Location: Idaho
Re: First Liebig build.
Read this entire thread and and the links within it and it should be helpful to build your liebig. Knowledge is power.
-
FussyShine
- Novice
- Posts: 14
- Joined: Sat Jan 21, 2017 7:54 pm
Re: First Liebig build.
Stillerboy,
From most of what I saw people using over 1" were for reflux stills or for much larger boilers. I also used it because it was cheaper than 1.5".
I am using the 1" jacket Insted of 3/4" because I bought 5' of 1" pipe so just using what was left over. This is also why it is 3' long. Calculations on the parent site said I would need about 28" long condenser so I know this is larger than needed.
I did decide to add the spiral around the 1/2" pipe but used 6 guages wire because this was all I found at my local store but I had the room for it anyways.
Might I ask why you say use 3/4" Insted of the 1" for the jacket? I could not find any information on what made that better.
Grasshopper,
Trust me I have done a lot of reading on this form along with many others. I did a lot of Google searches about Liebig design as well. I know it's still another new guy posting about a topic that has been discussed a million times but still we all like reassuring that we are doing something right our first time.
Thanks for the advice guys!
-
jb-texshine
- Master of Distillation
- Posts: 3036
- Joined: Thu Feb 12, 2015 12:03 am
- Location: Texan living in Missouri
Re: First Liebig build.
3/4" over 1/2 inch is lighter=less stress on solder joints and less of a water gap between =less weight also+less wear on your pump. Functionally though,it'll work.just keep an eye on your solder joints. Get a small mirror to check them during runs. Hold it close and look for condensation.FussyShine wrote:Stillerboy,
From most of what I saw people using over 1" were for reflux stills or for much larger boilers. I also used it because it was cheaper than 1.5".
I am using the 1" jacket Insted of 3/4" because I bought 5' of 1" pipe so just using what was left over. This is also why it is 3' long. Calculations on the parent site said I would need about 28" long condenser so I know this is larger than needed.
I did decide to add the spiral around the 1/2" pipe but used 6 guages wire because this was all I found at my local store but I had the room for it anyways.
Might I ask why you say use 3/4" Insted of the 1" for the jacket? I could not find any information on what made that better.
Grasshopper,
Trust me I have done a lot of reading on this form along with many others. I did a lot of Google searches about Liebig design as well. I know it's still another new guy posting about a topic that has been discussed a million times but still we all like reassuring that we are doing something right our first time.
Thanks for the advice guys!
Remember not to blow yourself up,you only get to forget once!
Deo Vendice
Never eat Mexican food north or east of Dallas tx!
Deo Vendice
Never eat Mexican food north or east of Dallas tx!
-
Saltbush Bill

- Site Mod
- Posts: 9750
- Joined: Thu Mar 17, 2011 2:13 am
- Location: Northern NSW Australia
Re: First Liebig build.
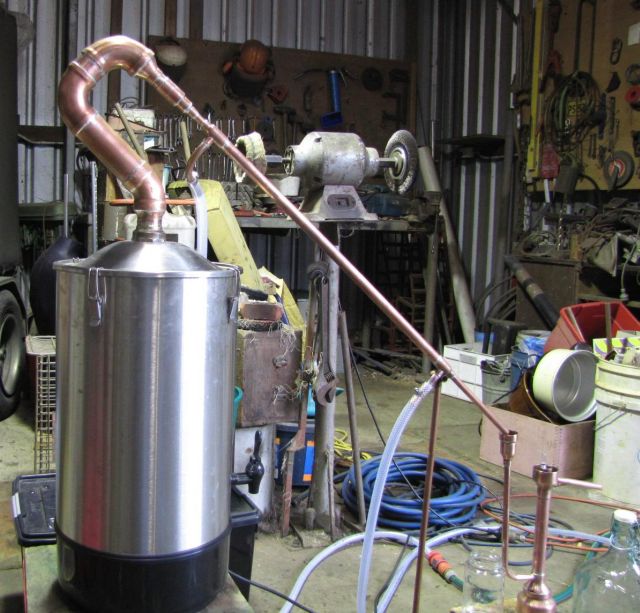
To take some of the worry out of using smaller diameter copper for your still, make some sort of prop that you can put under the end of condenser. This will take all or most of the weight of the condenser, water hoses and water.
If you look at the bottom hose on the still below you can see the prop I made to help support the condenser .
If you look at the bottom hose on the still below you can see the prop I made to help support the condenser .
-
FussyShine
- Novice
- Posts: 14
- Joined: Sat Jan 21, 2017 7:54 pm
Re: First Liebig build.
JB,
Good information! All I saw was it's lighter so didn't think that would effect function.
But won't the 1" have a larger thermal mass to help cool the 1/2" tube??
Saltbush,
I was looking at than with it all mocked up. I thought maybe notching a 2x4 and using it as a stand. The 90° and 45° will not be soldered together so I can adjust the height of my condenser based on what my collection vesle is, so I'll need something to hold it steady anyways.
Again, thanks guys!
-
GrassHopper
- Site Donor
- Posts: 1389
- Joined: Thu Feb 12, 2015 6:35 pm
- Location: Idaho
Re: First Liebig build.
My apologies Fussy,GrassHopper wrote:Read this entire thread and and the links within it and it should be helpful to build your liebig. Knowledge is power.
I forgot to add the link that I was referring to to help you on building a liebig. Sounded as if I was being a smartass and wanted you to read the whole damn forum.
Here it is: http://homedistiller.org/forum/viewtopi ... 87&t=65548" onclick="window.open(this.href);return false;" rel="nofollow
Carry on
-
jb-texshine
- Master of Distillation
- Posts: 3036
- Joined: Thu Feb 12, 2015 12:03 am
- Location: Texan living in Missouri
Re: First Liebig build.
its debatable...FussyShine wrote:JB,
But won't the 1" have a larger thermal mass to help cool the 1/2" tube?
Yes because there's more mass ,but you have to slow your water flow down even further to take full advantage of it which puts more back pressure on the pump. It will work though.put a valve on the water return(top).
Remember not to blow yourself up,you only get to forget once!
Deo Vendice
Never eat Mexican food north or east of Dallas tx!
Deo Vendice
Never eat Mexican food north or east of Dallas tx!
-
Saltbush Bill
- Site Mod
- Posts: 9750
- Joined: Thu Mar 17, 2011 2:13 am
- Location: Northern NSW Australia
Re: First Liebig build.
That would do the jobFussyShine wrote: I thought maybe notching a 2x4 and using it as a stand.
-
FussyShine
- Novice
- Posts: 14
- Joined: Sat Jan 21, 2017 7:54 pm
Re: First Liebig build.
GrassHopper,
I thought you wanted me to read the whole form lol. No hurt feelings, actually I have read that one and is where I got the idea to add the spiral.
And to Everyone else,
Me and a buddy soldered it together last night. My first time soldering copper pipe and id say it turned out decent, no picts to prove it lol. I am having an issue figuring out how to attach the head to my lid though, have looked at a lot of threads but didnt see any clear way to attach it. it is a stainless pot lid. I planed on using the screw ends I had but that doesnt seem like a tight seal. Any ideas or good pictures I could look at? After this I cant wait to do my cleaning run and sacrifice run to see how it works.