My first still was a cobbled together pressure cooker with a 1/2" wide column and condenser. I stripped 5 batches of UJSM then did a spirit run, which all tasted like shit. Been told I may have not fermented right, run the still right, etc. Decided that I needed a better still, fermenter and education. Been bugging my local brew shop and friends that brew beer, so think I have the fermentation right. So now the still. I spent a lot of time gathering materials and deciding on what to build. Thanks to all that have posted pics of their stills both here and other places on the web!
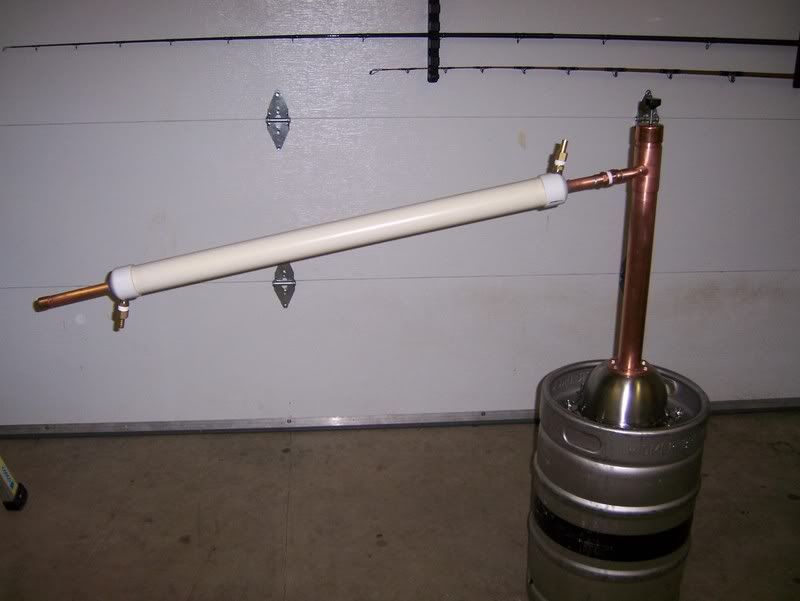
Scrapped beer Keg from a local micro brewery, 2" copper column 24" tall, packed with mesh about 2/3 full. Condenser is 48" of 3/4" copper with a 2"PVC jacket, 1/2" water inlets/outlet driven by a 80 GPH pond pump. The barrel I will circulate water from is 25 gallons
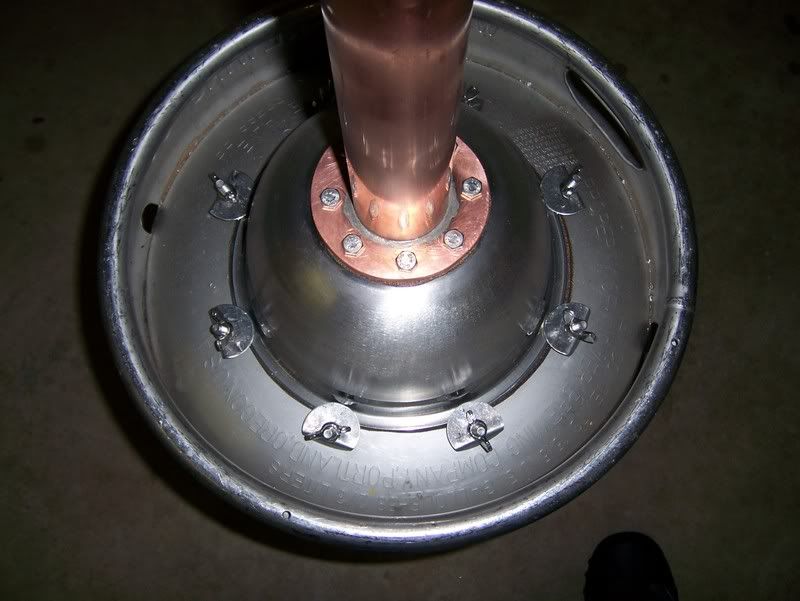
In this first pic, The flange the column is attached to is home made. I couldn't find a flange that would fit for a pirce in my range, so I made one. Let me tell ya, when you get into 1/4" thick copper plate, it gets expensive.
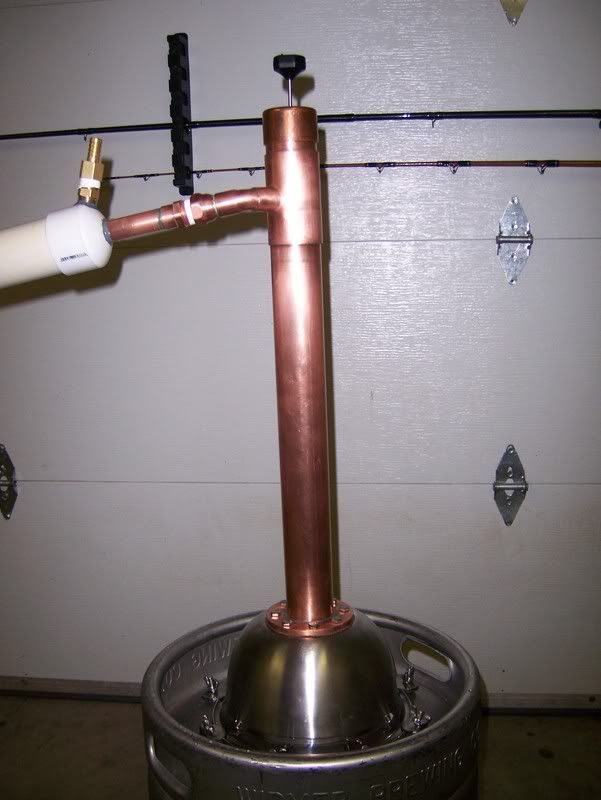
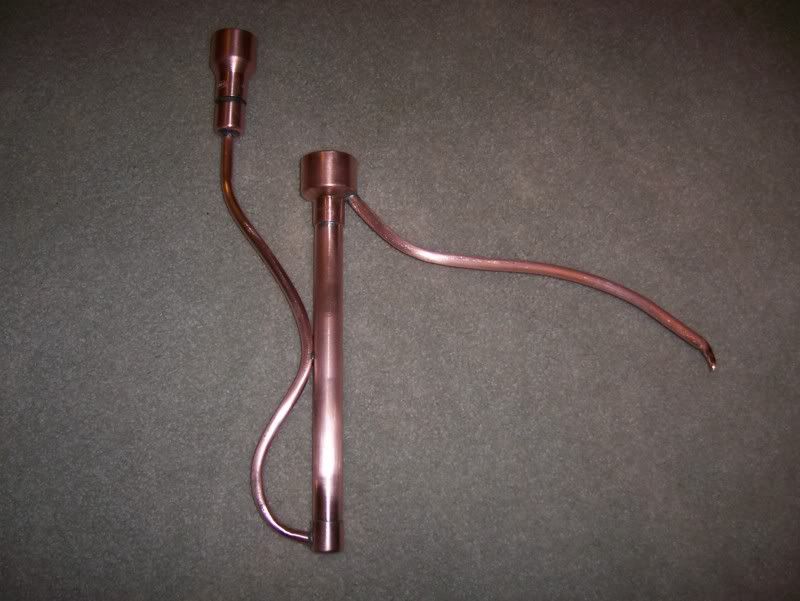
The top end assembly
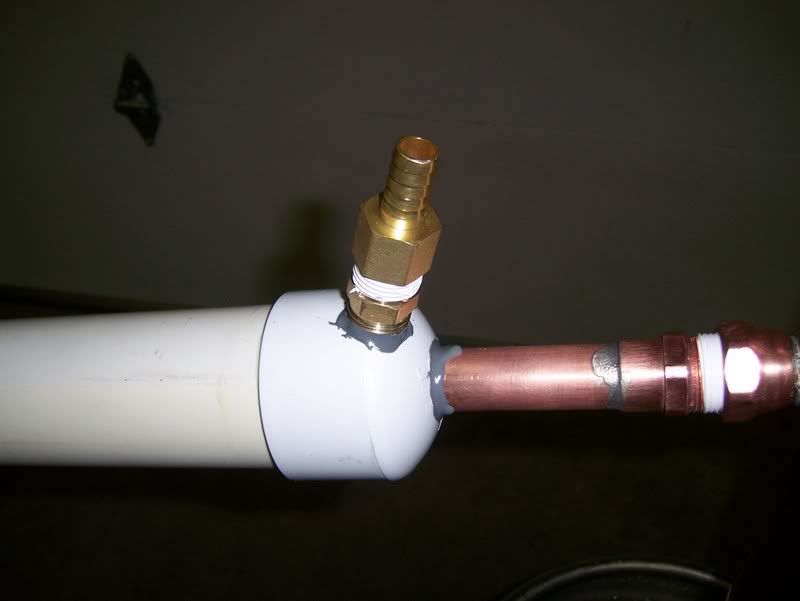
Close up of the condenser
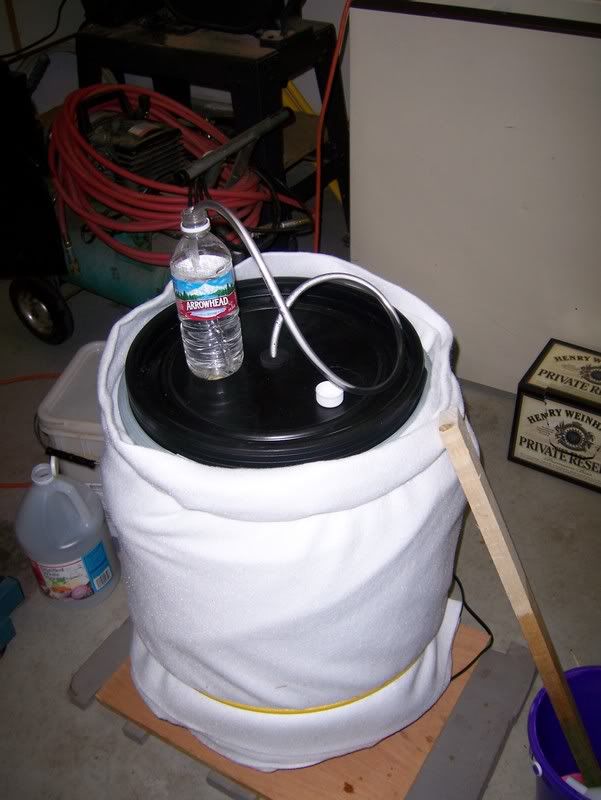
The whole thing. Already ran about 15 gallons of water thru it, fixed the three leaks I found. cleaned it paying extra attention to all the joints.
12 gallon rum wash started yesterday. Hopefully it will be done next week so I can run it
And while I was at it....decide to build one of these......
I would appreciate any comments, good or bad. Gotta learn somehow
Built it myself
Moderator: Site Moderator
-
- Novice
- Posts: 63
- Joined: Wed Nov 08, 2006 10:23 am
- Location: North of the border, near the ocean
I like the union to the boiler.
I am interested in reflux stills, but I realize that pot stills do not need a column, and that longer columns are better for refluxing.
I assume you are not interested in reflux, since you don't have a reflux condenser
Maybe there is something I am missing because I don't do pot distilling, but what is up with the column if you aren't refluxing?
What did you use to seal pvc to copper? Looks like JB Weld.
I like your parrot beak. When I made mine, I cut a piece of 11/2" pipe vertically and flattenened it into a plate of copper. I then used the plate as a base for the parrot beak and soldered the bottom to the base.
Just a thought.
-
- Novice
- Posts: 16
- Joined: Sat Nov 18, 2006 7:35 pm
Here's mine. Just ran a batch of rum yesterday. Ended up with approx 1/2 gallon of 150 proof! Have the second batch fermenting now. The column is 16" of 2" copper the 24" stainless condenser (1/2") was made by brewhaus (nicely made and well priced = happy customer!)
And the union to the keg. I cut the neck off another keg and had a friend machine out the inside to fit the 2" copper column, and then pressed it into place.
-
- Novice
- Posts: 63
- Joined: Wed Nov 08, 2006 10:23 am
- Location: North of the border, near the ocean
I am not pretending to know much of anything about distilling having just started myself. But, with the assumption that you want the vapor in as much contact with copper as possible, a short column is necessary to have a place to put the copper. Besides, all the other bigger potstills I've seen have a column of some sort. Take a look at a big distillery's potstill. The stills are close to 20 feet tall and most of that is column. Most of the keg potstills on this forum have a 18-24" column, packed with mesh. I'm just following the crowdMaybe there is something I am missing because I don't do pot distilling, but what is up with the column if you aren't refluxing?
exactlyWhat did you use to seal pvc to copper? Looks like JB Weld.
Hey City Boy.....I really like that union to the keg you have. I did the usual "cut out the top" thing as I want to be able to get in and scrub(because I'm positive I will screw something up sometime and burn it)
-
- Novice
- Posts: 16
- Joined: Sat Nov 18, 2006 7:35 pm
Thanks! I've cut a keg for someone else before. I wasn't happy with any way I could come up with to seal it. Maybe I just need to see one in action! About burning... I'm a homebrewer too and use a product called PBW (Powdered Brewery Wash) as a cleaner. This stuff kicks ass! It will clean off almost any organic nastyness you can throw at it. If I burn any wash I intend on letting it soak with PBW for a few days and I'm confident it will be gone! But as of right now, I don't intend on distilling any grain. This may change... followed by a quick change in design!Fretman124 wrote: Hey City Boy.....I really like that union to the keg you have. I did the usual "cut out the top" thing as I want to be able to get in and scrub(because I'm positive I will screw something up sometime and burn it)
-
- Rumrunner
- Posts: 732
- Joined: Sat Mar 04, 2006 1:42 am
- Location: Nth coast NSW
Re: Built it myself
="Fretman124"
And while I was at it....decide to build one of these......
I would appreciate any comments, good or bad. Gotta learn somehow
My first one was a bit like yours - 1/4" I presume - aiming to minimise volume retained in the thing, but in action I found it trapped bubbles at faster flow rates which floated the hydrometer .
I rebuilt it using 3/8 tube and topped it up with a 100mm section of 3/4" above the level of the outlet to allow bubbles to seperate out and not get trapped in the smaller tube. Seems to have solved the problem unless flow rate is very fast.
nice job there fretman. you said you had a few leaks when you checked it, where they from the pvc? i was wondering what would be the best way to seal the pvc to the copper and how well the jb weld will take the heat. keep us posted on how the rum wash works out. if you make the cuts rite the final product should be good. my first still was a pressure cooker with a worm condencer and it would make pretty good whiskey but only about a pint at the time so i had to get a little bigger. the cuts are what will make the deciding factor of the quality of your product. if you do your homework on the cuts like you have on your still manufacture you should do just fine. good luck!
Day Late;Dollar Short
-
- Novice
- Posts: 63
- Joined: Wed Nov 08, 2006 10:23 am
- Location: North of the border, near the ocean
Ricky wrote
The JB weld should take the heat very well. According to thier website, its heat resistant to 500 F. I'm hoping my condenser doesn't get that hot
Ricky wrote
Alas....this is where it will all fall apart. wish there was a way to have an experienced person there to say, "smell/taste this, this is heads. Smell/taste this, this is the body.....etc". The only thing I know for sure is to toss the fisrt little bit as foreshots(meth). Making cuts is the "black arts" of distilling and I damn sure ain't no artist!
Hornedrodent wrote
Is that what you mean?
All the leaks I had were at solder joints. The toughest one to seal was the 2" to 3/4" reducer. The fitting is about 3/16" thick around the pipe where the 1/4" reducer is formed and it wicks the heat away rapidly. Since all I had was a propane torch it took forever to heat it up for the solder to wick around the joint.nice job there fretman. you said you had a few leaks when you checked it, where they from the pvc? i was wondering what would be the best way to seal the pvc to the copper and how well the jb weld will take the heat.
The JB weld should take the heat very well. According to thier website, its heat resistant to 500 F. I'm hoping my condenser doesn't get that hot
Ricky wrote
if you do your homework on the cuts like you have on your still manufacture you should do just fine. good luck!
Alas....this is where it will all fall apart. wish there was a way to have an experienced person there to say, "smell/taste this, this is heads. Smell/taste this, this is the body.....etc". The only thing I know for sure is to toss the fisrt little bit as foreshots(meth). Making cuts is the "black arts" of distilling and I damn sure ain't no artist!
Hornedrodent wrote
I think the small tubing is 3/8" (1/4" ID) at the output, the tube holding the proofing meter is above the outlet tube, so the distillate overflows into the cup then out the tube.My first one was a bit like yours - 1/4" I presume - aiming to minimise volume retained in the thing, but in action I found it trapped bubbles at faster flow rates which floated the hydrometer .
I rebuilt it using 3/8 tube and topped it up with a 100mm section of 3/4" above the level of the outlet to allow bubbles to seperate out and not get trapped in the smaller tube. Seems to have solved the problem unless flow rate is very fast.
Is that what you mean?
theholymackeral wrote
Learn to use the search function... intellectual laziness is frowned upon here.