so i just finished picking up the last of the pieces today. should be able to spend some time starting to put it together this weekend.
it will be an inline bokakob reflux. 2X38 inch copper, 20L stainless steel stock pot.
heres everything ill be using:
2"X38" dvw (drain gauge) copper pipe
20L Stainless steel stock pot
20 ft 1/4" copper tube
brass needle valve
2" copper end cap
2" copper couple
10 ft vinyl tube
5 SS bolts
soldering supplies
hacksaw (double width stacked blades)
2" inline bokakob build in progress
Moderator: Site Moderator
-
eternalfrost
- Trainee
- Posts: 785
- Joined: Fri Mar 14, 2008 4:28 pm
-
eternalfrost
- Trainee
- Posts: 785
- Joined: Fri Mar 14, 2008 4:28 pm
found some extra time to fiddle yesterday. finished the condenser coil and about 3/4 of the plate soldering.
the condenser uses 20 feet of 1/4" OD copper tube. only acctualy ended up using bout 10 feet or so for the coil, the rest will be used for the needle valve take off to collection site.
filled it up with salt and taped the end shut. wrapped it by hand around a broom stick using my knee and the floor. it really sucked getting the first loop or two but was real easy once it was locked in.
i kept about a 1/4" gap between all the coils to give better surface area and condensation. i just wrapped it ad lib, then went back and put a screwdriver into any coils that were too close and twist-pried them apart to all a standard width.
the second layer goes from the bottom back up to the top. I intended forboth coild to twist the same way for better circulation, but didnt realize you have to 'switch directions' when you go back up for them to both go the same way the outter coil is about 1/8" an inch out from the inner one. same deal with the screwdriver.
over all its about 7 inches long. only got one bit of kink on the switch between inner and outer cuz i was flipping it all around and shifted the salt away.
ill post again when i get the plates all finished. still have some grinding and polishing to do
the condenser uses 20 feet of 1/4" OD copper tube. only acctualy ended up using bout 10 feet or so for the coil, the rest will be used for the needle valve take off to collection site.
filled it up with salt and taped the end shut. wrapped it by hand around a broom stick using my knee and the floor. it really sucked getting the first loop or two but was real easy once it was locked in.
i kept about a 1/4" gap between all the coils to give better surface area and condensation. i just wrapped it ad lib, then went back and put a screwdriver into any coils that were too close and twist-pried them apart to all a standard width.
the second layer goes from the bottom back up to the top. I intended forboth coild to twist the same way for better circulation, but didnt realize you have to 'switch directions' when you go back up for them to both go the same way
over all its about 7 inches long. only got one bit of kink on the switch between inner and outer cuz i was flipping it all around and shifted the salt away.
ill post again when i get the plates all finished. still have some grinding and polishing to do
The start is the tricky bit, and changing the direction for the outer wind (as you found out).eternalfrost wrote:it really sucked getting the first loop or two but was real easy once it was locked in.
1/8-1/4" is plenty. It is better to wind them the right distance apart in the first place, but using a screwdriver works okay too.eternalfrost wrote:i kept about a 1/4" gap between all the coils to give better surface area and condensation. i just wrapped it ad lib, then went back and put a screwdriver into any coils that were too close and twist-pried them apart to all a standard width.
Good length.eternalfrost wrote:over all its about 7 inches long.
What size mandrels did you use?
Ya done a good job. Satisfying, ain't it?
Be safe.
Be discreet.
And have fun.
Be discreet.
And have fun.
-
eternalfrost
- Trainee
- Posts: 785
- Joined: Fri Mar 14, 2008 4:28 pm
its a bit stiff. actually it might not be vinyl, more of a PVC mix i think. its not the clear super-flexible fish tank line, but its not like solid PVC either.Froggy wrote:How rigid is the vinyl tubing? I'm guessing this is for the cooling lines?
it cost a whole dollar for 10 feet so im not to worried ha but i think it would work fine for the cooling lines. only thing left is to find a way to hook it to a hose or the sink
-
eternalfrost
- Trainee
- Posts: 785
- Joined: Fri Mar 14, 2008 4:28 pm
got the plates mostly finished. I used that template thats floating around on this site. used a hacksaw with double blades in it to make a nice fat cut for the plate to fit into. wasnt the neatest job by a long shot as im sort of between houses at the moment and dont have access to a proper garage and tools. pretty much just winged it by hand.
the plates were made from a 2" copper couple fitting. i cut it in half then flattened it out with a hammer,coppers really soft it only takes like 3 blows it make it flat. they fit perfectly into the slots made using 2 hacksaw blades
used a propane bernz-o-matic to solder it. something with more heat would defiantly be nice. that big copper pipe acts like a big old heat-sink. had to kind of do it in sections and couldnt get a nice even bead, and having a kin of jagged cut didnt help either, had some blobs leak inside the tube a bit. filed it up with water though and its at least sealed tight.
the bottom plate went in first, with the reflux tab pre-cut, after it was soldered i stuck a broomhandle down it and wacked it with a hammer to fold down the tab, then put the top plate in
gave the seams a quick grinder job to make them flush with the pipe, will be giving the entire contraption a nice sand paper job to make it pretty when its all finished.
-
eternalfrost
- Trainee
- Posts: 785
- Joined: Fri Mar 14, 2008 4:28 pm
Sorry for the gap in posting here, in the process of moving and still dont have the net set up in the new place.
so its 99% done at this point...
Cut the handle off the 20L SS stickpot. drilled 5 bolt holes through the copper end cap. Then put the cap right on the lid and drilled through the holes so they would all match up. couldnt find the right sized hole drill anywhere so resorted to just drilling a handfull of holes with a plain bit and smoothing the edges out with a file. seemed to work ok, will be sealing the joint with flour paste to start then maby ordering some music-grade cork sheet in the future if seems like it could help.
overall the joint is fairly stable, it will wobble if you smack the column but stands up fine on its own
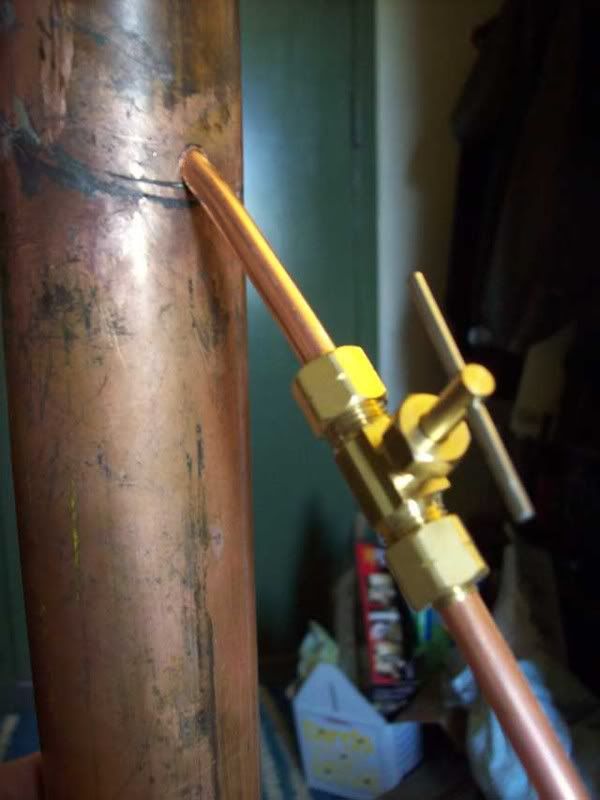
Drilled the output hole and cut a bit of tube to join it to the valve.
OK now for the some questions etc.
-where should the thermometer slot go? im looking at right in where the plates are as that gives the most acurate reading of what you are actually pulling off. but does it really matter if its like under/between/above the plates? and it should be "on axis" with the plates right? as in 180 degrees from the take-off valve?
-i know you have to treat the brass valve to get lead out of the surface. ive been looking around and everyone mentions it but havent really seen a straightforward way to actually do it? from what i gather it involves hydrogen peroxide and/or vinegar? could someone tell me in plain steps just how to do it, dont want to be gettin sick
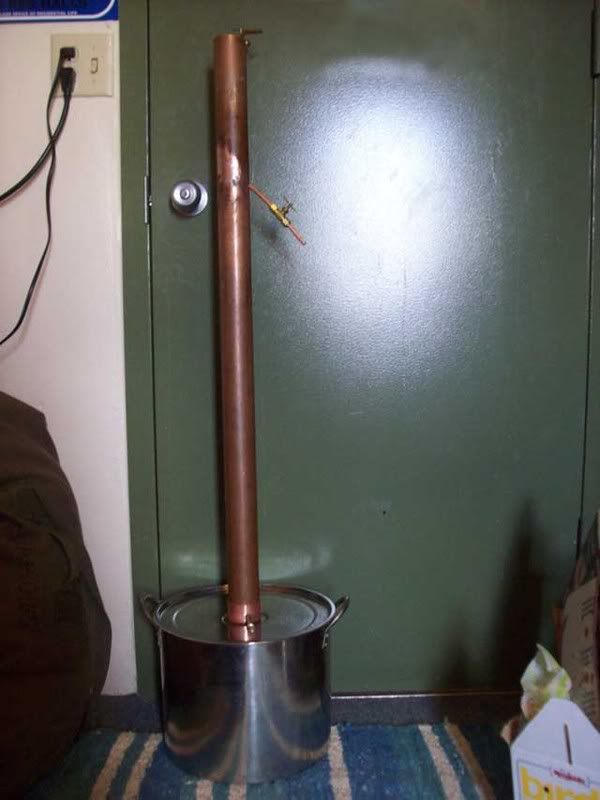
so its 99% done at this point...
Cut the handle off the 20L SS stickpot. drilled 5 bolt holes through the copper end cap. Then put the cap right on the lid and drilled through the holes so they would all match up. couldnt find the right sized hole drill anywhere so resorted to just drilling a handfull of holes with a plain bit and smoothing the edges out with a file. seemed to work ok, will be sealing the joint with flour paste to start then maby ordering some music-grade cork sheet in the future if seems like it could help.
overall the joint is fairly stable, it will wobble if you smack the column but stands up fine on its own
Drilled the output hole and cut a bit of tube to join it to the valve.
OK now for the some questions etc.
-where should the thermometer slot go? im looking at right in where the plates are as that gives the most acurate reading of what you are actually pulling off. but does it really matter if its like under/between/above the plates? and it should be "on axis" with the plates right? as in 180 degrees from the take-off valve?
-i know you have to treat the brass valve to get lead out of the surface. ive been looking around and everyone mentions it but havent really seen a straightforward way to actually do it? from what i gather it involves hydrogen peroxide and/or vinegar? could someone tell me in plain steps just how to do it, dont want to be gettin sick
Looking good.
Brass valve. Pull it apart and take out the seals.
Soak the parts in plain white vinegar overnight to get them clean to start with. Rinse with plain water.
Mix up 1 part 3% hydrogen peroxide and 2 parts plain white vinegar. Drop one valve part in and watch carefully. The surface of the brass will start to bubble and change to a lovely creamy golden yellow colour. This can take as little as about 2 minutes, so watch closely. When it all turns this colour take it out and rinse it well.
If you leave it in too long it starts to discolour and go black. If that happens take it out and put it in plain vinegar for a while, then scrub the black off and try again.
Repeat for all brass valve parts.
Reassemble.
••••••••••••••••••••••••••••
[Gets up on brass valve soapbox. Again. ]
My personal opinion is that brass is not a good choice for take off valves. Stainless is much better for a number of reasons, including health reasons. I know stainless is more expensive (about 3 times brass), but the advantages easily outweigh that additional up front cost, especially when spread over the lifetime of the still. I think saving a few bucks by using a brass take off valve is a false economy.
[Rant over. Normal service will now be resumed. ]
]
Brass valve. Pull it apart and take out the seals.
Soak the parts in plain white vinegar overnight to get them clean to start with. Rinse with plain water.
Mix up 1 part 3% hydrogen peroxide and 2 parts plain white vinegar. Drop one valve part in and watch carefully. The surface of the brass will start to bubble and change to a lovely creamy golden yellow colour. This can take as little as about 2 minutes, so watch closely. When it all turns this colour take it out and rinse it well.
If you leave it in too long it starts to discolour and go black. If that happens take it out and put it in plain vinegar for a while, then scrub the black off and try again.
Repeat for all brass valve parts.
Reassemble.
••••••••••••••••••••••••••••
[Gets up on brass valve soapbox. Again.
My personal opinion is that brass is not a good choice for take off valves. Stainless is much better for a number of reasons, including health reasons. I know stainless is more expensive (about 3 times brass), but the advantages easily outweigh that additional up front cost, especially when spread over the lifetime of the still. I think saving a few bucks by using a brass take off valve is a false economy.
[Rant over. Normal service will now be resumed.
Be safe.
Be discreet.
And have fun.
Be discreet.
And have fun.
-
new_moonshiner
- Trainee
- Posts: 964
- Joined: Sun Jan 21, 2007 7:15 am
-
eternalfrost
- Trainee
- Posts: 785
- Joined: Fri Mar 14, 2008 4:28 pm
Re: 2" inline bokakob build in progress
well things have been crazy lately.
finally got a chance to get everything together and do a 'dry' run with water only...about a month and a half after i finished building the thing lol
no leaks that i could find.
on full blast with a gas stove it put out just under 1.2L per hour of water
whats the best way to clean it out etc? it still looks quite grungy inside, nothing id want to drink anything from thats for sure.
also whats the best way for sealing a plain stockpot lid shut? ws planning on making the flour paste then clamping down with some of those black office binder clips. the test run the lid was just on like you would normally use to cook with, no seals or supports. no vapor was coming out but wouldnt keep it open like that with actual hootch inside
-
new_moonshiner
- Trainee
- Posts: 964
- Joined: Sun Jan 21, 2007 7:15 am
Re: 2" inline bokakob build in progress
try some cheap wine , and the seal is debatable sounds like flour might be a good investment for ya.
-
eternalfrost
- Trainee
- Posts: 785
- Joined: Fri Mar 14, 2008 4:28 pm
Re: 2" inline bokakob build in progress
so at this point im ready for the first 'live' run in a few days when my wash is done fermenting (hopefully, it looks like i might have duffed that up too but thats another thread haha)
I cleaned up the outside of the column by rubbing a paste of salt and bakingsoda with a bit of water over the whole thing then letting it sit about an hour. i then took a toothbrush dipped in vinegar to scrub that off. worked quite well and was blindingly shiny, for a day or two at least, of course it naturally hazed over but at least theres no more chemically soldering gunk on it.
I did two test runs of about an hour each with just vinegar. a whole mess of gunk was left in the water in the boiler afterwards but the inside of the column looked nice and shiny after rather then black and cruddy like it started as.
the column is packed with 6 SS scrubbers, basically right up to the plates. also rolled out 1/2 a scrubber and stuck it down the center of the condenser.
the conection between the column and lid is simply a slip on joint, no threads etc. i sealed everything with flour paste. I gobbed it on under the end cap before i bolted it down then a generous application around its base. same deal with the joint, globbed it around inside the cap then slid the column in and put more around the edge of the cap. the thermometer hole is also sealed with a little dab of flour. i spread a layer of paste around the rim of the pot then clamped the lid down with binder clips. they come in a pack of 24 which fits perfectally around the rim of the stock pot.
i found it easier to work with a paste that was about the consistancy of melted marshmellows. sticks all over to anything but quite easy to spread around at all. just a second under the faucet gets it all off your fingers too so dont worry. i found this much easier then the more 'doughy' versious I have seen other people use on here. quicker too, just get a glob on your finger and run it around the rim, no rolling it out etc.
everything worked great and im excited to finally do a real run soon
- Attachments
-
- 100_0268.JPG (46.94 KiB) Viewed 6626 times
-
- 100_0267.JPG (31.63 KiB) Viewed 6740 times
Re: 2" inline bokakob build in progress
One thing you might consider is doing the anti-syphon trick on your take off.
Can't remeber off hand which one of our gurus came up with it, but it works great. (thanks)
Straighten out the tube a bit and add an elbow after the valve with a small hole drilled in the top. That will make adjusting your take-off rate a whole lot easier.
Can't remeber off hand which one of our gurus came up with it, but it works great. (thanks)
Straighten out the tube a bit and add an elbow after the valve with a small hole drilled in the top. That will make adjusting your take-off rate a whole lot easier.
It is the very things that we think we know, that keep us from learning what we should know.
Valved Reflux, 3"x54" Bok 'mini', 2 liebig based pots and the 'Blockhead' 60K btu propane heat
Valved Reflux, 3"x54" Bok 'mini', 2 liebig based pots and the 'Blockhead' 60K btu propane heat
-
eternalfrost
- Trainee
- Posts: 785
- Joined: Fri Mar 14, 2008 4:28 pm
Re: 2" inline bokakob build in progress
interesting idea Hawke, im pretty sure i get what you are saying.
Ill have to see if I need it after the first run, up to this point i havent even had the downspout connected, just ending in the needle valve
Ill have to see if I need it after the first run, up to this point i havent even had the downspout connected, just ending in the needle valve
Re: 2" inline bokakob build in progress
With my take-off being 6 foot in the air, I use a long tube. It builds up a syphon and makes it hard to adjust for a drop or two per second. Think it was Hookline that posted it a week or so ago. Basicly works like a vent for sewer system. Since it's on the downstream side of the valve it won't leak.
It is the very things that we think we know, that keep us from learning what we should know.
Valved Reflux, 3"x54" Bok 'mini', 2 liebig based pots and the 'Blockhead' 60K btu propane heat
Valved Reflux, 3"x54" Bok 'mini', 2 liebig based pots and the 'Blockhead' 60K btu propane heat
-
punkin
- Master of Distillation
- Posts: 2711
- Joined: Fri Oct 05, 2007 12:36 pm
- Location: Northern NSW Oz Trail Ya
Re: 2" inline bokakob build in progress
Credit goes to our resident engineer/tinkerer Pintoshine in this thread
http://homedistiller.org/forum/viewtopi ... =17&t=6865
http://homedistiller.org/forum/viewtopi ... =17&t=6865
Re: 2" inline bokakob build in progress
Thanks punkin,
Knew it was one of the guru crowd, but my memory is as long as that certain part of the male anatomy
Knew it was one of the guru crowd, but my memory is as long as that certain part of the male anatomy
It is the very things that we think we know, that keep us from learning what we should know.
Valved Reflux, 3"x54" Bok 'mini', 2 liebig based pots and the 'Blockhead' 60K btu propane heat
Valved Reflux, 3"x54" Bok 'mini', 2 liebig based pots and the 'Blockhead' 60K btu propane heat