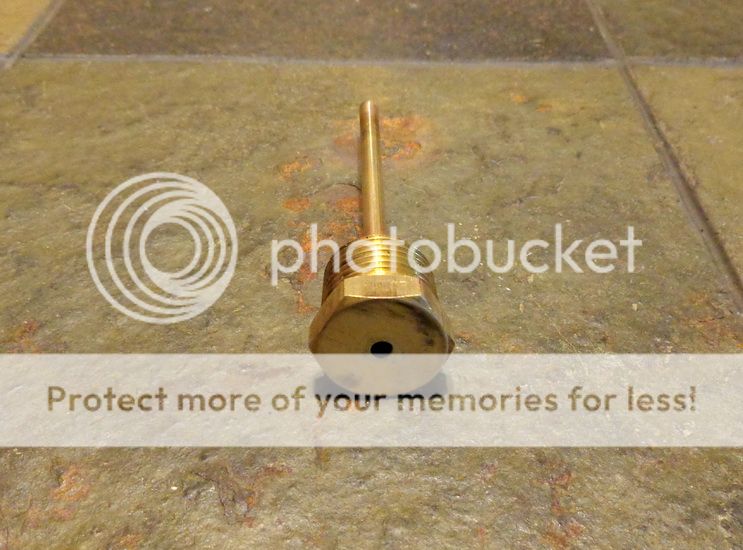
DIY Homemade Thermowell

Fittings, parrots, packing, tooling and so on.

Moderator: Site Moderator

Post Reply
NineInchNails

DIY Homemade Thermowell

Post by NineInchNails »

I'll try to keep this as short as I can. I have been trying to find a really good thermowell that is:

#1 Effective!
#2 Inexpensive
#3 Readily available
#3 Versatile
#4 Easy to use and no tools required. Just insert sensor/probe and pull it out. No thermal grease.
#5 Easily customized to fit my needs
#6 No compression fittings. Thermowell can be left in or removed & plugged.

Most that found online were quite expensive, bulky, made out of really thick material. I own a couple, but the inner diameter is too large for 4mm probes. Their inner diameters also varied which I thought was strange. I was seriously considering the Still Dragon thermowells, but I wanted something that could be easily replaced or modified. I also needed different lengths so I just had to make them myself.

One trip to the local Ace Hardware store I picked up a 1/2" npt brass plug ($3.29) and a 3/16" OD x 12" long brass tube ($1.29). Total cost for materials = $4.58. If you get a few plugs you could easily make a few thermowells. Any size plug would work.
Image

I drilled a hole through a hole dead center of the plug using a 3/16" drill bit. I cut a piece of the brass tube to the desired length.
Image

I sanded the end of the tube, sanded inside the plug, fluxed both surfaces and inserted the tube into the plug. I bent a length of solder to form a small ring and slid it over the tube. I heated up the brass plug with a propane torch until the ring of solder melted.
Image

Image

I then dipped the end of the brass tube into some paste flux, snipped approx a 1/4" long piece of solder, shoved it into the end of the tube, held the end of the tube against some steel and torched the end of the tube until the solder melted. I spit on it to cool it then cleaned up any rough edges.
Image

I flipped it around and used a countersink bit to bevel the hole. You can use a larger diameter drill bit.
Image

DONE! ! !

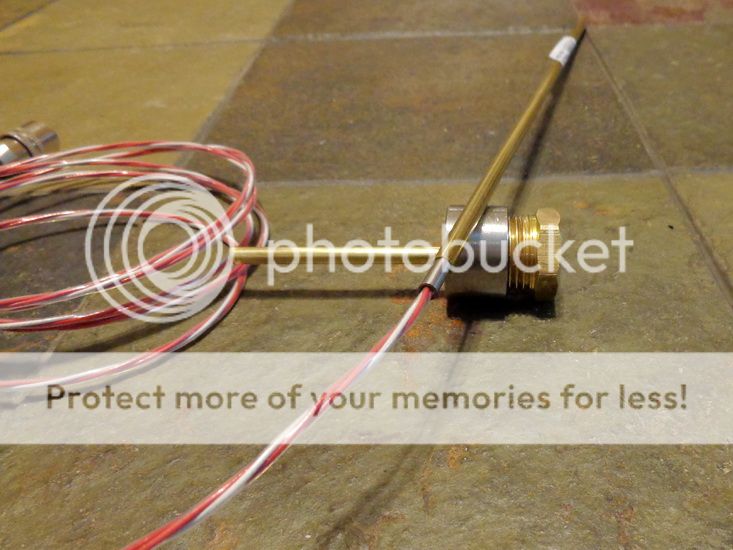
Here's a pic showing how tight a 4mm RTD probe (or 4mm thermocouple) fits inside this tube. No thermal grease required. It fits like a glove!
Image


I made a 2nd thermowell for a LONG K-type thermocouple I had lying around.
Image

Image

I would have preferred 3/16" OD copper tubing, but NONE of my local stores had any in stock :( Copper tube would have been ideal, but brass will work just fine. They're so cheap I'm sure I'll be making more as needed.
User avatar
WhiteDevil504
Swill Maker
Posts: 287
Joined: Mon Feb 24, 2014 7:34 pm
Location: Corn Country

Re: DIY Homemade Thermowell

Post by WhiteDevil504 »

These look perfect, I might just have to fire a couple up. My current arrangement is a but clumsy. Thanks for taking the pictures and breaking it down!
NineInchNails

Re: DIY Homemade Thermowell

Post by NineInchNails »

No problem. I saw the same tubing at a local hobby shop too. No copper though.
NineInchNails

Re: DIY Homemade Thermowell

Post by NineInchNails »

Right now I'm using a PID controller with a 3-wire RTD sensor. I use my PID for other hobby uses too which is why I have a longer K-type thermocouple.
User avatar
BigSwede
Rumrunner
Posts: 674
Joined: Thu Feb 06, 2014 10:36 am

Re: DIY Homemade Thermowell

Post by BigSwede »

Nice job... I'm thinking about adding a thermowell to my current project. This is a great way to do it.

If someone really wants copper, there is telescoping copper tubing available. I've worked with this stuff before, and it's really quite nice. One source is Zoro tools:

http://www.zorotools.com/g/Seamless%20C ... 65879/None

Zoro has a huge amount of stuff of interest to a home still guy.
NineInchNails

Re: DIY Homemade Thermowell

Post by NineInchNails »

BigSwede wrote:Nice job... I'm thinking about adding a thermowell to my current project. This is a great way to do it.

If someone really wants copper, there is telescoping copper tubing available. I've worked with this stuff before, and it's really quite nice. One source is Zoro tools:

http://www.zorotools.com/g/Seamless%20C ... 65879/None

Zoro has a huge amount of stuff of interest to a home still guy.
Yeah that Zoro website has a lot of useful stuff. I bought some terminal strips and jumpers from them not long ago.

I had a hard time finding copper tube that fit my 4mm probes so I just rolled with the brass. I'll probably pickle it to be safe. I haven't double checked the ID of that copper tube but be sure there's no slop between the probe and the ID of the tube.

I saw your shotgun build, beautiful work!!!
raven_r_one
Bootlegger
Posts: 105
Joined: Sun Feb 16, 2014 6:05 pm

Re: DIY Homemade Thermowell

Post by raven_r_one »

Can you post the wiring diagram you used for the pid?

I have 2 that were given to me and I want them just for temperature display pourposes like you talked about.
NineInchNails

Re: DIY Homemade Thermowell

Post by NineInchNails »

raven_r_one wrote:Can you post the wiring diagram you used for the pid?

I have 2 that were given to me and I want them just for temperature display pourposes like you talked about.
To my knowledge, not all PIDs are wired the same because they're not all made identical. I would try to find the instructions for your PID/PIDs online. There should be wiring diagrams there and you could feel confident that you have reliable info. Any wiring diagram I, or anyone, gives you may not be correct if it is not for the same PID you have.

I've been using Auber SYL-2352 to control a Camco 5500W ULWD element, not just as a thermostat. Their instructions (including wiring diagram examples) are in that link too. I set the temp and the PID brings the boiler to that set temp. My buzzer/alarm sounds off when my set temp is reached and I know the boiler will hold steady temp for as long as I choose to leave it. I also included a switch from Radio Shack to kill the alarm. It's nice to have an alarm, but it's also nice to be able to kill that annoying sound.

This is what the buzzer/alarm sounds like:


A lot of people say that PIDs are of no use in this hobby, but that is incorrect. There are a LOT of uses for such a smart thermostat. Some PIDs have features that control an element's output, but I haven't messed around with those features yet (probably never will). I put together a controller that that can be switched from PID control to manual/varible control (good for auto warm up). I can then switch from auto to manual variable control using the selector switch (top center of the box).
Image
raven_r_one
Bootlegger
Posts: 105
Joined: Sun Feb 16, 2014 6:05 pm

Re: DIY Homemade Thermowell

Post by raven_r_one »

Yep I realize "not all wiring diagrams are equal", but I wanted to see.

I have two PIDs - largely I just wanted them for the digital temp readout (maybe for the boiler and the recirc water?).

I also though about using PIDs for:

- bringing my water to 155 before throwing in the grains
- bringing my wash to 150, sound the buzzer, and let me switch to manual mode
- just use for temp display (not sure how to do that yet)
NineInchNails

Re: DIY Homemade Thermowell

Post by NineInchNails »

raven_r_one wrote:Yep I realize "not all wiring diagrams are equal", but I wanted to see.

I have two PIDs - largely I just wanted them for the digital temp readout (maybe for the boiler and the recirc water?).

I also though about using PIDs for:

- bringing my water to 155 before throwing in the grains
- bringing my wash to 150, sound the buzzer, and let me switch to manual mode
- just use for temp display (not sure how to do that yet
)
Exactly! Lots of practical uses.

As long as there's no power running to the element the PID will read temp just like a thermometer. The PID will be sending a signal to turn the element on & off, but as long as the element isn't plugged in nothing will happen. You may have to 'auto tune' the PID to retrain it next time you use it to control the element/boiler though. From what I understand it confuses the hell out of the PID's algorithm when it is trying to fire or turn off the element.
User avatar
WhiteDevil504
Swill Maker
Posts: 287
Joined: Mon Feb 24, 2014 7:34 pm
Location: Corn Country

Re: DIY Homemade Thermowell

Post by WhiteDevil504 »

Hey nine inch nails, any chance you have a post about your controller build? I'd love to build something like that but it's above my present experience level.
NineInchNails

Re: DIY Homemade Thermowell

Post by NineInchNails »

WhiteDevil504 wrote:Hey nine inch nails, any chance you have a post about your controller build? I'd love to build something like that but it's above my present experience level.
My most current wiring diagram needs updated. I've made a few changes to the wiring since since I originally drew the diagram. I have been meaning to update it, for an occasion such as this, but I haven't gotten around to it yet. I would hate to post a diagram that is not 100% correct.
Stillernz
Novice
Posts: 30
Joined: Mon Feb 03, 2014 2:21 am

Re: DIY Homemade Thermowell

Post by Stillernz »

Yeah that controller really looks good prob one if the best around. Please if you could do an update an post it make an awesome thread and something new to help refinery stilling process. Be wicked to add it to
My new still which just been built has 2 element but could do away with 2 and have one decent one controlled by the PID
User avatar
hypnopooper
Bootlegger
Posts: 119
Joined: Mon Jul 23, 2012 4:45 pm

Re: DIY Homemade Thermowell

Post by hypnopooper »

NIN,
This is a great write-up on the DIY thermowell... I will be using this for building a custom length sanitary RTD thermowell for my boiler. I'm curious should I add a dab of glue or some sort of adhesive to keep the sensor at the end of the tube when building one of these? Thanks.
NineInchNails

Re: DIY Homemade Thermowell

Post by NineInchNails »

Not at all necessary. Just install the thermowell and slide the probe in there. What's cool about this thermowell is that you can stick one in the boiler, monitor temp until it comes up to approx 170F, simply pull it out and now stick it another thermowell that's at the top of the vapor path. Technically you could have a probe in the boiler and a separate probe in the vapor path.

Now if you stick the probe itself directly in boiling water it should read 212F. With a thermowell it might read 212F or a couple degrees lower can be common thermowells. Many controllers, like the Auber EZboil, can be calibrated by modifying the 'offset temp' to read perfectly accurate. I tried using copper instead of the brass tube and the probe was too tight of a fit to be practical. It was so annoying that I ended switching back to the copper tube and they all work perfectly again.

Most all commercially available thermowells are really thick, bulky and overly expensive. A lot of other DIY thermowells I've seen are just a compression fitting which means that you cannot remove the probe in the middle of a run.
Last edited by NineInchNails on Thu Aug 13, 2020 10:40 am, edited 1 time in total.
seabass
Rumrunner
Posts: 626
Joined: Tue Feb 26, 2013 1:08 am

Re: DIY Homemade Thermowell

Post by seabass »

You could also do a similar thermowell and solder it directly in to the kettle. That's how I did mine. It's permanent, but I'm good with that. It's just the 1/4in copper tube.
NineInchNails

Re: DIY Homemade Thermowell

Post by NineInchNails »

seabass wrote: Thu Aug 13, 2020 10:26 am You could also do a similar thermowell and solder it directly in to the kettle. That's how I did mine. It's permanent, but I'm good with that. It's just the 1/4in copper tube.
True. I like to modify plugs so that they can be removed or eliminated entirely just for versatility.
Post Reply