Good copper to copper soldering video on youtube
http://youtube.com/watch?v=doqoEJJOdYA" onclick="window.open(this.href);return false;" rel="nofollow
How to solder (beginners guide)
Moderator: Site Moderator
-
defcon4
- Swill Maker
- Posts: 237
- Joined: Tue Jun 05, 2007 4:09 pm
- Location: Blue rock hurtling 'round the Sun
-
pintoshine
- Distiller
- Posts: 1132
- Joined: Sun Aug 20, 2006 1:30 pm
I like the BernzOmatic brand 1% silver and tin with no antimony.
http://www.bernzomatic.com/bernzomatic/ ... idWire.pdf" onclick="window.open(this.href);return false;" rel="nofollow
http://www.bernzomatic.com/bernzomatic/ ... idWire.pdf" onclick="window.open(this.href);return false;" rel="nofollow
-
Bsnapshot
- Swill Maker
- Posts: 203
- Joined: Wed Aug 29, 2007 11:08 am
Any one know if thisis a good solder to use?
http://www.tool-box-hardware.com/ALPHA- ... PSPVKG.htm" onclick="window.open(this.href);return false;" rel="nofollow
http://www.tool-box-hardware.com/ALPHA- ... PSPVKG.htm" onclick="window.open(this.href);return false;" rel="nofollow
-
pintoshine
- Distiller
- Posts: 1132
- Joined: Sun Aug 20, 2006 1:30 pm
from the advertisement it states:
Personally, the only complaint I have about it is that it does not "hang" well. The antimony causes it to run like water. This is a good attribute if you are sweating and there will be little to no contact with the water. Water pipes calcify on the inside and have a natural protective layer against most metals.
As far as safety factors are concerned I haven't found that exposure to antimony other than chronic inhalation of the dust at refineries are any threat to health.
My research is supported by the US EPA
http://www.epa.gov/ttn/atw/hlthef/antimony.html" onclick="window.open(this.href);return false;" rel="nofollow
Some have had issues with this alloy.LPHA METALS LEAD-FREE SOLID WIRE SOLDER 3 Oz. .125 dia. For general non-electrical applications Melting temperature 464 deg.F 95% tin/5% antimony Peggable Card
Personally, the only complaint I have about it is that it does not "hang" well. The antimony causes it to run like water. This is a good attribute if you are sweating and there will be little to no contact with the water. Water pipes calcify on the inside and have a natural protective layer against most metals.
As far as safety factors are concerned I haven't found that exposure to antimony other than chronic inhalation of the dust at refineries are any threat to health.
My research is supported by the US EPA
http://www.epa.gov/ttn/atw/hlthef/antimony.html" onclick="window.open(this.href);return false;" rel="nofollow
-
GingerBreadMan
- Swill Maker
- Posts: 412
- Joined: Sat Aug 25, 2007 6:39 pm
- Location: Ontario
I haven't been able to find a reasonably price solder iron to solder SS to copper. There were a couple on ebay but no shipping to Canada. Anyways, I was at my parents place during easter and looked what I scored going through my dad's tools.


It's a soldering iron tip that snaps on a propane torch. This should work as a soldering iron, no?
Does anyone know where you can buy such a thing? Just in case this breaks, gets lost, etc. I've never seen something like this before.
Anyways, I'm going to give this a try and solder a 1 1/2" copper pipe end cap to a SS bowl for my next still project.
It's a soldering iron tip that snaps on a propane torch. This should work as a soldering iron, no?
Does anyone know where you can buy such a thing? Just in case this breaks, gets lost, etc. I've never seen something like this before.
Anyways, I'm going to give this a try and solder a 1 1/2" copper pipe end cap to a SS bowl for my next still project.
I started out with nothing, and I still have most of it left.
-
GingerBreadMan
- Swill Maker
- Posts: 412
- Joined: Sat Aug 25, 2007 6:39 pm
- Location: Ontario
Success! Whooo hooo!
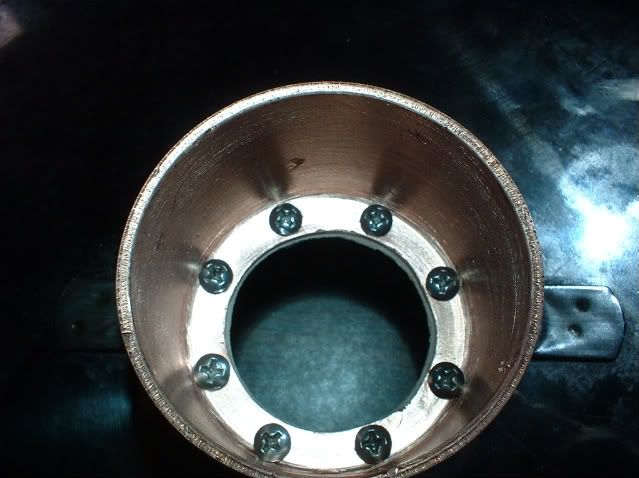
I successfully soldered a 1 1/2 copper pipe end cap to a stainless steel bowl.
Here how I did it-
- First I bolted the end cap to the bowl with a 1/4" bolt.
- I applied Kester 817 liquid flux to the SS around the end cap with a nylon brush
- Then I used the solder iron tip to apply the solder to the stainless steel. The solder would only apply very close to where the iron was heating. It pooled quite nicely.
- I let it cool down
- I applied normal plumbing flux to the copper where it attaches to the bowl
- I heated up the copper end cap with the propane torches going in a circular motion
After about a minute the solder melted and adhered very well making a perfect seal between the copper and stainless. I let it cool down.
Here is pic of the copper end cap bolted and soldered to the bowl -

After it cooled down, I drilled 4 holes (3/8" diameter). Tip: it's easier drilling from the inside of the bowl - in other words starting from the SS and through the copper, then the other way around. Removed the bolt and I have a nice copper connection to the stainless steel bowl.


Many thanks to pintoshine for letting us know how to soft solder copper to stainless steel.

I successfully soldered a 1 1/2 copper pipe end cap to a stainless steel bowl.
Here how I did it-
- First I bolted the end cap to the bowl with a 1/4" bolt.
- I applied Kester 817 liquid flux to the SS around the end cap with a nylon brush
- Then I used the solder iron tip to apply the solder to the stainless steel. The solder would only apply very close to where the iron was heating. It pooled quite nicely.
- I let it cool down
- I applied normal plumbing flux to the copper where it attaches to the bowl
- I heated up the copper end cap with the propane torches going in a circular motion
After about a minute the solder melted and adhered very well making a perfect seal between the copper and stainless. I let it cool down.
Here is pic of the copper end cap bolted and soldered to the bowl -
After it cooled down, I drilled 4 holes (3/8" diameter). Tip: it's easier drilling from the inside of the bowl - in other words starting from the SS and through the copper, then the other way around. Removed the bolt and I have a nice copper connection to the stainless steel bowl.
Many thanks to pintoshine for letting us know how to soft solder copper to stainless steel.
I started out with nothing, and I still have most of it left.

-
GingerBreadMan
- Swill Maker
- Posts: 412
- Joined: Sat Aug 25, 2007 6:39 pm
- Location: Ontario
Both are great ideas and would recommend it. (Actually just bought a dremel and itching to try it out).
But, I have plans for that 1/4" hole in the still design.
The 4 holes that are 3/8" works out to be the same size as a 3/4" hole which is what my current still has, so I don't think I'll have problems.
But, I have plans for that 1/4" hole in the still design.
The 4 holes that are 3/8" works out to be the same size as a 3/4" hole which is what my current still has, so I don't think I'll have problems.
I started out with nothing, and I still have most of it left.
-
Centimeter
- Swill Maker
- Posts: 210
- Joined: Sat Mar 15, 2008 11:38 am
- Location: Virgo Supercluster
Is it better to use brazing rods or silver solder? I intend to use a MAP torch as my heat source. All joints will be copper to copper.
Also, I have access to both 70% silver solder (very expensive) and the BernzOmatic brand 1% silver and tin solder Pint sugested. Which will provide a better more durrable seel while reducing potential off flavors? I ask because my last still developed many breaks in the solder after I ran hot steam through the tower.
In the solderig directions, it says that any flux will do. Is this neccesarily true? Which ones have you guys found to work the best for our applications?
Also, I have access to both 70% silver solder (very expensive) and the BernzOmatic brand 1% silver and tin solder Pint sugested. Which will provide a better more durrable seel while reducing potential off flavors? I ask because my last still developed many breaks in the solder after I ran hot steam through the tower.
In the solderig directions, it says that any flux will do. Is this neccesarily true? Which ones have you guys found to work the best for our applications?
-
HookLine
- retired
- Posts: 5628
- Joined: Sun May 13, 2007 8:38 am
- Location: OzLand
So ya gonna keep us in suspense?GingerBreadMan wrote:But, I have plans for that 1/4" hole in the still design.

A bunch of smaller holes with a combined area equal to one bigger hole, will not allow as much total flow through them as the single big hole. The resistance to flow is proportionally higher in the smaller holes, because the ratio of perimeter to area is higher.GingerBreadMan wrote:The 4 holes that are 3/8" works out to be the same size as a 3/4" hole which is what my current still has, so I don't think I'll have problems.
Not saying you will have problems. Those four 3/8" holes may be enough. You will soon find out.
It will help if you can keep the first inch or two after the holes empty (free from packing), make it a sort of expansion chamber.
Be safe.
Be discreet.
And have fun.
Be discreet.
And have fun.
-
GingerBreadMan
- Swill Maker
- Posts: 412
- Joined: Sat Aug 25, 2007 6:39 pm
- Location: Ontario
hmm... well I'll have to see if the 4 holes are big enough, otherwise make a plan B.
The 1/4" hole in the center is for attaching an optional 'gin head'. I know the gin head is usually mounted like a thumper, but my idea is to use a threaded rod bolted to this hole and mount a smaller stainless steel bowl inside the boiler just under the lid. The threaded bolt would hold the smaller bowl in place.
The vapors will have to flow through this bowl where the botanicals are and out the still. This would only be done on the second or third distill while the still is operating as a pot still so there would be no reflux.
Sorry no diagram or picture, hope this makes sense.
If the experimental gin head fails, I'll just make the holes bigger
The 1/4" hole in the center is for attaching an optional 'gin head'. I know the gin head is usually mounted like a thumper, but my idea is to use a threaded rod bolted to this hole and mount a smaller stainless steel bowl inside the boiler just under the lid. The threaded bolt would hold the smaller bowl in place.
The vapors will have to flow through this bowl where the botanicals are and out the still. This would only be done on the second or third distill while the still is operating as a pot still so there would be no reflux.
Sorry no diagram or picture, hope this makes sense.
If the experimental gin head fails, I'll just make the holes bigger
I started out with nothing, and I still have most of it left.
-
GingerBreadMan
- Swill Maker
- Posts: 412
- Joined: Sat Aug 25, 2007 6:39 pm
- Location: Ontario
Re: Howto solder (beginners guide)
I just finished soldering stainless steel to stainless steel. Here's how I did it.
First the tools that are required -

Propane torch with solder iron tip (or you could use an electric solder iron as pintoshine describes)
Kester 817 liquid flux - says on label good for soldering SS (pintoshine has alternative fluxes)
95/5 tin/silver solder - your garden variety plumbing solder
Brush for applying flux
SS scrubby and SS brush on dremel tool
For this soldering project, I cut the rim off a SS bowl and I'm going to solder this rim to a SS pot. The idea is it will make it real easy to attach a SS bowl (I soldered a copper fitting to this bowl earlier) with black clips and seal with flour dough.
First step is to clean the SS surfaces to be soldered. First with the SS scrubby and then with a SS brush attached to the dremel tool. Apply some liquid flux and then attach securely with some black clips and start soldering.

Actually I found it easier to solder with the pot in this position -

Man I could solder SS to SS all day long. It's really easy to do.
Here's the final result -

Some tips -
- pieces should be clean. I had four spots where the solder didn't stick. No worries, when it cooled down, I used the SS brush to clean it up, applied some flux and resoldered.
- do not attempt with just a propane torch, you'll just scorch the SS. The trick is the soldering iron.
- I found it best to solder an inch at 12,3,6, and 9 o'clock positions. Then I soldered an inch in between those. This way I could ensure the bowl rim was perfectly aligned on the pot.
- soldering SS to SS is more like making a little pool of solder and spreading it around. Nothing like soldering copper. It's very fast once you get started. Apply liquid flux again if it doesn't stick to the SS. It should right away.
Gee, I feel like a pro after doing this. Thanks to pintoshine for the great instructions.
Here's how the pot goes together with flour paste -

A couple of black clips and this boiler is so easy to set up and break down.

First the tools that are required -
Propane torch with solder iron tip (or you could use an electric solder iron as pintoshine describes)
Kester 817 liquid flux - says on label good for soldering SS (pintoshine has alternative fluxes)
95/5 tin/silver solder - your garden variety plumbing solder
Brush for applying flux
SS scrubby and SS brush on dremel tool
For this soldering project, I cut the rim off a SS bowl and I'm going to solder this rim to a SS pot. The idea is it will make it real easy to attach a SS bowl (I soldered a copper fitting to this bowl earlier) with black clips and seal with flour dough.
First step is to clean the SS surfaces to be soldered. First with the SS scrubby and then with a SS brush attached to the dremel tool. Apply some liquid flux and then attach securely with some black clips and start soldering.
Actually I found it easier to solder with the pot in this position -
Man I could solder SS to SS all day long. It's really easy to do.
Here's the final result -
Some tips -
- pieces should be clean. I had four spots where the solder didn't stick. No worries, when it cooled down, I used the SS brush to clean it up, applied some flux and resoldered.
- do not attempt with just a propane torch, you'll just scorch the SS. The trick is the soldering iron.
- I found it best to solder an inch at 12,3,6, and 9 o'clock positions. Then I soldered an inch in between those. This way I could ensure the bowl rim was perfectly aligned on the pot.
- soldering SS to SS is more like making a little pool of solder and spreading it around. Nothing like soldering copper. It's very fast once you get started. Apply liquid flux again if it doesn't stick to the SS. It should right away.
Gee, I feel like a pro after doing this. Thanks to pintoshine for the great instructions.
Here's how the pot goes together with flour paste -
A couple of black clips and this boiler is so easy to set up and break down.
I started out with nothing, and I still have most of it left.
-
Cmonster
- Novice
- Posts: 45
- Joined: Sat Jan 26, 2008 7:06 pm
- Location: Downunder
Re: Howto solder (beginners guide)
Nice work GingerBreadMan. You've made it look so easy I want to try and do some myself.GingerBreadMan wrote:I just finished soldering stainless steel to stainless steel. Here's how I did it.
Thanks for the inspiration - I've got some work to do for my other hobby on a cylindroconical fermenter.
cheers, Cookie
-
HookLine
- retired
- Posts: 5628
- Joined: Sun May 13, 2007 8:38 am
- Location: OzLand
-
pintoshine
- Distiller
- Posts: 1132
- Joined: Sun Aug 20, 2006 1:30 pm
Re: Howto solder (beginners guide)
GBM you win the prize for today. That is an excellent solution to a bowl on pot and many will benefit from you ingenuity. That is a real nice piece of work and you are going to get a lot of enjoyment out of that. Two bowls.. who would have thought. One for a platform and the other as the cape. You impressed me a lot with that. It is so obvious now that I see it. I will make sure that that design says GingerBreadMan forever and recommend it to all the newbs wanting a cheap and reliable setup. that is a perfect foundation for a pot still or a column. Kudos to GBM.
One question for the future builders. What are the brand names of the pot and the bowls and what are their place of purchase? I can never find any that fit that well.
One question for the future builders. What are the brand names of the pot and the bowls and what are their place of purchase? I can never find any that fit that well.
-
Bohunk
- Angel's Share

- Posts: 165
- Joined: Mon Mar 05, 2007 7:30 am
- Location: Where the Big Red Play
Re: Howto solder (beginners guide)
GB,
I had the same idea some months back, I got the idea from picking up a stack of bowls in a store, and found it hard to get one bowl off of the stack. The light went off in my small little mind, “interference fit”. I had been trying to figure out how to get away from messy seals, etc. If you find a store that has good quality bowls, you can pick two that fit together very well. I would suggest if you silver solder or weld the bowl to the top of a keg, you should leave the first bowl alone until after it is welded on, then cut the top off, this helps keep it from warping. I also left the first bowl much taller than you did, every little bit helps seal it up. Great tutorial GB, I hope more folks can benefit from your post.
The Bohunk
I had the same idea some months back, I got the idea from picking up a stack of bowls in a store, and found it hard to get one bowl off of the stack. The light went off in my small little mind, “interference fit”. I had been trying to figure out how to get away from messy seals, etc. If you find a store that has good quality bowls, you can pick two that fit together very well. I would suggest if you silver solder or weld the bowl to the top of a keg, you should leave the first bowl alone until after it is welded on, then cut the top off, this helps keep it from warping. I also left the first bowl much taller than you did, every little bit helps seal it up. Great tutorial GB, I hope more folks can benefit from your post.
The Bohunk
-
GingerBreadMan
- Swill Maker
- Posts: 412
- Joined: Sat Aug 25, 2007 6:39 pm
- Location: Ontario
Re: Howto solder (beginners guide)
Thanks pinto. I see this boiler as a product of evolution from all the posts and pictures I've seen here. The end cap was inspired by pikluk's design - which I would have done if I used a 2" cap. The 1 1/2" cap seemed better to put the bolt in the middle with a few holes.
pikluk's mounting of a 2" copper cap to SS
This post (and seeing the SS bowls stacked) triggered the idea of soldering the rim of a bowl to the pot
http://homedistiller.org/forum/viewtopi ... =16&t=3549
The more we post and show pictures and share whatever information the better we get at making simple and safe stills and of course making really fine likker.
pikluk's mounting of a 2" copper cap to SS
This post (and seeing the SS bowls stacked) triggered the idea of soldering the rim of a bowl to the pot
http://homedistiller.org/forum/viewtopi ... =16&t=3549
The more we post and show pictures and share whatever information the better we get at making simple and safe stills and of course making really fine likker.
To find a SS bowl that fit, this was more of a treasure hunt. I measured my pot and went around to different places and measured SS bowls with my handy Stanley tape measure. It would seem there is no standard size. I ended up finding the right size at a grocery store. Did the same thing when I built a still for my friend. We measured pots and bowls until we found the right size.pintoshine wrote:One question for the future builders. What are the brand names of the pot and the bowls and what are their place of purchase? I can never find any that fit that well.
I started out with nothing, and I still have most of it left.
-
Hawke
- retired
- Posts: 2471
- Joined: Tue Mar 25, 2008 1:39 am
Re: Howto solder (beginners guide)
It should work great. One thing that may be of concern; If you find that when you remove the top and have a flood of liquid run out between the two. You may want to drill a couple of small weep holes in the rim, if this happens.
It is the very things that we think we know, that keep us from learning what we should know.
Valved Reflux, 3"x54" Bok 'mini', 2 liebig based pots and the 'Blockhead' 60K btu propane heat
Valved Reflux, 3"x54" Bok 'mini', 2 liebig based pots and the 'Blockhead' 60K btu propane heat
-
Xnerd
- Swill Maker
- Posts: 286
- Joined: Tue Jul 22, 2008 11:52 am
Re: Howto solder (beginners guide)
Sorry no pictures yet but I wanted to ask a question anyway.
I have built a fairly large pot still head that will be attached to a keg VIA a stainless bowl.
I have a good thick stainless bowl to work with instead of the thin flimsy ones you find around today.
I was going to braze a 2 inch fitting right to the bottom of the bowl using standard brass brazing rod. But I have had issues with the stainless warping in a past attempt using ox/acetylene torch. Now perhaps I was using two heavy of a rod I am not sure. My past experience is mainly brazing steel bar stock and angle iron.
My question would be… do you think that silver solder would be a relatively strong connection (butt soldering) to a bowl like this? The reason that I want to do it this way is to reduce the internal reflux of this system somewhat. It is a tall keg and will have a lot of reflux going on all by it self.
I can’t decide whether to try silver solder or give brazing another attempt. I was thinking that perhaps if I do the brazing BEFORE I cut the hole in the bowl It might now warp as much. Or perhaps talk braze around the fitting to keep it tighter?
Anyone with any experience in this area?
Thanks you great posts here btw.
Jeff
I have built a fairly large pot still head that will be attached to a keg VIA a stainless bowl.
I have a good thick stainless bowl to work with instead of the thin flimsy ones you find around today.
I was going to braze a 2 inch fitting right to the bottom of the bowl using standard brass brazing rod. But I have had issues with the stainless warping in a past attempt using ox/acetylene torch. Now perhaps I was using two heavy of a rod I am not sure. My past experience is mainly brazing steel bar stock and angle iron.
My question would be… do you think that silver solder would be a relatively strong connection (butt soldering) to a bowl like this? The reason that I want to do it this way is to reduce the internal reflux of this system somewhat. It is a tall keg and will have a lot of reflux going on all by it self.
I can’t decide whether to try silver solder or give brazing another attempt. I was thinking that perhaps if I do the brazing BEFORE I cut the hole in the bowl It might now warp as much. Or perhaps talk braze around the fitting to keep it tighter?
Anyone with any experience in this area?
Thanks you great posts here btw.
Jeff
-
Hawke
- retired
- Posts: 2471
- Joined: Tue Mar 25, 2008 1:39 am
Re: Howto solder (beginners guide)
I think silver solder would be strong enough, and requires less heat than brazing.
It is the very things that we think we know, that keep us from learning what we should know.
Valved Reflux, 3"x54" Bok 'mini', 2 liebig based pots and the 'Blockhead' 60K btu propane heat
Valved Reflux, 3"x54" Bok 'mini', 2 liebig based pots and the 'Blockhead' 60K btu propane heat
-
Xnerd
- Swill Maker
- Posts: 286
- Joined: Tue Jul 22, 2008 11:52 am
Re: Howto solder (beginners guide)
well too late LOL
I just tried it agian and damn its hard! funny thing is it sticks to the stainless easier then the copper.
Its like trying to get water to stick to butter!
I got it dont but I tell you what I will never post an image of it. It doesnt seem to leak.... much....
Now I have to figure a way to clamp the bowl to the keg. Lots of good ideas around here so I should be able to figure out something.
I hate do drill outside the bowl and use washers but that seems to be straght forward....
I just tried it agian and damn its hard! funny thing is it sticks to the stainless easier then the copper.
Its like trying to get water to stick to butter!
I got it dont but I tell you what I will never post an image of it. It doesnt seem to leak.... much....
Now I have to figure a way to clamp the bowl to the keg. Lots of good ideas around here so I should be able to figure out something.
I hate do drill outside the bowl and use washers but that seems to be straght forward....
-
Xnerd
- Swill Maker
- Posts: 286
- Joined: Tue Jul 22, 2008 11:52 am
Re: Howto solder (beginners guide)
Ok I filled the fitting with water and it did leak 
It took about ten minutes to noticeably leak...
If you ware wondering I brazed it to the bowl before cutting the center out. That’s how I was able to fill the coupling.
I’m starting to get bummed out here. It leaked real slow I mean a teaspoon in ten minutes.
Perhaps in an open system nothing much will come out… I don’t know.
At any rate I will try to use it this weekend and then come up with a better solution.
What a nightmare this one aspect of this project has been. Next time I use the clamp I think….
It took about ten minutes to noticeably leak...
If you ware wondering I brazed it to the bowl before cutting the center out. That’s how I was able to fill the coupling.
I’m starting to get bummed out here. It leaked real slow I mean a teaspoon in ten minutes.
Perhaps in an open system nothing much will come out… I don’t know.
At any rate I will try to use it this weekend and then come up with a better solution.
What a nightmare this one aspect of this project has been. Next time I use the clamp I think….
-
Hawke
- retired
- Posts: 2471
- Joined: Tue Mar 25, 2008 1:39 am
Re: Howto solder (beginners guide)
Vapor will find it's way out pretty easily. Use some flour dough around the joint to seal it.
It is the very things that we think we know, that keep us from learning what we should know.
Valved Reflux, 3"x54" Bok 'mini', 2 liebig based pots and the 'Blockhead' 60K btu propane heat
Valved Reflux, 3"x54" Bok 'mini', 2 liebig based pots and the 'Blockhead' 60K btu propane heat
-
Xnerd
- Swill Maker
- Posts: 286
- Joined: Tue Jul 22, 2008 11:52 am
Re: Howto solder (beginners guide)
Well...
I decided to try something that I should have in the first place. I put a bigger tip on my torch and turn up the heat.
I stayed far away from the joint and simply heated the whole thing up; bowl and fitting cherry red. As soon as it hit red the blobby weld smooth out and spread evenly. It is 100% sealed now... Still looks a bit rough but it will work. I'll use a hand grinder to improve the appearance for prides sake.
It is very tricky to braze copper to stainless. Copper just wants to get rid of the heat and the stainless wants to cave in! I think that I learned a whole lot doing this step. I wont soon forget this technique. You can’t stitch weld a thing like this! You have to have a HUGE area heated to red before you introduce the rod.
So its done now. I used a small stainless bowl to further reduce the internal reflux of this design. It will be tricky to attach this to the keg in a way that will allow easy removal.
I have a big box of stainless screws and wing-nuts so I am thinking about brazing three stainless machine screws up through the keg top around and using washers and wing-nuts to clam the thing down.
I decided to try something that I should have in the first place. I put a bigger tip on my torch and turn up the heat.
I stayed far away from the joint and simply heated the whole thing up; bowl and fitting cherry red. As soon as it hit red the blobby weld smooth out and spread evenly. It is 100% sealed now... Still looks a bit rough but it will work. I'll use a hand grinder to improve the appearance for prides sake.
It is very tricky to braze copper to stainless. Copper just wants to get rid of the heat and the stainless wants to cave in! I think that I learned a whole lot doing this step. I wont soon forget this technique. You can’t stitch weld a thing like this! You have to have a HUGE area heated to red before you introduce the rod.
So its done now. I used a small stainless bowl to further reduce the internal reflux of this design. It will be tricky to attach this to the keg in a way that will allow easy removal.
I have a big box of stainless screws and wing-nuts so I am thinking about brazing three stainless machine screws up through the keg top around and using washers and wing-nuts to clam the thing down.
-
Xnerd
- Swill Maker
- Posts: 286
- Joined: Tue Jul 22, 2008 11:52 am
Re: Howto solder (beginners guide)
BTW I didn’t mean to hijack this thread with my personal soldering/welding issues. I am actually going to build a small still based on the design in this thread. It is very innovative! I am very impressed with the simple and effective method.
I do have a question for the author though… Is it necessary to use a soldering tip like this or could you do it with bare flame?
You did a very neat job on this so I think I should look around for a soldering tip like this!
I do have a question for the author though… Is it necessary to use a soldering tip like this or could you do it with bare flame?
You did a very neat job on this so I think I should look around for a soldering tip like this!
-
pintoshine
- Distiller
- Posts: 1132
- Joined: Sun Aug 20, 2006 1:30 pm
Re: Howto solder (beginners guide)
I found the soldering tip(iron) to be quite necessary to push the solder around on stainless. Stainless lacks the wicking property the copper has. The solder wets quite nicely but puddles and does not run like on copper. Yes a tip or iron is necessary with stainless steel.