When i look at how you made all this, i'm starting to doubt how the hell i ever can do it myself. Very nice!
Re: Maxx's Bok
Posted: Tue Aug 13, 2013 3:14 pm
by Maxximus Flavius
syro wrote:When i look at how you made all this, i'm starting to doubt how the hell i ever can do it myself.
In the end, it's really just a Tee, two endcaps and a bicycle spoke.
Re: Maxx's Bok
Posted: Wed Aug 14, 2013 1:06 am
by TDS
Maxximus Flavius wrote:
syro wrote:When i look at how you made all this, i'm starting to doubt how the hell i ever can do it myself.
In the end, it's really just a Tee, two endcaps and a bicycle spoke.
Maxx, just face it, you got mad skills!
You're doing the right thing, showing us unskilled types
how to do it, how it's not nearly as impossible
as it sometimes might seem.
I tip my 24oz Corona Bottle your way!
Cheers!
Re: Maxx's Bok
Posted: Wed Aug 14, 2013 1:17 am
by F6Hawk
That's awesome, Max!! I was recently pricing some SS valves, and they were over $100... You ROCK!!
Re: Maxx's Bok
Posted: Wed Aug 14, 2013 1:23 am
by TDS
F6Hawk wrote:That's awesome, Max!! I was recently pricing some SS valves, and they were over $100... You ROCK!!
50 bucks for a Ham-Let H330U!
No Fair!
I Blame Me!
If I had any skills I have plenty of bike spokes about.
Re: Maxx's Bok
Posted: Sun Aug 18, 2013 3:43 pm
by Maxximus Flavius
I don't often get things right the first time. My first attempt on the condenser/plate head was not to my liking. So I tried again. This time I cut a small piece off the old head to use as a template. The slant plates were drawn on a piece of copper.
The small part I cut off was split at the little end and used to draw the cut lines. My $99 bandsaw made the cuts.
When I split this ring, it sprung open just enough to slide nicely over the outside of the 2" tube.
By ever so slightly bending the main tube, the .040" plates slipped in for a tight fit.
I find it easier to solder stainless fittings on to smaller pieces of copper for better heat control. This is the outlet fitting for the needle valve. This method also allows for a careful placement over a pre-drilled hole in the lower slant plate.
And the final assembly.
Re: Maxx's Bok
Posted: Mon Aug 19, 2013 9:40 am
by Maxximus Flavius
I finished the temperature port and soldered the big threaded coupling onto the condenser head.
I chucked a piece of teflon tape into my drill and spun up a rope seal for the dome flange interface.
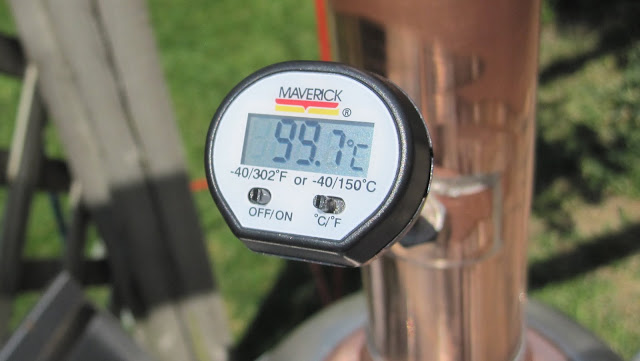
And apparently I have a purifying device ready for making pure H2O. Can anyone guess which is the cold water line and the hot output line on the condenser?
Straight tap water to check for leaks and to check the calibration on the thermometer. This number agrees very closely to my corrected alitutde.
And here's some output...
Re: Maxx's Bok
Posted: Mon Aug 19, 2013 3:24 pm
by wv_cooker
Unless you have your lines reversed Max it's a pretty easy guess to answer your question. Nice job of using YHB's valve idea in yet another way. Good build my friend!
Re: Maxx's Bok
Posted: Mon Aug 19, 2013 4:13 pm
by lampshade
wv_cooker wrote:Nice job of using YHB's valve idea in yet another way.
WV_Cooker, pls elaborate about YHB's valve idea.
Re: Maxx's Bok
Posted: Mon Aug 19, 2013 4:26 pm
by wv_cooker
High Lamp, YHB used a bicycle spoke and made a needle valve on his build, Max just used the same idea in a different fashion. Both work well and are much cheaper than a stainless needle valve.
The importance of cleaning
Posted: Tue Aug 20, 2013 1:11 pm
by Maxximus Flavius
I ran some straight water through yesterday to check operation/leaks etc. This was after I had given the condenser head, boiler and dome a good scrubbing with hot soapy water. I didn't scrub the condenser coil though. When I pulled the condenser head apart for inspection the side walls were covered in a grey greasy slime. When I pulled the dome off, here's what I found.
Kinda qualifies the reason for vinegar and a sacrificial run.
Re: Maxx's Bok
Posted: Sat Aug 24, 2013 7:06 pm
by Maxximus Flavius
Ahhh, on the home stretch. Because I'll be heating by propane and outside in a somewhat variable climate, I suspect an insulated column will be necessary. Since I like to keep things looking as nice as I can, I wanted some attractive way of doing that. Things work better when they're clean and dressed up, right? I know my cars always work better after a good wash. So, here's what I've come up with. I found some dollar store stainless bowls that I cut a hole in.
A little more trimming and they fit over an aluminum dryer vent as end caps.
The hole is big enough to go over the top male fitting on the column, but not over the bigger female fitting on the bottom. BTW, I've finished polishing all the exposed parts.
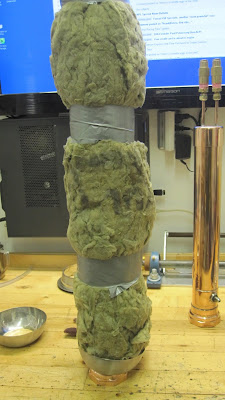
I used some left over rock wool from a home improvement project.
With some difficulty, the dryer vent was slid over the insulation. It's soft stuff and some damage is visible. A probable do-over. Yes, that's the HD site in the background.
At the same dollar store where I sourced the bowls, I found this stainless drain screen. I think it will work as a scrubbie stopper.
Re: Maxx's Bok
Posted: Sun Aug 25, 2013 12:31 pm
by Maxximus Flavius
Yup, it was a do-over. I cut up a tomato juice can to cut round pieces for the insulation. A short piece of copper pipe made the centre hole. I just stacked them on the column.
I found some semi-rigid dryer duct that was more robust than the tissue paper thin one I used before. I sprayed it with some self etching primer and then a coat of copper enamel. The same bowl end caps were used.
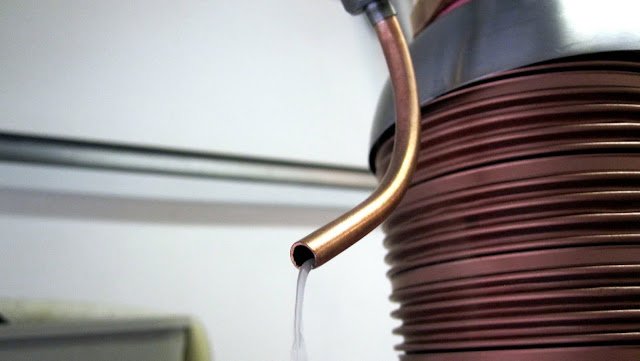
Away up in the sky is the condenser head with cooling lines oraganized.
And all ready for the vinegar run.
Vinegar run
Posted: Mon Aug 26, 2013 8:58 am
by Maxximus Flavius
I ran/evaporated 3 litres of 50% water and vinegar through this morning. But the first order of business was to remove the BS cutoff timer from the turkey fryer burner. I just soldered the two wires coming off the timer together, leaving the thermocoupler safety in place.
A rare just below standard atmosphere and the added SG of the mix, produces a dead on 100C.
I had to protect the ceiling of my workshop from the jet of steam with a storage box lid.
I tested the condenser which knocked down all the steam at 2 litres/minute. This will make a great water still as well. A couple of operational notes. The thermometer is to high up to read without a tall stool or ladder. Going to have to change to some kind of remote. And, the needle valve adjustment valve gets too hot to use bare fingies. Have to use gloves or will install an insulated knob or something.
Here's a short video showing how quickly the cold water knocks down the steam jet.
Re: Maxx's Bok
Posted: Mon Aug 26, 2013 9:11 am
by jollyroger
I check this thread 3-4 times a day in hopes of seeing more pics! Truly an awesome build. I love it. Thanks for posting all of these pics and vids. Hopefully one day I can build something this beautiful.
Re: Maxx's Bok
Posted: Mon Aug 26, 2013 9:21 am
by Maxximus Flavius
jollyroger wrote:I check this thread 3-4 times a day in hopes of seeing more pics!
Hey, thanks. I wouldn't be doing it if I wasn't having a ball. I AM having a ball
Re: Maxx's Bok
Posted: Wed Aug 28, 2013 12:41 am
by TDS
My thoughts.....
Your Boiler is NOT WORTHY of your Stack...
Get a bigger one.
Also, your aluminum dryer vent tube seems superfluous,
but hey, as long as it works!
I guess it must beat zip tying it for each run.
I don't insulate myself, but many here believe in it.
Cheers!
Re: Maxx's Bok
Posted: Wed Aug 28, 2013 5:24 am
by Maxximus Flavius
TDS wrote:My thoughts.....
Your Boiler is NOT WORTHY of your Stack...
Get a bigger one.
Also, your aluminum dryer vent tube seems superfluous,
but hey, as long as it works!
I guess it must beat zip tying it for each run.
I don't insulate myself, but many here believe in it.
Cheers!
Agreed on the boiler size. It's a start though. The dryer duct and rock wool insulation I used was inexpensive. My thoughts on insulating the column were more to do with energy conservation on the heat source rather than some imagined process improvement. There should just be less heat radiating into the environment, I think
Re: Maxx's Bok
Posted: Wed Aug 28, 2013 5:41 am
by wv_cooker
Outside of making your column far more efficient the dryer duct is just shear ingenuity at play Max. As for the boiler, if you are making enough to keep you happy the boiler is perfect. When you break it down just look's like momma's been canning. pure art at work here. Love it!
Re: Maxx's Bok
Posted: Wed Aug 28, 2013 6:32 am
by Maxximus Flavius
Time to make the sugar wash. A couple of years ago I snagged a half dozen 20L wine pails, suspecting they would come in handy someday. I failed to grab the lids that came with them. I priced them at a local wine supply store and they wanted too much for them. So, my favourite dollar store had some plastic serving bowls the perfect size. They're even BPA free, that's important, right. I drilled a hole in the centre, inserted a grommet and stuck the airlock in. The black targets are for my infrared thermometer. I can stand way back, point and shoot
I'm going to start with a half batch of Birdwatchers. I found some Turbo yeast that seems promising. JUST KIDDING! I'm off to the store to buy my supplies. Yahoo! I''ve got water warming and outgassing any residual chlorine from our municipal water supply. Should see some bubblin goin on when I come home from work tonight. I'll do a full batch in four pails next time...
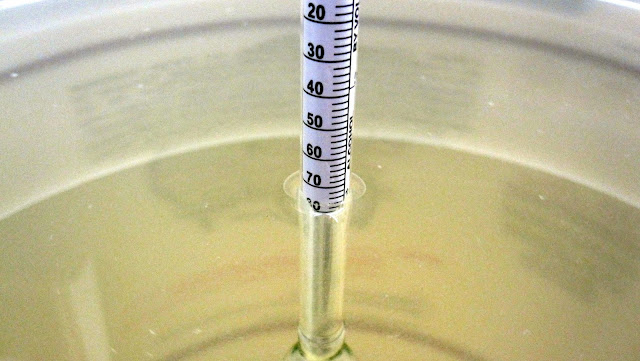
...1.5 hour passes and I the wash is pitched with yeast and hopefully starting to do something. 18 litres of water and 2 kilograms of sugar yielded this SG reading.
After the rest of the ingredients were added and topped off to 20 litres, this is the SG reading. Right where Birdwatcher recommends.
And starting with 30 C water, by the time I was finished fooling around, it reads this.
Gentlemen, start your ferment!
Re: Maxx's Bok
Posted: Wed Aug 28, 2013 9:00 pm
by Maxximus Flavius
There was bubbles within 30 minutes of pitching the yeast in the pail that was at 26.5 C. The other pail at 27 C started 30 minutes after that. When I got home from work 12 hours later the temperature had increased to 29 C and the airlocks are a popping. The ambient air temperature is around 25 C. I love the smell of yeasties working.
Re: Maxx's Bok
Posted: Wed Aug 28, 2013 9:17 pm
by Halfbaked
Max I really hate to brake this to you but It looks like you have done this before! Yup not your first rodeo! Very nice details , very nice!
Re: Maxx's Bok
Posted: Thu Aug 29, 2013 5:12 am
by Maxximus Flavius
halfbaked wrote:Max I really hate to brake this to you but It looks like you have done this before! Yup not your first rodeo! Very nice details , very nice!
I did make a couple of batches of beer about 25 years ago. I've been ferment free ever since. I tried "unsuccessfully" to make a carbonation machine back then to avoid the sediment in the beer bottles. Mostly though, the beer tasted like the typical amateur homebrew of that era. Can you charge vodka with CO2?
Re: Maxx's Bok
Posted: Thu Aug 29, 2013 5:33 am
by just-a-sip
not sure if anyone else said this as i skip around a bit in your thread, but as a fairly new poster i must applaud your attention to detail and willingness to share.
you have used your brain to problem solve rather then just beg for the answer, you have shown ingenuity, and you document often. these are the attributes to a great member. i say great job and good luck in all your future projects. cant wait to hear more from you.
Re: Maxx's Bok
Posted: Fri Aug 30, 2013 9:38 am
by Maxximus Flavius
While waiting for the wash to complete, I decided to do some hose management. BTW, 48 hours after the start of the ferment, it's still rocking and rolling. Lots of CO2.
I'm not sure if I mentioned that all the coolant lines and fittings are truck airbrake. Very robust, and inexpensive. The fittings are push to lock. I've had the lines off and off numerous times and the seal is still good. The only issue with airbrake lines is the stiffness. They don't really fall nicely into organization. So, at the top to act as a strain relief, I welded a stainless strap onto a stainless Mikalor clamp.
Another strap/bar rests over the boiler handle.I drilled and tapped the handle for a #10 screw to keep the parts count down. This stands the product tube nicely away from the burner. The product tube (copper) is hiding inside the copper painted pvc/abs??? conduit. The conduit gives me a place to screw tube clamps to and protects the fragile copper. Also gives a place to mount a ball valve.
Here's a view up the "service" column and the final assembly.
And waiting for that first drip.
Re: Maxx's Bok
Posted: Fri Aug 30, 2013 12:28 pm
by Hawkeye3
"Can you charge vodka with CO2?"
Hi Maxx. Nice looking rig. Regarding your question, I tried to make champagne with my Soda Stream machine using chardonnay. What a mess. I think the density of alcohol is so much less than h2o that the co2 does not get held in. I tried it when I was alone so nobody saw the mess I made.
Re: Maxx's Bok
Posted: Sat Aug 31, 2013 1:54 am
by TDS
I want this!
Re: Maxx's Bok
Posted: Sat Aug 31, 2013 9:05 am
by iDrinkWash
Hawkeye3 wrote:"Can you charge vodka with CO2?"
Hi Maxx. Nice looking rig. Regarding your question, I tried to make champagne with my Soda Stream machine using chardonnay. What a mess. I think the density of alcohol is so much less than h2o that the co2 does not get held in. I tried it when I was alone so nobody saw the mess I made.
CO2 solubility is a function of temperature and pressure (and maybe it the case of your soda stream device - time). The warmer the liquid, the more pressure you need to get the CO2 to dissolve it it. Wine is only about 12-14% alcohol, so there is still quite a bit of water left in there to dissolve the CO2 in. I don't know how soluble CO2 is in alcohol (if at all). You should be able to make champagne out of Chardonnay quite easily. Next time get it REALLY cold - as close to freezing as possible before you put it in your soda stream machine. And if you can, leave it on all the pressure you can - for a day or two - at a cold temp. I don't have one of those machines, but I have the old timy seltzer bottles, with are essentially the same design. When you dispense your champagne, do NOT try to throttle it by opening it slowly. That will cause more foam. If you want to slow down the flow, put a long vinyl tube on the output, instead.
IDrinkWash
Re: Maxx's Bok
Posted: Sat Aug 31, 2013 3:46 pm
by Maxximus Flavius
Here's a better shot of the new product tube triangulation support system. I'm really pleased how it worked out. And, it has stiffened considerably, the very tall column. I love triangles. Should of been an engineer I guess, sigh...
In other news, the Birdwatchers sugar wash is still working away. I checked SG after 60 hours on one pail. Came up 1.015, from the original 1.070. 80 hours after start, at this posting time, I'm seeing a bubble every 3 seconds. The temperature has dropped from 4-5 degrees Celsius over ambient temperature to just 1 degree over. It must be on the home stretch.
Re: Maxx's Bok
Posted: Sun Sep 01, 2013 6:18 pm
by Maxximus Flavius
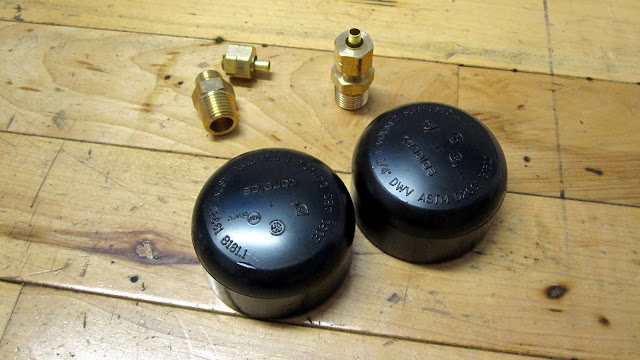
While waiting for the wash to complete, boredom has set in. During the vinegar run I was surprised how hot the output was when the valve was fully open. Hey, I'm slow, okay? I'm thinking that a little bit of cooling on the output line when in pot mode might be a good idea.
A couple of 1/4" compression to 1/4" MPT fittings and 1 1/4" ABS pipe caps. Experience in building a lot of pneumatic potato cannons has taught me that you can thread brass/steel fittings into into a slightly undersized hole in ABS for a very tight leak free fit.
Drilled the fittings out to 1/4" all the way through.
Just so happens I have a tool to wind coils really easily and quickly. And the first coil diameter fits nicely inside the 1/ 14" ABS pipe. About 3' of tubing will go into a 1' piece of ABS pipe.
The order of assembly is, wind the coil, place into the pipe, slide and glue the end caps on, and then slide and thread the fittings in place, slide the compression sleeves on, then the nuts and tighten. Not as complicated as it sounds. Oh, and give it a coat of copper spray paint.
 Very nice!