Page 1 of 3

Our reflux still

Posted: Sat Jun 04, 2005 8:49 pm
by Uncle Remus
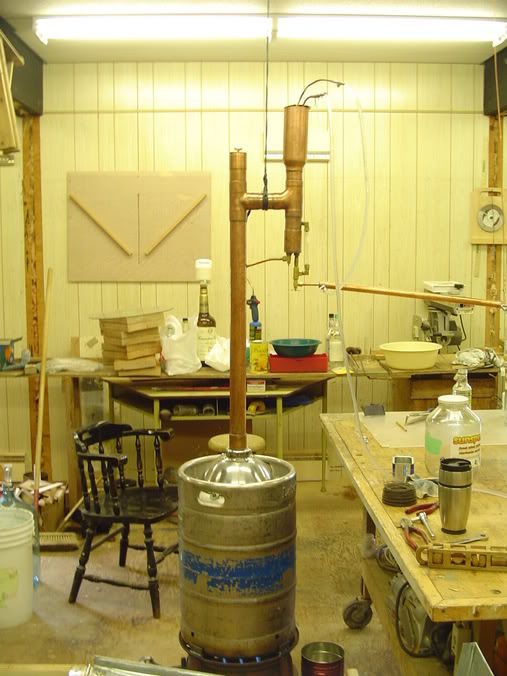
Here are some photos of our reflux still. We started out with the plan from the home distiller site and made a few changes.
Image

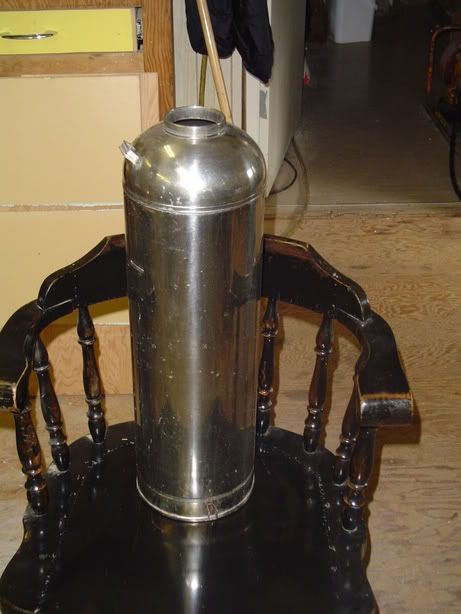
We made the condenser coil removeable for cleaning purposes. You simply just drop it in the top and hook up the water.
Image

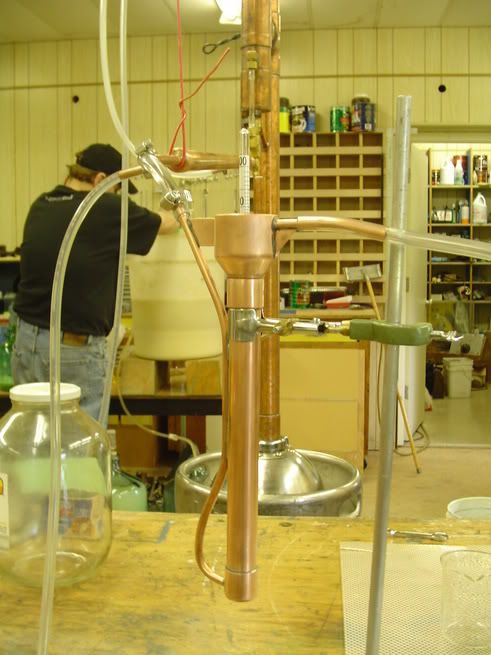
Next we added a sight glass near the needle valves for reflux and output. We find this feature very handy for monitoring the amount of alcohol being refluxed. It gives you a window to see whats happening how fast it's coming off etc. The way we've been running it is we set the output at a steady rate, collecting about 100ml in 4 minutes. then we adust the reflux to keep a constant level in the sight glass (ie: not gaining or losing)
Most runs the output needle valve is opened about 1/8 of a turn and the reflux is opened about 3/4 of a turn. During the middle of the run we've been getting a consistant 88% product.
Image

We recently added a secondary cooler. After the cooling water runs through the condenser coil it runs through another cooling tube on the output. Coming off of the output valve is a 1/4" copper tube which the alcohol runs through, this tube runs through a 1" copper pipe which water is circulated through. The purpose of this cooler is to get the temperature of the product down to about 20 deg C so the product can be acurately monitored for alcohol %.
Image

Then after the secondary or output cooler we have a copper testing chamber in which the alcohol meter floats thoughout the entire run. The product comes into the bottom and flows out the top into a collection jug.
Image

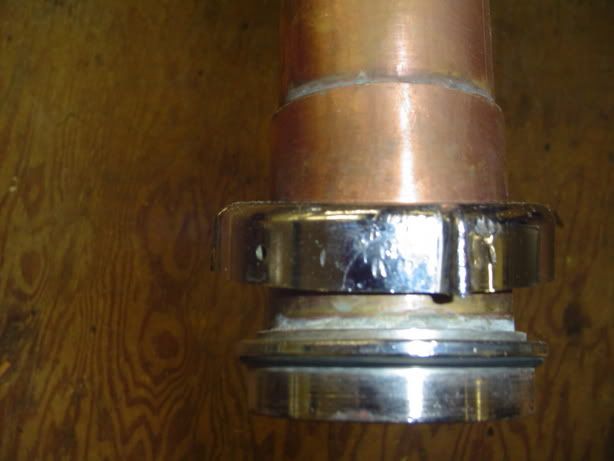
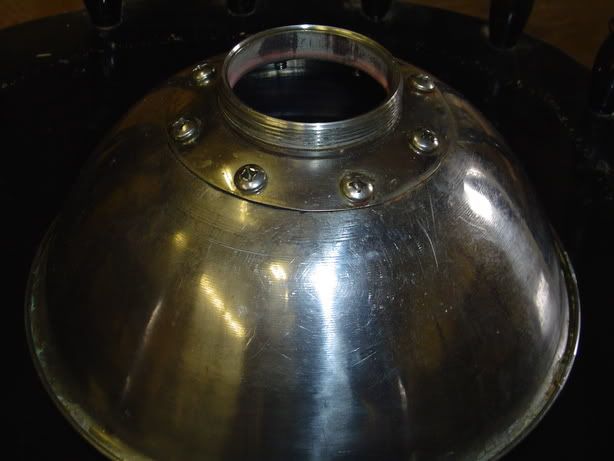
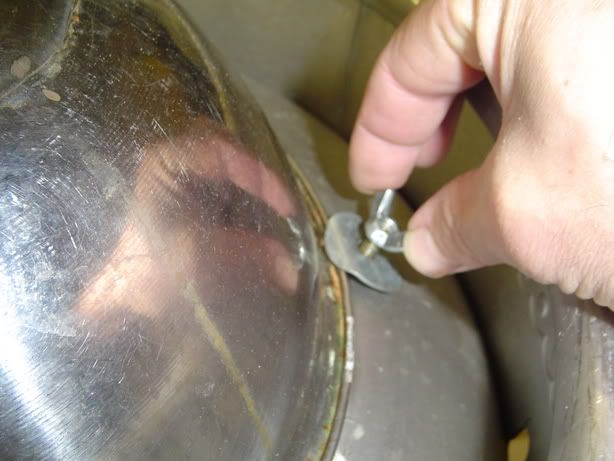
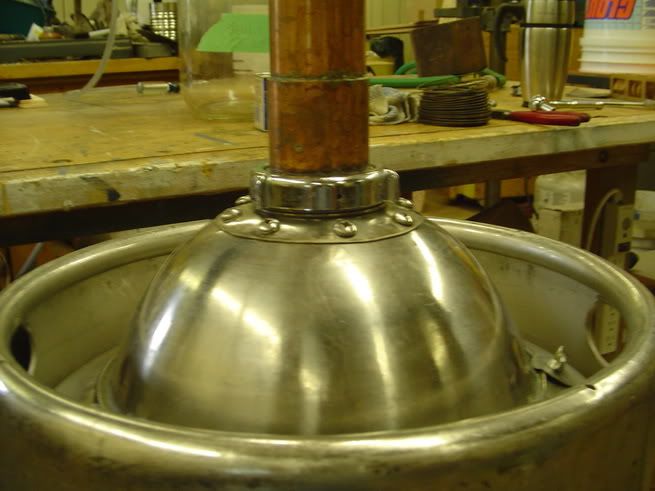
We used the stainless mixing bowl idea in the plan to connect the column to the beer keg and used a coupler off of an old fire extinguisher to join the column to the bowl. This coupler has an o-ring fitting and is easily attatched or detached.
Image
Image
Image
Image

Image

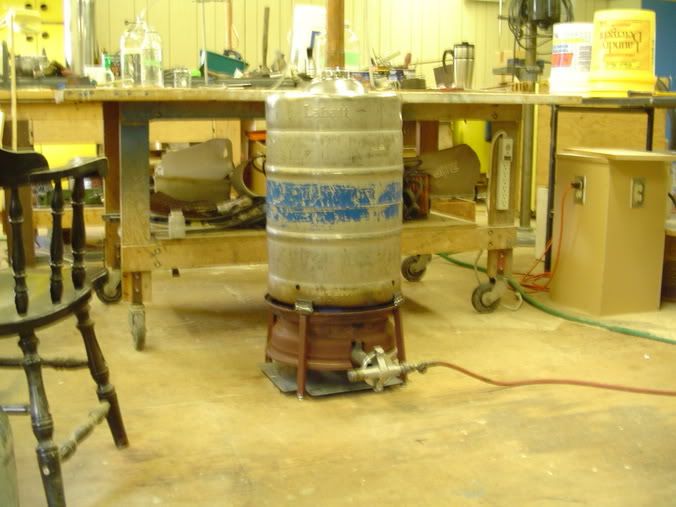
And finally the heat source. Good ole propane, Hank Hill would bevery proud. We can't be bothered futsin' around with electric heater elements. Propane is so easy to control and responds right now
Image
That's about it. We've run about 10 washes through it now, with good results. Comments? Questions?

Posted: Sun Jun 05, 2005 6:27 am
by Fourway
excellent work.

Posted: Sun Jun 05, 2005 7:19 am
by Grayson_Stewart
I like it....looks like you put alot of work into it.

Two suggestions though.

Remove the thermometer from the top of the column and plug that hole. Take a short piece of 1/4" copper tubing and solder it in the side of the column where your " T " begins the horizontal run. If you flare the end of the tubing projecting from the column, a few wraps of teflon allows a snug vapor tight fit. You won't need a ladder to read temps and you won't accidentally lean into a 174+ degree pipe.

Replace the plastic tubing running to your collection jar with a piece of copper tubing so you don't get some cloudy collection one day.

Other wise looks great!

Posted: Sun Jun 05, 2005 2:46 pm
by The Chemist
I'm as envious of your workshop as I am of your great-looking still!! Does it go on forever? :lol:

Posted: Sun Jun 05, 2005 5:22 pm
by Guest
One word.....NICE.
Two words.....Great work!!

But......why only 88% in the middle of your run?
how fast are you runnin, what % is wash, do you use packing(copper?), Is your coil a double helix?


I am definately envious of your working environment. I have a 18'x24'shed that is only worth walking into during the spring, fall, or winter. (although I might add an air conditioner later this summer).

Posted: Sun Jun 05, 2005 5:33 pm
by Uncle Remus
The Chemist wrote:I'm as envious of your workshop as I am of your great-looking still!! Does it go on forever? :lol:
Thanks Chemist and Grayson for your kind compliments :oops:
We've kinda just kept making small improvements as we've gone along. My partner is a very skilled tradesman (for a carpenter :wink: ) He actually made the condenser chamber on his lathe out of a piece of 3" copper. He made a wooden jig or plug the shape we wanted the condenser and then kneeled out the copper down to 2".

The best part of this still, is it cost us almost nothing to build, just time. The copper is all old stuff that we scrounged and sweated apart and cleaned up. We got the beer keg for free, apparently it had been frozen once and the brewery will not use them again if this happens. Even the stove you see underneath it, I built from an old 16" tire rim (the keg sits perfectly on the bead of the rim) inside the rim is a cast burner out of an old furnace, which now runs on propane. It's been as much fun buiding this thing as drinking the product (well almost :wink: ).

Grayson, good idea on the thermometer, come to think about it I am getting kinda sick of climbing up on a chair to check the temp. We have not yet had a cloudy product because of the plastic tube, however the plastic tubing has turned cloudy itself. Maybe giving off unwanted shit into the alcohol. Yes we should replace it.

Thanks again for you comments and compliments. This is really turning out to be a fun hobby!

Cheers all!!!

Posted: Sun Jun 05, 2005 5:49 pm
by Uncle Remus
Anonymous wrote:One word.....NICE.
Two words.....Great work!!

But......why only 88% in the middle of your run?
how fast are you runnin, what % is wash, do you use packing(copper?), Is your coil a double helix?
The wash has usually been beween 15-18%. We have been running it off at about 100ml in 3-4 minutes, or 1litre in 30-40 minutes. Yes the column is full of structured copper packing from the reflux tube to the bottom.

I'm not sure what you mean by a double helix. The coil I made is 1/4" copper tubing first wrapped about 10 times around a 1" pipe and then wrapped about another 10 turns around a 2" pipe. So it is a 1" coil inside of a 2" coil.

The highest alc%/vol. I've measured so far has been maybe 91% and only for a short time. What kinda % should we be pulling during mid run?

Posted: Sun Jun 05, 2005 6:20 pm
by Guest
I think you might be getting greedy.
SLOW it down a bit.......let it reflux for about an hour....then collect SLOWLY!!!.
you should be getting about 90-94% at least.

with a keg run it 12 hrs.

Posted: Mon Jun 06, 2005 5:55 am
by LeftLaneCruiser
First: WHAT A NICE PIECE OF COPPER !!! 8)

The cooling coil is definately a double helix .. :wink:

As others I think you are running too fast. Most of us run 500 ml/hr at max. Collecting high purity alcohol (90+) takes a lot of patience.

From the looks and your description of your still you must be able to get 94 easily. :D

And if it does, i would remove the plastic tubes at the output line like Grayson suggested.. :wink:

KJH

Posted: Mon Jun 06, 2005 6:18 am
by Virginia Gentleman
Nicely done, Uncle Remus. That's a very sweet looking bit of handiwork. Congratulations on your (obviously) hard work! Sound like it's paying off.

Posted: Mon Jun 06, 2005 6:29 am
by Guest
Yes I can also appreciate your work shop. Have you discovered yet how effective radial arms saws are for cutting copper with an suitable back stop amd tungsten blade.
Can i make a few comments. If you want to stay with LM get rid of the reflux valve. Put a T above your pduct vave and connect it back to the column with a slight uphill. This will get rid of that huge dam of condensate which desenitizes your cuts and contaminates your product with heads. Stability seems to be a problem with all those strings to the roof, a built in problem with big off set heads.
Can I make a suggestion, move your condenser to the top of your column. install a gate valve on the side arm which feeds a liebig of 1" tube ( with a twisted baffle in it) with a 1 1/4 jacket 1 foot long, extend the 1" tube down and incorporate your parrots beak in it. Result will be a much more balanced rig, better contol, no dam of condensate and a parrots beak that is going to be right on the ball to help you pick your cuts in cool product.
Hope I can get me foot outa me mouf afta this. cheers

Posted: Mon Jun 06, 2005 7:32 am
by Guest
Anonymous wrote:Yes I can also appreciate your work shop. Have you discovered yet how effective radial arms saws are for cutting copper with an suitable back stop amd tungsten blade.
Can i make a few comments. If you want to stay with LM get rid of the reflux valve. Put a T above your pduct vave and connect it back to the column with a slight uphill. This will get rid of that huge dam of condensate which desenitizes your cuts and contaminates your product with heads. Stability seems to be a problem with all those strings to the roof, a built in problem with big off set heads.
Can I make a suggestion, move your condenser to the top of your column. install a gate valve on the side arm which feeds a liebig of 1" tube ( with a twisted baffle in it) with a 1 1/4 jacket 1 foot long, extend the 1" tube down and incorporate your parrots beak in it. Result will be a much more balanced rig, better contol, no dam of condensate and a parrots beak that is going to be right on the ball to help you pick your cuts in cool product.
Hope I can get me foot outa me mouf afta this. cheers
Actually stability is not a problem when the column is mounted on the keg.
We have the string there so we can remove the keg and just let the column hang, especially when it is hot. The other string is needed to support the output tube.
Thanks for all the feedback guys :D

Posted: Mon Jun 06, 2005 7:53 am
by Uncle Remus
OOPS! last post was me. :oops:

nice work

Posted: Mon Jun 06, 2005 8:17 am
by big_turbo_diesel
hey Uncle Remus
That is a sweet set up
i am in the process of making the same still but using the original plans
Is using a beer keg OK
I have heard they are aluminum stainless alloy and am nervous about using one and wasting my time
but yaou seem to be using one fine?.
how did you hook your stainless bowl to the keg?
Thanks BTD

Posted: Mon Jun 06, 2005 9:37 am
by Enlikil
First off, nice lookin still guys.

as to the person asking about kegs.
I made a bunch of calls and If your in england or euorup The kegs are usualy aluminum.
if your in the united states then they are without a doubt stainless steel, Especialy if they are less then 20 years old.

Re: nice work

Posted: Mon Jun 06, 2005 1:07 pm
by Uncle Remus
big_turbo_diesel wrote:hey Uncle Remus
That is a sweet set up
i am in the process of making the same still but using the original plans
Is using a beer keg OK
I have heard they are aluminum stainless alloy and am nervous about using one and wasting my time
but yaou seem to be using one fine?.
how did you hook your stainless bowl to the keg?
Thanks BTD
First cut a hole about an inch smaller than the diameter of the bowl with a sabre saw with metal blade. Then drilled and installed 1/4" brass nut-serts, I think we put in about 6 evenly spaced around the perimeter of the hole. Then from inside the keg, theaded in 1/4" stainless bolts about 3/4" in length. So what you got is 6 studs sticking up around the hole. Then took some fender washers and put a bend in them and used wing nuts to tighten them down. I made a paper gasket (from gasket material) to seal the bowl to keg. You can see one of the wing nuts and washers in this pic.
Image

Posted: Thu Jun 16, 2005 10:02 pm
by Jaeger
What kind of fittings did you use for the sight glass?
I assume it is actually glass or pyrex since high % alcohol is running through it.
Can you tell me where you got these parts :)

Posted: Fri Jun 17, 2005 6:53 am
by Uncle Remus
Jaeger wrote:What kind of fittings did you use for the sight glass?
I assume it is actually glass or pyrex since high % alcohol is running through it.
Can you tell me where you got these parts :)
Yes the sight glass tube itself is 3/8 pyrex tube. I used 90 degree brass (Weatherhead) compression fittings( 1/4"npt to 3/8" tube ).

There is a short piece, maybe only a 1/2" long, of 3/8''plastic tube coming out of each compression fitting. This plastic tube acts like a flexable coupler. The pyrex is pushed into the plastic tube and pretty well butts up against each fitting.

The fittings can be bought in almost any autoparts store. My partner had a couple foot length of pyrex tube. I'm not sure where it came from, but I'm sure any place that sells lab supplies would have it.

Your still

Posted: Fri Jun 17, 2005 12:11 pm
by Blueraven
UR,

Thanks for the pics and info..Its inspiring me to get on with building mine.

I cant decide on that type, with valves, or the El-2 type by Bokakob..(see his el-2 design at the homedistiller.org). It used elliptcal plates to capture the distillate.

Did you have to make the same decision?

Blueraven

Posted: Fri Jun 17, 2005 12:35 pm
by outlawokie
Very nice hard work pays in the best ways sometimes :D I really like the sight glass idea coool

Re: Your still

Posted: Sat Jun 18, 2005 6:25 am
by Uncle Remus
Blueraven wrote:UR,

Thanks for the pics and info..Its inspiring me to get on with building mine.

I cant decide on that type, with valves, or the El-2 type by Bokakob..(see his el-2 design at the homedistiller.org). It used elliptcal plates to capture the distillate.

Did you have to make the same decision?

Blueraven
No. Actually my partner was the one who did the research and decided on the reflux column we built. He printed out the plans and we started scrounging for material

Stack size

Posted: Sat Jun 18, 2005 9:37 am
by Guest
UR,

Is your column 1-1/2" or 2". I read its harder attaching a 2"er..

Blueraven

Posted: Sat Jun 18, 2005 11:40 am
by Uncle Remus
Column is 2''. The coupler you see in the pic, above the ss bowl, is the top cut off of an old fire extinguisher. It fit nicely on the ss bowl, there is a paper gasket between the bowl and the cut off piece from the fire ext. and the bolts are stainless also. The big nut immediatly below the copper unthreads, co the column can be detatched from the bowl.

Posted: Mon Jun 20, 2005 12:49 am
by Guest
UR just interest to know if ya improved ya out put up from 88%

Seeking advise

Posted: Mon Jun 20, 2005 1:21 am
by Newie to the game
I have constructed one of these units as per plan. Have completed 2 runs with it and have an ok result first try. But I have some questions as to Cloudy spirit. I got 5.4 lts at 71% off a 28 lt wash, after mixing the 3 containers I got together. Near the finish and before the tails I got some cloudy spirit still at 40 % so I stopped.
The second try I got only 2.2 lts of a 15 lt wash and then got a about a lt cloudy spirit at 30% when the temp got near 88% at which point I shut down again.
My question is I have a small plastic tube on the end of the outlet as does this one would that posssibly make the spirit cloudy if it gets to hot.

Posted: Mon Jun 20, 2005 5:53 am
by Uncle Remus
I got rid of the plastic tubing and now have 1/4'' copper on the output. The first couple times we ran this still we got some cloudy product. The very first even had a metallic taste. I think this came from soldering flux that never got washed out after building the column.

Since then there has been no cloudy product at all, not even heads or tails.

Guest. We ran some corn mash weekend before last, we used very little reflux and got 84-86% in the middle run. It had a nice corn flavour which we were after. The next time we run a sugar wash we'll try cranking up the reflux and collecting a little slower and see what happens.

measuring the product ABV

Posted: Mon Jun 20, 2005 7:37 am
by Blueraven
UR,

1. Can u provide dimensions and list of materials for the pieces of cu that coolect the product and allow you to measure it?

2. Did ya'll silver solder the whole deal or did you use brazing on certain parts?

Wanting to get started on mine..<G> Yum!
Blueraven

Re: measuring the product ABV

Posted: Wed Jun 22, 2005 6:39 am
by Uncle Remus
Blueraven wrote:UR,

1. Can u provide dimensions and list of materials for the pieces of cu that coolect the product and allow you to measure it?

2. Did ya'll silver solder the whole deal or did you use brazing on certain parts?

Wanting to get started on mine..<G> Yum!
Blueraven
1. The tube itself is 3/4'' copper pipe. On the bottom is a 3/4'' cap, drill a hole in the side of the cap just big enough to fit a piece of 1/4'' flexible copper tubing into. Solder this tube in the hole you drilled. Look at the pic and you can see how this tube is routed up the side of the 3/4'' pipe. The alcohol comes in through this 1/4'' line and fills the 3/4" pipe.
Make your 3/4" pipe long enough to float your alcohol hydrometer. At the top of the 3/4" we put a 3/4" to 1-1/2" reducer coupler. AT the top of this reducer drill, fit and solder in another piece of 1/4" tubing. This one will go to your collection bottle. Have a good look at the pic and my descriptions might make sense :?


2. Every joint is soldered with lead free solder. No brazing at all. The only joint silvered is the bottom of the copper column to a stainless steel coupler.

Good luck with your project BR. :)

Gusest Questions

Posted: Mon Jun 27, 2005 8:10 am
by Guest
Guest:

I plan to make a similiar still.. Can explain your comments"

<<Can i make a few comments. If you want to stay with LM get rid of the reflux valve. Put a T above your pduct vave and connect it back to the column with a slight uphill. This will get rid of that huge dam of condensate which desenitizes your cuts and contaminates your product with heads.>>
Can you supply drawings? If one does this, should they do the following paragraph?

<<Can I make a suggestion, move your condenser to the top of your column. install a gate valve on the side arm which feeds a liebig of 1" tube ( with a twisted baffle in it) with a 1 1/4 jacket 1 foot long, extend the 1" tube down and incorporate your parrots beak in it.>>
Can you supply some drawings?

thanks..

Posted: Tue Jun 28, 2005 9:19 pm
by Guest
Guest, I'm glad you asked as I was just going to answer Blueravens post ,so 2 birds with one stone.

Now I don't want to offend anybody, I know how precious we all are about our stills, but, there is always a better one.

My opinion of the theory behind UR's still is,its dubious. Yes it will work but why complicate it, and anything less than 95.5% ABV and you're wasting your time if you are making neutral spirit. If you can explain to me the purpose of the valve that takes condensate back to the column, or the purpose of the sight glass, or the purpose of trying to hold the resivor of condensate there at a particular level, and any of them have merit,then I will bend over.

Have alook at this (must be the simplest)still. http:/tinyurl.com/8snpx
So Ok it's bokakobs mini still, but appreciate its'form and simplicity of function. Just make it out of 2" and 1000mm column.
Look 2 slanting plates replace all those T's and stuff. ( I would install the top plate same as the lower, so they are both fixed) Yes and only one valve for LM (liquid management). Want 100% reflux leave the valve closed. Want 100% product, open the valve. Don't need to see it inside, you see the product pouring out. Cause I know you understand if you open your valve fully and measure the total rate of out put at a particular power setting, then you just have to close it till you get the percentage you want of the total to acheive the reflux ratio you choose.

Now the condenser, well bokakob has a few skills a lot of us don't and that is in forming VERY small radius coils. Problem with them is they restrict water flow, so if you are recirculating water they are not the best. The over kill of the 3" tube and coil and difficulty for most getting those bits , makes it a dinasaur. so have a look at this still http:/tinyurl.com/cegbf This was conceived by a guy who's credentials are second to none in this game..

OK it's a bit over the top in it's construction detail but you can simplify that with a bit of thought, here the water runs in a series of parralel tubes with virtually no resistance; or just use 25 or so turns of 1/4"in a 2" pipe vertically above your column. aka mini still.


Want the best of all worlds. Add a VM (vapour management) take off, simply a 1" pipe out the side opposite the valve on the mini still about an 1" down. (just braze a 1"brazing bush directly to the column) Go via a restricted throat 1" gate valve, (ie, it is the short series that only has a 3/4 opening when fully open) turn down 90*, add your liebig, add on the parrots beak and you have the best we can offer so far unless you want to add ARC, but then you need to ask RIKU, that's his baby.

Guys don't pick a still just cause it;s in a book. Was it the Ensil that was a car some years back, but hey we know there are a lot better round now.

Now Blueraven had a go at me about photos, OK but I did ask him to give me a bit of time, I'm working on it, wont be long

Now i'm ducking from all those sensitive guys out there who have taken offence.

take care.