This is my first parrot I'm building for use with my 30qt Brewhaus Pot still. The basic design i plan on using is below. I intend to use 3/4" pipe for the alcohol meter cylinder with a 1" adapter on the top and 1/4" tubing for the input and output and a 3/4" pipe cap for the input cup. I had some questions concerning the measurements i should use.
1. How long should the cylinder be? my alcometer is 9 inches tall.
2. How long should the input tube be?
3. How close to the bottom of the cylinder should the input tube be?
4. how long should the output tube be?
5. How close to the top of the cylinder should the output tube be?
Measure the alcoholmeter from bottom to the 100% mark. (You will never get over 96%) This is how tall the well should be.
I would make the input tube long enough to stand above the well by a 1/2 inch or so.
You want the input tube to enter as low as possible.
The output tube needs to be long enough to reach whatever your collection vessle happens to be without banging the parrot and jug against each other.
I would recommend a slightly larger adapter at the top. 1 1/4 or 1 1/2". If you can get the adapter that uses just a dimple, instead of a full sholder for a pipe stop, they are much easier to work with.
It is the very things that we think we know, that keep us from learning what we should know.
Valved Reflux, 3"x54" Bok 'mini', 2 liebig based pots and the 'Blockhead' 60K btu propane heat
I made my first parrot using 3/4" tubing, and it gave false readings as there was not enough gap around the hydrometer which created a hydrolic effect giving a low ABV reading. I have since changed it to 1" tubing and now get correct readings.
I adore my parot. I didn't have one for years until Tracker made me one. Best piece of equipment I've had apart from my still.
blanik
Simple potstiller. Slow, single run.
(50 litre, propane heated pot still. Coil in bucket condenser - No thermometer, No carbon) The Reading Lounge AND the Rules We Live By should be compulsory reading
olddog wrote:I made my first parrot using 3/4" tubing, and it gave false readings as there was not enough gap around the hydrometer which created a hydrolic effect giving a low ABV reading. I have since changed it to 1" tubing and now get correct readings.
That is a good point Olddog.
Measure the diameter of the bulb, if it is over 1/2" diameter, you may get better results from a larger well.
I have two meters, one is 1/2" and works well in my 3/4" parrot. The other is 5/8" diameter, it bounces around quite a bit.
It is the very things that we think we know, that keep us from learning what we should know.
Valved Reflux, 3"x54" Bok 'mini', 2 liebig based pots and the 'Blockhead' 60K btu propane heat
Hawke wrote:Measure the diameter of the bulb, if it is over 1/2" diameter, you may get better results from a larger well.
I have two meters, one is 1/2" and works well in my 3/4" parrot. The other is 5/8" diameter, it bounces around quite a bit.
Cut a short(3" long) piece of 2" in half lengthwise, then solder it to the bottom.
It is the very things that we think we know, that keep us from learning what we should know.
Valved Reflux, 3"x54" Bok 'mini', 2 liebig based pots and the 'Blockhead' 60K btu propane heat
Another way to do it is to wrap some 1/4" around it with a loop for the foot.
It is the very things that we think we know, that keep us from learning what we should know.
Valved Reflux, 3"x54" Bok 'mini', 2 liebig based pots and the 'Blockhead' 60K btu propane heat
Whats the best way to clean this thing now, I want to make sure i get all the flux out. I already washed it with warm water and detergent and ran it through the rinse cycle on the dishwasher. It this enough? should I sanitize it to?
Just finished my Parrot and what i used for a stand was small piece of 4x4 post and i drilled a 1.25 inch hole into it just deep enough for the cap on the bottom to fit flush in the hole. if using 1 '' copper it fits nice and tight.
For a stand, I used a 4x4 sq piece of heavy ga. sheet copper I got as sample from a copper supply place. Put it on 45 degree angle and fluxed/soldered the bottom of the parrot to it at the corner. This allows more room for placing the glass/jar, etc., in front of it. I used a 3/8" 45 degree copper fitting that I filed/notched and fluxed/soldered to use as a support foot for the back on the opposite corner. I used 1" tube, with 2" to 1" reducer for overflow and 1/4" spout. I used 3/8" soft L copper for the input tube. It floats dead steady. I made mine "just" to the 95 pct mark as I'm running potstills only and wanted to minimize the parrot volume. I also put a small bit of copper mesh in the very bottom to protect the hydrometer should it happen to bounce off the bottom for any reason. That knocked it down to around 93 percent...which is fine. All my stills operate at under 90 percent max...but I have the extra room (just pull out the mesh if I need to measure something higher).
I'm a stone cold rookie when it comes to this stuff. I built this entirely with hand tools, ie., literally..in my hands. I carefully measured, and ground away bits at a time. If you are like me..ie., sloppy, the trick it is use the next size drill "down" from the size you ultimately want..and then use files to take it the rest of the way out by hand little bits at a time. Otherwise, you are going to waller out the hole and leave it ill fitting...have to try and make it up with solder...and it's more prone to leak. I was able to get a good tight fit working that way, that made soldering much easier. Taking the notch/lip/stops out of the fitting so the tube would slide through it takes a bit of work, but I already had some experience with that in making several liebigs. I tried to be careful to get it to fit as evenly as possibly over the 1" tube so that there wouldn't be any large gaps on one side or another. That makes it solder up good and tight as well.
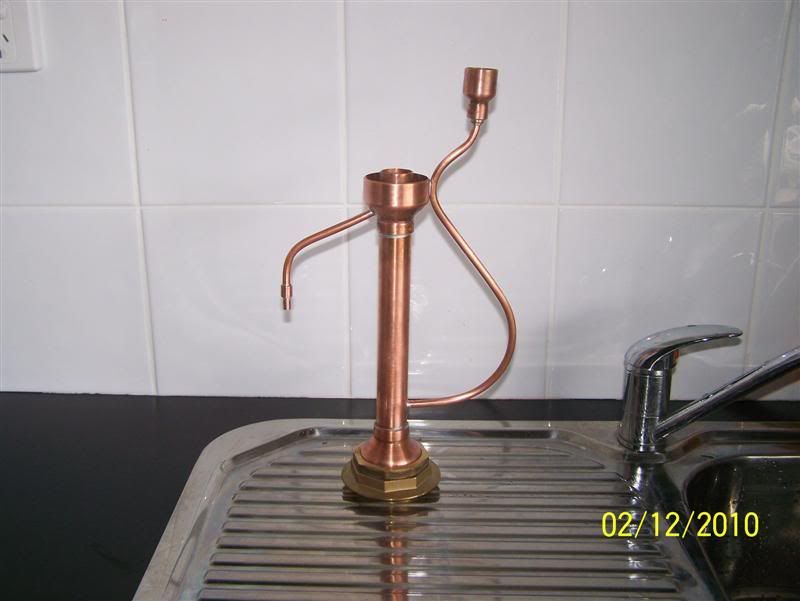
I am almost done with my first parrot. I still have to build a stand for it, and no the beak is not to long as I built it to sit on a raised box to allow for different size bottles. I do have a question about it however. I ran a test run with water simulating the approximate amount of flow from the still. It works great to a certain point and then starts coming out the intake. I can solve this problem by first priming it in the main tube that holds the hygrometer. This is not a big thing as I always have some extra uncut neutral laying around. I believe it is forming an airlock so it is like priming it to get it to work properly. I am thinking it has to do with my fancy bend in the pipe. Any thoughts on the matter? See picture below.
Bushman wrote:I am almost done with my first parrot. I still have to build a stand for it, and no the beak is not to long as I built it to sit on a raised box to allow for different size bottles. I do have a question about it however. I ran a test run with water simulating the approximate amount of flow from the still. It works great to a certain point and then starts coming out the intake. I can solve this problem by first priming it in the main tube that holds the hygrometer. This is not a big thing as I always have some extra uncut neutral laying around. I believe it is forming an airlock so it is like priming it to get it to work properly. I am thinking it has to do with my fancy bend in the pipe. Any thoughts on the matter? See picture below.
First-Parrot.jpg
PS I used 3/8 flexible tubing so I know that the tubing is large enough to handle the problem, plus once it is primed it works great!
I solved my own parrot problem, after thinking about having to prime it first I realized the reason it was backing up was due to an airlock created by the shape of my intake line. To solve the problem I just needed to force air back through the main pipe (1" pipe). Easy solution, easy fix and it works great!