Page 1 of 1
My VM-LM build
Posted: Mon Jan 09, 2012 12:46 am
by hstuurman
I promised Samohan to show the build of my VM-LM still,

The 60 mm head and the reflux-cooler. I'm not realy happy with the cooler, but for now....
The lines will be the cuts for the plates (boka-style), and the 8 mm will be to connect the ball-valve.

Another pic, 90 degrees turn, a 22 mm connection for the gate valve.
Re: My VM-LM build
Posted: Fri Jan 13, 2012 1:06 am
by hstuurman
Finaly I had a bit building time, this is gonna take some time

Made the first plate:

The plate is made of a piece of 54 mm tube, straighten it, heatened it and flattende it with a lump hammer
The outside part is oversized, so i can make it fit after soldering


Re: My VM-LM build
Posted: Fri Jan 13, 2012 4:44 am
by Samohon
Hey Henk, great start so far man..
Solder those plates one at a time Henk, just lay the 1st soldered plate on a cold wet cloth when you go to solder the second plate.
Do the relevant Thero/take-off ports when soldering...
A Stainless/Copper scrubbie sock around the coil should be ok to ensure efficiency...
I initially used ¼" for the take-off from the LM, but changed it to 3/8 for quick tails collection... 8mm sounds good to me...

I also initially used a 22mm (¾") branch for the VM, but ended up taking it up to 25mm (1")...
This is what I have:
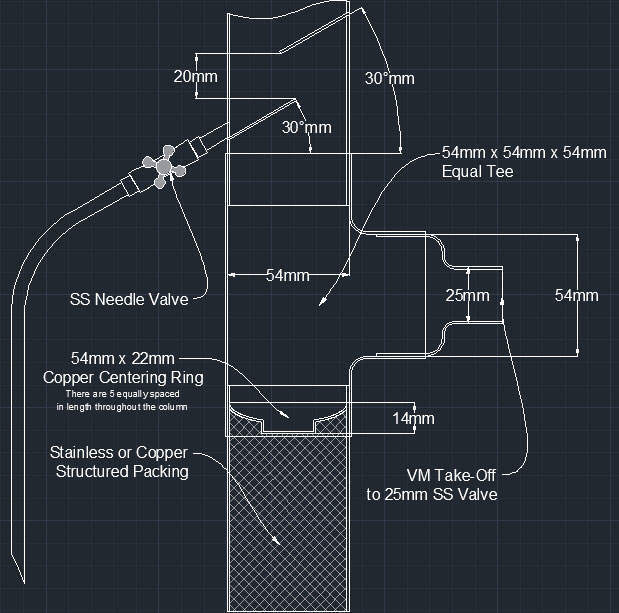
The thermo port is not shown below the top plate, but you get the idea...
If this build is anything like your Ponu build then HD is in for a treat... Keep us posted...
Just holler if you need more, subscibed thread...
Re: My VM-LM build
Posted: Fri Jan 13, 2012 6:26 am
by hstuurman
Thanks Samohon,
I'm in a doubt, must I place the VM output under the plates (like your sketch) or in between the plates (like Condesificator
http://homedistiller.org/forum/viewtopic.php?t=17062)
Re: My VM-LM build
Posted: Fri Jan 13, 2012 7:27 am
by Samohon
I use the LM on my combo only for fores, heads and tails collection so decided to place the VM branch below the plates, but I guess both would work equally as well..
The benefit is in the storing of the still. I use a hard guitar case that I modified to store the still away when not in use. The LM head with coil slips off the top of the 54mm equal tee, the tee with branch and gate valve slips off of the column and the column, which is in 2 pieces, held together with easy flanges, is stored in the case as well along with the liebig condenser and in-line parrot...
I'll try and get some photos of it...
Hope it helps..

Re: My VM-LM build
Posted: Fri Jan 13, 2012 7:38 am
by hstuurman
You're on the same idea as I, I was thinking seperate the heads with the LM, and the heart with the VM, so 2 different heads.
But then Odin asked me why i didn't place the VM petween the plates, I remebered Condesificators beaty-build, he placed the VM between the plates....

I'll wait a few days, maybe someone else is having a brite idea

Re: My VM-LM build
Posted: Fri Jan 13, 2012 7:48 am
by jake_leg
Samohon wrote:I use a hard guitar case that I modified to store the still away when not in use.
Chicago speakeasy style... If you get your violin case out, I'll know to scram

Re: My VM-LM build
Posted: Fri Jan 13, 2012 7:59 am
by Samohon
Re: My VM-LM build
Posted: Fri Jan 13, 2012 3:00 pm
by HookLine
Drawing does not show output or reflux return lines, etc.
Re: My VM-LM build
Posted: Mon Feb 06, 2012 3:21 am
by hstuurman
And 3 weeks further I've had time to finish the VM/LM head:

Re: My VM-LM build
Posted: Mon Feb 06, 2012 3:28 pm
by Samohon
Looking good Henk, great things come to those who wait...
Keep us posted man..
Re: My VM-LM build
Posted: Tue Feb 07, 2012 12:41 am
by hstuurman
Hope to build the productcondenser soon, after that I'll start with the boiler.
It will be the same like my ponu-boiler, only 10 liter smaller.
Cannot wait to start running this one

But am incredible bussy on work and house

Re: My VM-LM build
Posted: Tue Feb 07, 2012 2:06 am
by Wim
What type of product cooler are you going to make?
Re: My VM-LM build
Posted: Tue Feb 07, 2012 4:46 am
by hstuurman
Just a simple leibig, 15 mm inside 22 mm outside
Re: My VM-LM build
Posted: Tue Feb 07, 2012 5:41 am
by Wim
hstuurman wrote:Just a simple leibig, 15 mm inside 22 mm outside
Ah then that will be the simplest of all the components to make.
My first try at making components for my still was a 1,2m liebig also 15mm inside 22mm.(It stands unused now in the shed)
I stripped an electrical wire and soldered it in a spiral around the 15mm tube. Afterwards it fitted snugly in the 22mm this way you can direct the flow of the water in the mantle.
Re: My VM-LM build
Posted: Tue Feb 07, 2012 5:51 am
by hstuurman
Wimmels wrote:
Ah then that will be the simplest of all the components to make.
My first try at making components for my still was a 1,2m liebig also 15mm inside 22mm.(It stands unused now in the shed)
I stripped an electrical wire and soldered it in a spiral around the 15mm tube. Afterwards it fitted snugly in the 22mm this way you can direct the flow of the water in the mantle.
Good idea, and this will spice up the build a bit
Re: My VM-LM build
Posted: Mon Feb 13, 2012 11:59 pm
by hstuurman
placed a fitting for the thermometer:

a 6-8 mm compression fitting, made a hole just fit for the 8 mm.
Re: My VM-LM build
Posted: Tue Feb 14, 2012 12:01 am
by hstuurman
And made the liebig:


15 mm inside and 22 outside
Re: My VM-LM build
Posted: Tue Feb 14, 2012 4:33 am
by Samohon
Your getting close to completing that baby Henk... Looking good man...
Re: My VM-LM build
Posted: Tue Feb 14, 2012 12:03 pm
by rad14701
Looking good, hstuurman...
Take your time, but hurry...

We want to see that rig come to life...

MUahahahahahaha...

Re: My VM-LM build
Posted: Sun Feb 19, 2012 8:21 am
by Bubba Q
Cool idea with the wire to influence water direction! How long does your Liebig need to be at that diameter to not only knock down the vapour but to cool the condensate enough when it comes out? I like the idea of a 3"Graham condensor with 1/2" copper but concerned because everyone uses the Liebig which I'm told is not as efficient. Gotta wonder why they're used so much then.
Re: My VM-LM build
Posted: Sun Feb 19, 2012 9:28 am
by Bubba Q
Samohon wrote:I use the LM on my combo only for fores, heads and tails collection so decided to place the VM branch below the plates, but I guess both would work equally as well..
The benefit is in the storing of the still. I use a hard guitar case that I modified to store the still away when not in use. The LM head with coil slips off the top of the 54mm equal tee, the tee with branch and gate valve slips off of the column and the column, which is in 2 pieces, held together with easy flanges, is stored in the case as well along with the liebig condenser and in-line parrot...
I'll try and get some photos of it...
Hope it helps..
Love to see that Somohon!
Re: My VM-LM build
Posted: Thu Feb 23, 2012 8:05 am
by hstuurman
This have been a shitty week, my PC broke, so I've been plastering 2 walls, removing the paint (with heat) from 3 doors & half a wall, and placed a fence.
Today I'm so damn tired, I'm glad tomorrow my holiday starts

Re: My VM-LM build
Posted: Thu Feb 23, 2012 7:54 pm
by Bubba Q
Atta boy Henk! There'll be plenty of time to rest when your dead.
Re: My VM-LM build
Posted: Mon Mar 12, 2012 11:19 pm
by hstuurman
Finally a pic of the collumn:

Yesterday I made a start with the boiler, place 3 tubes as legs. This makes working on the boiler easier
Re: My VM-LM build
Posted: Fri Sep 07, 2012 2:53 am
by hstuurman
Ok it has been a while but I've been very bussy.
Kitchen is almost ready, work is still crazy, but the LM/VM is almost finished.
In the dutch forum Odin talked about the new idea of Mike Nixon (a paper Harry spread), so I changed a few things. The Lm is changed, there is an extra valve for reflux, which goes into a thumper.
Her some pics:


Sadly, because I'm on the going legal traject, I cannot try it before my lisences are ok.
Re: My VM-LM build
Posted: Fri Sep 07, 2012 10:12 am
by Odin
Henk,
Wow. Finally! My "Non Plus Ultra Still" in the flesh! Or allmost. I guess it is a combination of Mike's original VRS (Vapour Reflux System) and my addition of making it a VM/LM combo, while using the LM take-off as the possitive feedback line (Liquid Reflux Feedback System?). Instead of using a bubble ball, you choose a thumper. That is clooser to Mike's original design. But he did have another option added that might suit your design as well: a heater under the thumper. And a sorta dial that would give power to the "parent" boiler as well as the thumper. And as the run progresses, he suggested to give less power to the parent boiler and more to the thumper. And actually to Mike this "thumper" was not a real "thumper". More of a secundary boiler, not charged with anything (initially), just slowly loaded with 95%+ neutral from the refluxing tower.
For more reading on the design Mike and I propose:
http://homedistiller.org/forum/viewtopi ... odin+ultra
Also for those into reading poetry, actually.
Now get those licenses and make this baby sing, Henk!
Odin.
Odin.