Page 1 of 1
Finally Commited
Posted: Sat May 26, 2012 5:54 am
by MGilbert3
I manned up yesterday and finally committed myself to making a boka. I've been using my little pot still for a while but now its time for a change. I've been collecting my pieces and I think I have what I need to start making it. So far I've wasted quite a bit of copper alone just trying to bend the condenser.
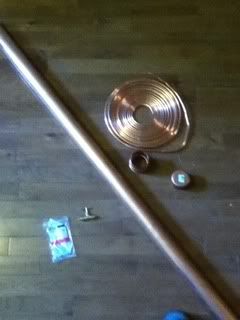
My flattened out piece I'm going to use to make the plates didn't make it into the picture.
I've got some rough measurements for everything taken from other peoples builds but the way I see it is after i have my condenser bent I can just go from there as a starting point, sound logical?
Thanks everyone for the awesome site and the amounts of knowledge I've gained from it!
Re: Finally Commited
Posted: Sat May 26, 2012 7:06 am
by Braz
...after i have my condenser bent I can just go from there as a starting point, sound logical?
Makes sense to me.
Re: Finally Commited
Posted: Sat May 26, 2012 7:35 am
by jimmyjames1981
That's where I would start, that's the toughest part of the build I think, either making a deflag or winding a coil, once your done with that its all smooth sailing, happy construction!
Re: Finally Commited
Posted: Sun May 27, 2012 4:36 am
by emptyglass
MGilbert3 wrote: So far I've wasted quite a bit of copper alone just trying to bend the condenser.
Its ok mate, they are still making it. You can always get more.
It won't be the last bit of copper you waste either!
Only other thing I can say is make sure you angle your take off tube down a little, if you havn't worked that out already.
Re: Finally Commited
Posted: Sun May 27, 2012 7:41 am
by MGilbert3
I'm gonna try to dedicate today to bending that coil. Need to poke around the house see if I can find like a pipe kicking around I can use as a guide
Re: Finally Commited
Posted: Sun May 27, 2012 9:32 am
by Expat
I'm in the same boat as you, i'm just prepping for my bok build

When I renovated one of my closets I found they'd uses a piece of natural gas pipe as a hanging rod, 3/4" and super heavy; based on the tutorials it should be an appropriate guide.
Good luck with the build!
Re: Finally Commited
Posted: Sun May 27, 2012 9:51 am
by MGilbert3
well...its not pretty but it fits nicely in my pipe, isn't kinked, and doesn't leak. I am partially embarrassed to upload it and show you guys though. One that that keeps me at peace is once its in nobody has to see it again.
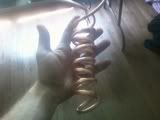
Edit: resized pic
Re: Finally Commited
Posted: Sun May 27, 2012 10:01 am
by Frosteecat
Functional is GOOD. The beauty of this site is we can see where we're headed by looking at some of the "art stills" the Masters are building...gotta start somewhere and it looks better than mine!
Re: Finally Commited
Posted: Mon May 28, 2012 12:41 am
by emptyglass
Looks to me to be a little short.
How many feet/meters went into its making?
Re: Finally Commited
Posted: Mon May 28, 2012 5:47 am
by rad14701
emptyglass wrote:Looks to me to be a little short.
How many feet/meters went into its making?
+1
Excessively flat too... Not sure how that happens...

But I've seen worse first, second, and even third attempts... If it flows at least 1 liter of water per minute then is "might" work if there is enough cooling capability there... A rough rule of thumb is at least 10 coils per helix... This condenser is clearly shy of that mark...
It gets easier...

Re: Finally Commited
Posted: Mon May 28, 2012 5:57 am
by MGilbert3
I've got some left over from my spool I'm gonna try again see if I can't make a little better one
Re: Finally Commited
Posted: Mon May 28, 2012 2:54 pm
by Expat
As mentioned i'm following up on the same component myself

Here are the results of my attempt:
http://homedistiller.org/forum/viewtopi ... 32&t=29673
I believe mines also a bit flattened but I seem to be able to get a decent flow of air through it, still need to try water though.
Re: Finally Commited
Posted: Mon May 28, 2012 3:51 pm
by emptyglass
There are quite a few good threads here on winding coils. Have a look at a few before proceding with your next one, I reckon you'll be a lot happier with what you make after getting some tips.
Your coil needs to be efficient enough to condense all the vapor you can produce. Any less and you'll have issues. Better to have a little bit more coil than find you have issues once up and running.
Re: Finally Commited
Posted: Wed May 30, 2012 2:02 pm
by MGilbert3
While I wait to scrounge up more copper for the coil I stumbled across this today
http://nh.craigslist.org/for/3022157580.html" onclick="window.open(this.href);return false;" rel="nofollow . I know the hole on top looks a little small but think it could be bored out or something to accommodate for the 2 inch pipe? Or should I just scrap that idea and try to find a keg that already has a 2inch hole?
Re: Finally Commited
Posted: Wed May 30, 2012 4:56 pm
by emptyglass
Its up to you. Depends on how hard a keg with a 2" sankey style fitting is to find for you. It would be easier to use a keg with a 2" hole.
Re: Finally Commited
Posted: Wed May 30, 2012 9:24 pm
by jimmyjames1981
That old keg wouldn't be bad but you would have to buy a tri clamp ferrule and have it welded to the keg, probably another $30 in added cost, that keg is worth the $35, with 304 stainless going for $1.01 per pound , you could buy it and if you decide not to use it you can scrap it for the same money you bought it for. I think the old keg is cool, different and vintage looking, its got alot more character than a normal sanke keg
Re: Finally Commited
Posted: Sat Jun 02, 2012 2:02 pm
by MGilbert3
Made my flange today after I picked up my keg. Decided against the old one and got a regular one I found.
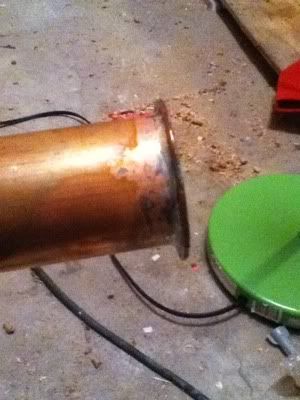
The picture makes the flange look cockeyed but it sits straight on the ground.
