Page 1 of 1
Bolt-in keg to electric boiler (inspired by Butterman)
Posted: Mon Feb 04, 2013 8:00 am
by oakback
I liked Butterman's thread, so I figured I'd show how I did my conversion without welding/soldering.
There was a post somewhere with a PDF that showed how to install a bolt-in heating element. I can't find it, but I took some pics of my conversion.
I positioned this as low as I could before the keg started curving downward. Hole saw cut through real easy

Here's the element I used, with the bolt holes drilled. I used the gasket that came with the element as a template for the holes.

I bought a couple toilet tank-to-bowl bolt kits, and used one metal washer, one rubber washer, and one nut on each bolt.

I somehow managed to not drop any of them inside.

Temporarily in place with the felt gasket that came with the element.

Element in place (wingnuts were later replaced with regular nuts). I haven't trimmed the bolts off yet, but I'll leave one longer than the rest for the ground wire to connect to.

The router controller with heat sink, and extension cord I butchered to add connections for the element. I used heat shrink tubing on the ring terminal connections, and later crimped an alligator clip to the ground wire, which I clip to one of the bolt studs sticking out.

I then added a 2nd element, situated about 90 degrees to this one, and slight higher. I did this 2 weeks ago, and have since run the still with no leaks or problems of any kind. The element flange is beefy, and when I tightened down the nuts, the keg flattened to meet the flange.
Re: Bolt-in keg to electric boiler (inspired by Butterman)
Posted: Tue Feb 05, 2013 11:09 am
by beelah
interesting, but did you put the rubber gasket on the inside of the keg? Not a recommended practice, likely cork would be better or Teflon tape wrapped around the rubber gasket, but I don't know how long it would hold up...also some may say no brass, so stainless steel bolts would be better... are you running 110 or 220 volts there...I have one of those controllers and was wondering how it runs...some have experienced some problems others not so much.
Re: Bolt-in keg to electric boiler (inspired by Butterman)
Posted: Tue Feb 05, 2013 11:30 am
by bellybuster
nice post, I may have to go this route, found out today the local welder want $45/hr to weld in couplings. He figures 1 couplking into 3 kegs would be a couple hours. Too pricey for me
Re: Bolt-in keg to electric boiler (inspired by Butterman)
Posted: Tue Feb 05, 2013 11:31 am
by Butterman
Nice Job.
I like that the keg flattened out to meet the flange to make a nice seal on the gasket, thats pretty cool.
I agree that rubber and brass should probably be replaced with cork and stainless, but besides that nice solution for all of those/us who dont have TIG capabilities.
What did you use to cover the element connections?
Butterman
Re: Bolt-in keg to electric boiler (inspired by Butterman)
Posted: Tue Feb 05, 2013 12:52 pm
by oakback
beelah wrote:interesting, but did you put the rubber gasket on the inside of the keg? Not a recommended practice, likely cork would be better or Teflon tape wrapped around the rubber gasket, but I don't know how long it would hold up...also some may say no brass, so stainless steel bolts would be better... are you running 110 or 220 volts there...I have one of those controllers and was wondering how it runs...some have experienced some problems others not so much.
The issue with rubber and brass isn't a concern. They're submerged, and not exposed to the volatile gases (and never get above 100C). Never hurts to be on the safe side, though.
The elements are rated for 220, but I'm on 110. I ended up running the controller on full-on (then unplugging it, and plugging the element cord in directly), since I was refluxing and it was quite cold outside. It was nice being able to wrap the keg in a blanket, though. Propane was fine most of the time, but if it was breezy at all, it was tough to maintain a consistent boil.
Butterman wrote:Nice Job.
I like that the keg flattened out to meet the flange to make a nice seal on the gasket, thats pretty cool.
I agree that rubber and brass should probably be replaced with cork and stainless, but besides that nice solution for all of those/us who dont have TIG capabilities.
What did you use to cover the element connections?
Butterman
I haven't covered the connections, aside from shrink-wrapping the base of the ring terminals. I don't see a problem leaving it like that, it's kept under cover when not in use. Additionally, the risk of some metal falling in such a way to ground out the element is ridiculously slim, and would be remedied by the breaker (a risk I'm willing to accept). My boiler also sits in sand when in use, I keep a fire extinguisher handy, and my distillate collection
isn't a tripping hazard. Additionally, I like to be able to remove the wires, and with a bolt-on element, it can't be quickly removed (like I assume a screw-in element can...?). With the connections left exposed, it's quick and easy for me to remove the 2 screws holding the ring terminals in place.
Re: Bolt-in keg to electric boiler (inspired by Butterman)
Posted: Sat Feb 09, 2013 11:35 pm
by Chem op
Great post I have book marked it. One question will you post a picture of the element grounded to the keg? Also where did you find the bolt on elements? Thanks.
Re: Bolt-in keg to electric boiler (inspired by Butterman)
Posted: Tue Feb 12, 2013 5:57 am
by oakback
Elements purchased at Lowe's. I'll get a pic later.
Re: Bolt-in keg to electric boiler (inspired by Butterman)
Posted: Wed Feb 20, 2013 5:34 pm
by Expat
Great post! I'm thinking i'll do the same with mine

Question: Have you installed a drain fitting? If so, did you do that weld less, all the kits I've seen require access to the inside which wouldn't be possible.
Re: Bolt-in keg to electric boiler (inspired by Butterman)
Posted: Fri Mar 01, 2013 9:37 am
by oakback
ExpatLad wrote:Great post! I'm thinking i'll do the same with mine

Question: Have you installed a drain fitting? If so, did you do that weld less, all the kits I've seen require access to the inside which wouldn't be possible.
No drain fitting. I just detach the column (triclamp fitting) and tip it over.
Re: Bolt-in keg to electric boiler (inspired by Butterman)
Posted: Fri Mar 01, 2013 6:24 pm
by Dnderhead
http://catalog.pemnet.com/viewitems/bli ... bs-unified" onclick="window.open(this.href);return false;" rel="nofollow?
have a looky...
Re: Bolt-in keg to electric boiler (inspired by Butterman)
Posted: Sat Mar 02, 2013 2:04 pm
by Soggy Bottom Boy
Just a heads up:
PEM nuts require precise tolerance hole sizes in order to work properly. +0.003"/-0.000" (or +0.08mm/-0.00mm) is typical. Don't expect to get that quality of hole by using a hand drill and a cheap drill bit, especially in 304 SS. Not saying it isn't possible, but, using a drill press, with proper feeds & speeds and cutting oil, followed by a reamer would be the best method.
Also, they are not leak proof, either. They can leak where the nut and parent material are cold-formed together on installation, particularly if submerged in fluid. If used in a vapor environment, they might work OK, but they still might weep a little.
Re: Bolt-in keg to electric boiler (inspired by Butterman)
Posted: Sat Mar 02, 2013 4:00 pm
by maheel
if using SS bolts you can wrap the ends in ptfe and pull them through and tighten up.
i have something on a keg done this way and it has never leaked in years of use
bit dodgy but it works

Re: Bolt-in keg to electric boiler (inspired by Butterman)
Posted: Mon Apr 01, 2013 6:41 pm
by Expat
Following along to what Oakback laid out, I've similarly finished installing and testing my elements!

I used stainless steel carrage bolts with washers rather than brass in this case.
Things that I found important:
- Wrapping the bolt in plumbers tape (PTFE) was critical to getting a good seal (as maheel indicated)
- For drilling the bolt holes I HIGHLY recommend using a "Cobalt" drill bit, it cost more ($12 for a 1/4 bit vs $5 for black oxide) but they chew through stainless like it was butter. WORTH EVERY PENNY!
- Don't forget to put a stainless washer on the outside of the element, but inside the nut, else its impossible to get a positive seal.
- Don't bother with a rubber washer on the outside below the nut and its washer. In my experience the rubber washer disintegrated under the torque in the tightening process i.e. nothing left, torn apart.
I'm still planning to cut a pair of plastic boxes to fit over the mounted elements, which should a modicum of safety around the element terminals; should stop pets or wayward conductive objects.
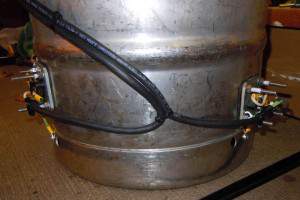
- Both elements
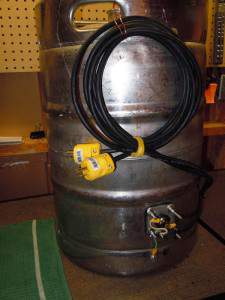
- Side and Cable
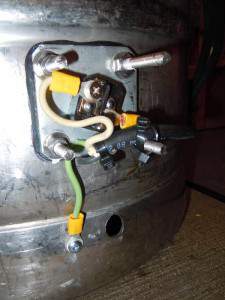
- Close Up
Now working on the drain. Since i'll be using this guy indoors in my basement workshop I will need an easy way to empty out the used up contents. Plan is to use the floor flange, and mount it to the center ridge in the bottom of the keg; that way i'll be able to drain every last drop without having to lift it

.
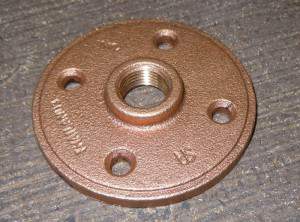
- Floor Flange
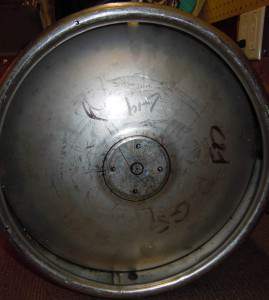
- Keg bottom
I'll post some additional details on this as i move a bit further along.

Re: Bolt-in keg to electric boiler (inspired by Butterman)
Posted: Tue Apr 02, 2013 5:39 am
by oakback
Very nice! I'm going to use your ground screw idea. Currently mine is an alligator clip that clips onto one of the 4 bolt studs, nowhere near as secure as yours.
Re: Bolt-in keg to electric boiler (inspired by Butterman)
Posted: Sun Apr 07, 2013 1:34 pm
by Expat
A further update:
I've mostly completed my keg drain installation now:
- Drilled out the holes, bimetal hole saw for the center and the 1/4" cobalt bit for the bolt holes.
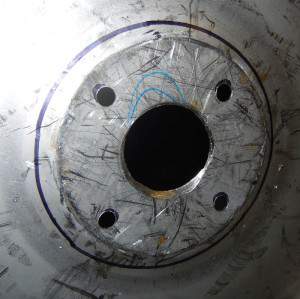
- Holes are drilled out
- Gasket, bolts, washer and flange laid out just prior to installation. The gasket was made from natural cork and cut to fit the template of the flange.
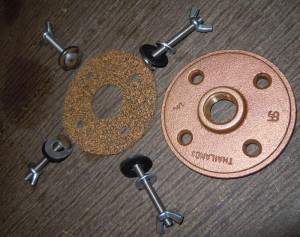
- Flange bolts and washers
- To make life much easier this time, bolts are PTFE wrapped prior to installation.
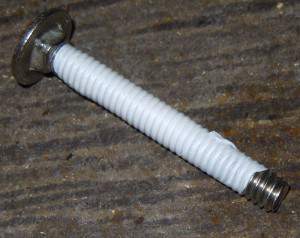
- Wrapped bolt
- Got the bolts in the holes and the flange test fitted.
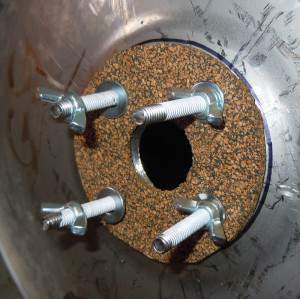
- Gasket and Bolts test fitted
- Finished and installed. Not quite done, but close enough... just waiting on me to get the appropriate nuts; using wing nuts in the temporary to hold things together. Looking good though

Also, i'll need to dismount the flange in order to be able to thread the Elbow since there wouldn't be clearance between the bolts.
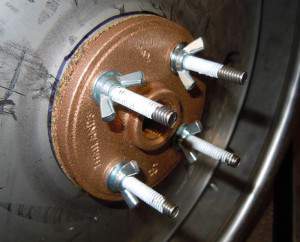
- Flange installed (minus proper nuts)
- Next Steps: Replace wingnuts, install '1/2" NPT to 1/2" sweat 90 degree elbow' to flange, build base and install drain valve.
To be continued.....
Re: Bolt-in keg to electric boiler (inspired by Butterman)
Posted: Mon Apr 08, 2013 6:38 am
by oakback
Will you be adding feet to your keg, or will the drain hardware fit in the space there?
Re: Bolt-in keg to electric boiler (inspired by Butterman)
Posted: Mon Apr 08, 2013 6:47 am
by rad14701
ExpatLad wrote:- Gasket, bolts, washer and flange laid out just prior to installation. The gasket was made from natural cork and cut to fit the template of the flange.
Just to clarify, that is not a "natural cork" gasket...!!!

That is a composition gasket that uses synthetic glue to hold the cork crumbs together...

Natural cork is 100% cork, without binding agents...

In the low %ABV liquid portion of the boiler the use of composite cork isn't as bad as where it would come into contact with high proof alcohol vapor...

I wouldn't trust it will low wines from a stripping run, however...

Re: Bolt-in keg to electric boiler (inspired by Butterman)
Posted: Mon Apr 08, 2013 8:32 am
by Expat
Oakbak - Yes, i'm building a square 2x4 base which i'll be strapping to the keg base, this will give me the extra space required to add the drain pipe; also it will provide something solid to attach the valve and drain pipe. I'll provide the rest of the walk through tomorrow after the fitting I need arrives

(1/2" male NPT elbow 1/2" sweat)
Rad - Thank you for the correction and the info; I had intended to convey that it was a cork seal and (I guess) natural rather than say a rubber seal. Wasn't aware that some cork materials had binding agents. Pardon my sleep deprived mind

I'll wrap the gasket in PTFE tape to eliminate the exposure in a similar fashion to Samohon's ever lasting gasket. Do you see any issues with that direction?
Re: Bolt-in keg to electric boiler (inspired by Butterman)
Posted: Mon Apr 08, 2013 7:03 pm
by NcHooch
just an FYI, there are fittings made (SS, Brass, and copper) that you could have easily silver soldered in there... no bolts, gaskets, or worries.

Re: Bolt-in keg to electric boiler (inspired by Butterman)
Posted: Mon Apr 08, 2013 7:59 pm
by Expat
I hear ya, but avoiding soldering/welding anything to stainless is pretty much the mantra of this thread


Re: Bolt-in keg to electric boiler (inspired by Butterman)
Posted: Mon Apr 08, 2013 8:43 pm
by rad14701
ExpatLad wrote:Oakbak - Yes, i'm building a square 2x4 base which i'll be strapping to the keg base, this will give me the extra space required to add the drain pipe; also it will provide something solid to attach the valve and drain pipe. I'll provide the rest of the walk through tomorrow after the fitting I need arrives

(1/2" male NPT elbow 1/2" sweat)
Rad - Thank you for the correction and the info; I had intended to convey that it was a cork seal and (I guess) natural rather than say a rubber seal. Wasn't aware that some cork materials had binding agents. Pardon my sleep deprived mind

I'll wrap the gasket in PTFE tape to eliminate the exposure in a similar fashion to Samohon's ever lasting gasket. Do you see any issues with that direction?
Wrapping is a definite plus... But at that point you might as well wrap cardboard and have the extra rigidity... Give 'er a go...

Re: Bolt-in keg to electric boiler (inspired by Butterman)
Posted: Wed Apr 10, 2013 10:25 am
by Expat
Finished the drain install, here is the final result.
View from below showing the drain with gasket (PTFE wrapped) installed and torqued down.
Drain assembly from the flange is:
- 90 degree elbow 1/2"NPT to 1/2" sweated fitting
- Length of 1/2" copper
- 1/2" NPT union
- 1/2" full port ball valve
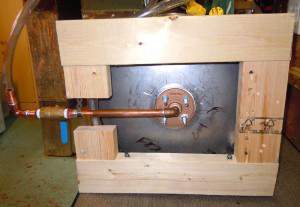
- Bottom View
Keg is held in place to the base by strapping.
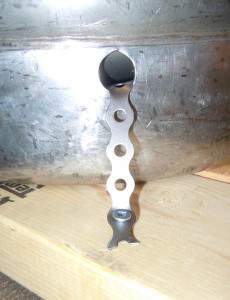
- Keg mount to base
Finished result. I added a 90 degree elbow to the valve output as my drain is directly to one side. Not a leak in sight!
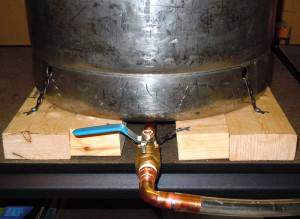
- Finished Result
Re: Bolt-in keg to electric boiler (inspired by Butterman)
Posted: Thu Apr 11, 2013 4:58 am
by oakback
Looks like the base will also serve as good insulation, if you ever need to run it while it's set on a floor that's sensitive to heat (if running indoors on something other than concrete).
Re: Bolt-in keg to electric boiler (inspired by Butterman)
Posted: Thu Apr 11, 2013 6:27 am
by Expat
Yup, and even on concrete you might want to add some insulation to increase efficiency; expanding foam would probably work well if it were sufficiently heat tolerant.
Re: Bolt-in keg to electric boiler (inspired by Butterman)
Posted: Sat Sep 28, 2013 4:28 pm
by Skipper1953
oakback wrote:
I haven't covered the connections, aside from shrink-wrapping the base of the ring terminals. I don't see a problem leaving it like that, it's kept under cover when not in use. Additionally, the risk of some metal falling in such a way to ground out the element is ridiculously slim, and would be remedied by the breaker (a risk I'm willing to accept). My boiler also sits in sand when in use, I keep a fire extinguisher handy, and my distillate collection
isn't a tripping hazard. Additionally, I like to be able to remove the wires, and with a bolt-on element, it can't be quickly removed (like I assume a screw-in element can...?). With the connections left exposed, it's quick and easy for me to remove the 2 screws holding the ring terminals in place.
Please tell us that you have at least had the good sense to incorporate a dedicated GFCI device into your distilling electrical supply. Your ground connection needs to be at least as secure as your other electrical connections. No ifs, ands or buts. Place a proper cover over your electrical connections. You can then extend a short male pigtail out of the box for a safe and probably easier quick connect/disconnect of your electrical supply.
What you say in the last paragraph of this post and the fact nobody has jumped all over your ass for it makes a mockery out of any other discussion of safety in this entire thread. There needs to be a rule about electrical safety in the "Rules We Live By". Yeah, I know I have probably broken rule #2 by dredging up this old thread and commenting so harshly. But,
that is a risk
I am willing to accept.

Re: Bolt-in keg to electric boiler (inspired by Butterman)
Posted: Wed Nov 06, 2013 9:28 am
by bluenose
Sorry to dredge up an old thread, but what material is the element flange itself, and does it matter? I've been looking at the online and my fear is that they're not SS
Re: Bolt-in keg to electric boiler (inspired by Butterman)
Posted: Fri Nov 08, 2013 5:42 am
by stillerD
Great solution to the propane clutter. What are the heating times with electric?
Re: Bolt-in keg to electric boiler (inspired by Butterman)
Posted: Wed Feb 26, 2014 5:05 pm
by Expat
Heating time depends on whats being heated

and what element wattage are installed.
14 gallons of wash @~10% takes about 90 minutes with 2 x 1500 watt elements.
Re: Bolt-in keg to electric boiler (inspired by Butterman)
Posted: Wed Feb 26, 2014 5:30 pm
by Prairiepiss
stillerD wrote:Great solution to the propane clutter. What are the heating times with electric?
There is a calculator on the parent site. In the calcs section. That will tell you heat up times for different inputs.


