Page 1 of 4
Bokakob 54mm x 150cm column
Posted: Wed Aug 26, 2015 8:15 am
by bionut
Today i took the plunge and started to work at my column. As the title say is made out of 150cm of 54mm copper pipe.
I made a wood jig for making the flange.

Started to hammer the flange with very little succes

A few minutes later and after annealing the copper the pipe is forming like some modeling clay


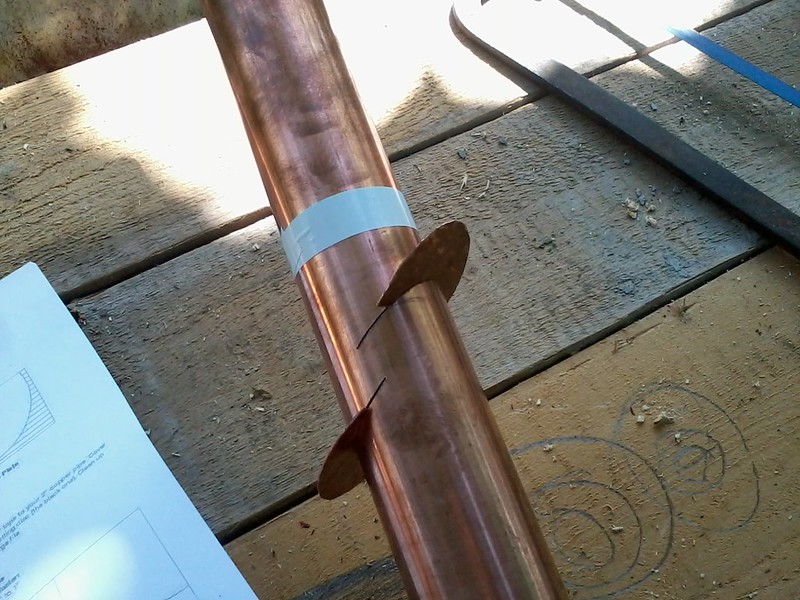
I measured 300mm from the top for the condenser and taped the 2" template on the pipe

note that i didn't have clear tape so i used a brown one. The lines were still visible

The job was very easy with a hack saw

and the result

With a little filing the slant plates will fit snuggly
I will return with more pics when i will get the solder and the tubing for the condenser.
LE: I had some problems with the pictures host. I hope now it works.
Re: Bokakob 54mm x 150cm column
Posted: Wed Aug 26, 2015 11:53 am
by cranky
Looking good bionut. That flange is awsome, way better than the ones I make.

Re: Bokakob 54mm x 150cm column
Posted: Wed Aug 26, 2015 1:35 pm
by Plaincrazy
Love your easy flange jig
I recently built a Boka myself, works great
Re: Bokakob 54mm x 150cm column
Posted: Wed Aug 26, 2015 1:56 pm
by Danespirit
And i wondered if it was my pc having a "cerebral hemorrhage" as i couldn't see the pictures..

You did a great job there..i am sure you have a winner at hand..
Re: Bokakob 54mm x 150cm column
Posted: Wed Aug 26, 2015 2:47 pm
by FreeMountainHermit
binut, would you please tell us how you made the plate templates so neatly.
This thread surely should be an inspiration to many of us here.
Re: Bokakob 54mm x 150cm column
Posted: Wed Aug 26, 2015 2:53 pm
by Danespirit
Gues he used something like this:
Re: Bokakob 54mm x 150cm column
Posted: Wed Aug 26, 2015 2:59 pm
by FreeMountainHermit
Thanks, Dane, I remember seeing that.
How does one go about setting it up to the proper scale ?
Sorry but I'm not a computer person.
FMH.
Re: Bokakob 54mm x 150cm column
Posted: Wed Aug 26, 2015 3:10 pm
by bionut
In fact i used this template. I guess they are the same.
When you print it at Page sizing & handling you need to check "actual size" tab. The pdf is already scaled to fit a 2" column so you will get the exact size. Hope i explained well.
Re: Bokakob 54mm x 150cm column
Posted: Wed Aug 26, 2015 3:21 pm
by bentstick
Keep trying is what I did FMH until the lines were inline on template,resize bigger a bit at atime!
Re: Bokakob 54mm x 150cm column
Posted: Wed Aug 26, 2015 3:28 pm
by FreeMountainHermit
bentstick wrote:Keep trying is what I did FMH
Ha !!!! famous last words.

I would have to go to the library to do that.
Librarian : Whatcha doooooinn ???
FMH: Beats the helloutame

Re: Bokakob 54mm x 150cm column
Posted: Wed Aug 26, 2015 3:34 pm
by bentstick
Heheheheheehe ya buddy
Re: Bokakob 54mm x 150cm column
Posted: Wed Aug 26, 2015 3:36 pm
by FreeMountainHermit
bionut, is there a pdf template for the plate slices on the column ???
I have a piece of 2" X 40" on my work bench that isn't being used and might give it a try.
Also have a worm and a stainless valve gathering dust.
Re: Bokakob 54mm x 150cm column
Posted: Wed Aug 26, 2015 6:30 pm
by HDNB
NICE work!
Re: Bokakob 54mm x 150cm column
Posted: Wed Aug 26, 2015 10:53 pm
by Danespirit
FreeMountainHermit wrote:Thanks, Dane, I remember seeing that.
How does one go about setting it up to the proper scale ?
Sorry but I'm not a computer person.
FMH.
You can do that without a PC and other higtech gadgets.
Scale up and down a drawing/picture of what you like with a pantograph.
It's availible in most hobbyshops or at a book& paper store.
I used it a lot to scale templates for all my other projects i have.
Re: Bokakob 54mm x 150cm column
Posted: Thu Aug 27, 2015 12:54 am
by bionut
FreeMountainHermit wrote:bionut, is there a pdf template for the plate slices on the column ???
I have a piece of 2" X 40" on my work bench that isn't being used and might give it a try.
Also have a worm and a stainless valve gathering dust.
There is a template for the slices, i uploaded it in this post
bionut wrote:In fact i used this template. I guess they are the same.
When you print it at Page sizing & handling you need to check "actual size" tab. The pdf is already scaled to fit a 2" column so you will get the exact size. Hope i explained well.
You simply print it with the actual size, no scaleing or resizing needed. Then you cut out the square at the bottom of the page and scotch tape it on your 2" pipe and cut with a saw or dremel along the lines.
Re: Bokakob 54mm x 150cm column
Posted: Thu Aug 27, 2015 2:16 am
by gemcutter
If you have access to a compound miter saw you don't need a template...set the bevel to 30 degrees and set the depth adjustment for the appropriate depth and you'll get perfect 30 degree cuts to a perfect depth in no time with a good sharp carbide blade...just make damn sure the pipe is held in position with no wobble. I built a snug wood box to hold mine in position.Then find a plate the size of the thickness of the blade and you'll have a perfect fit. no template needed for those either.slide them in snug after cutting them a bit big and trace the shape of the pipe to both side and use a grinder to grind away what isn't needed.
Re: Bokakob 54mm x 150cm column
Posted: Thu Aug 27, 2015 4:37 am
by bionut
Yeah, if you have the tools you can make it this way. But you need to have a plate with the same thickness as the saw blade.
Today i enlarged the slits a little bit and made new plates. This time i just made a square from a copper pipe that i cut on a side and unfolded, and put the square in the slits marking the elipse where i need to cut. I find this a better solution for making the plates than the template. Altough the template for the slots is very good and i would use it again.
Now i have to wait until i get the other needed stuff, solder, 1/4" pipe, triclamp, needle valve... :-(
Re: Bokakob 54mm x 150cm column
Posted: Thu Aug 27, 2015 5:27 am
by cranky
bionut wrote: This time i just made a square from a copper pipe that i cut on a side and unfolded, and put the square in the slits marking the elipse where i need to cut.
I did the same thing when I made mine, squareish plates then I soldered then in place and ground and filed them down after wards. I think too much thought goes into the placement of slant plates on a boka. I free handed mine on a band saw. As long as they are angled and overlap the actual angles don't really matter all that much.
Re: Bokakob 54mm x 150cm column
Posted: Thu Aug 27, 2015 5:48 am
by Danespirit
You are right about that, Cranky..
Most important thing is the overlap and a resonable space between the plates.
And...to cut the slots for the little driptap, before soldering the whole thing up..!
I also just put two square pieces of plate into my stainless i made for a friend.
Tackwelded them into place , cut the worst excessive away with the anglegrinder and smoothed the out prior to TIG welding them.
Used no rod, just gave it one pass with the torch...the burrs from the grinding did it for the fillerrod.
Re: Bokakob 54mm x 150cm column
Posted: Thu Aug 27, 2015 6:01 am
by cranky
Danespirit wrote:
And...to cut the slots for the little driptap, before soldering the whole thing up..!
and bend that tab BEFORE you solder in the top plate.
Re: Bokakob 54mm x 150cm column
Posted: Thu Aug 27, 2015 6:03 am
by Plaincrazy
bionut wrote: Now i have to wait until i get the other needed stuff, solder, 1/4" pipe, triclamp, needle valve... :-(
Have you considered a DIY valve?
http://homedistiller.org/forum/viewtopi ... 17&t=18270
Re: Bokakob 54mm x 150cm column
Posted: Thu Aug 27, 2015 8:03 am
by bionut
I thought about going this way but i can't figure it out without the pictures

I have a 6 mm brass needle valve that i could pickle and use it before i get an stainless one, but i am not sure how should i check for the correct seal (teflon, rubber, plastic, etc.)

LE: sorry, it seems that there are still some pictures that are working.
Re: Bokakob 54mm x 150cm column
Posted: Thu Aug 27, 2015 8:18 am
by just sayin
Great start and welcome, Bionut! Did have to anneal more than once to produce that beautiful flange? Very nice post!
Re: Bokakob 54mm x 150cm column
Posted: Thu Aug 27, 2015 8:32 am
by bionut
Thank you! I annealied a second time before i hammered the flange from the top side on a straight metal plate to make it as flat as possible, but it wasn't really necesary, i just like the sound of the hot copper in cold water
The copper can harden from hammering, but for a flange you don't have to do a lot of it because is really easy and fast to form it.
I didn't mentioned that in my first post, but i am not a native english speaker, so you may have a hard time understanding some things i say...or write

LE: the jig don't have a lot of grip on the pipe, so i hammer with a hand and turn the pipe with the other hand. It is really a fast job to do.
I figured it out how to disassemble the needle valve. It looks like it have a rubber seal at the top, where the stem is, but no seal at the bottom. So if a install it in horizontal position the distill won't be in contact with the rubber gasket (or i can make a teflon tape seal). The valve has a lot of grease in it that should be cleaned before use though.

Re: Bokakob 54mm x 150cm column
Posted: Thu Aug 27, 2015 12:18 pm
by Deerhunter
I'm no expert with valves. I purchased a stainless steel needle valve for my Boka. But that appears to be a rubber packing o-ring. You may want to remove that and pack the valve stem with Teflon tape. Pack it tight so when you tighten the packing nut it will seal correctly.
You would want to follow the steps for pickeling the valve first.
Re: Bokakob 54mm x 150cm column
Posted: Thu Aug 27, 2015 12:32 pm
by Danespirit
+1 Deerhunter..
Only problem is..it gets hard to get that valve sealed with PTFE tape inside..
Bionut..i bought a stainless steel valve on E-bay for less than 12$...
It know it's ridiculous big and can take 1000 PSI, but the quality is ok, even for a china product.
All gaskets are PTFE...and free shipping..
$$$
Search for 1/4" needlevalve..and don't buy this cheap chromed crap they offer...genuine stainless..it doesn't matter if it's 201 or 304.

- 1/4" Needlevale 201 SS
- mIYlbJ_zJnJCk_A6l95BzjA.jpg (2.47 KiB) Viewed 6482 times
Edit: Or take a look at this beauty Brian build with a DIY needlevalve:
http://homedistiller.org/forum/viewtopi ... 17&t=26274
Re: Bokakob 54mm x 150cm column
Posted: Thu Aug 27, 2015 1:08 pm
by bionut
I know the chinese needle valves from ebay. There is where i got this brass one that i wanted to use on a CM column. Now i switched to LM. I plan to order a SS one, but i found only with female threads, no compression fittings. The one from you picture has weld end, how did you conected to your tubing? The disadvantage of ordering from China is the shipping duration.
The brass one is 1/4 i think that you recommended me to use a bigger output tube. I was thinking about 3/8 tubing.
DIY valves look neet, but i am not sure that i can make one... I will have to try
Re: Bokakob 54mm x 150cm column
Posted: Thu Aug 27, 2015 2:21 pm
by Plaincrazy
DIY valve is super easy to make, all stainless and copper, no "forbidden" materials
Re: Bokakob 54mm x 150cm column
Posted: Thu Aug 27, 2015 6:01 pm
by Hound Dog
cranky wrote:bionut wrote: This time i just made a square from a copper pipe that i cut on a side and unfolded, and put the square in the slits marking the elipse where i need to cut.
I did the same thing when I made mine, squareish plates then I soldered then in place and ground and filed them down after wards. I think too much thought goes into the placement of slant plates on a boka. I free handed mine on a band saw. As long as they are angled and overlap the actual angles don't really matter all that much.
I agree. Whats with the template? Make two cuts so plates overlap. They don't have to be a specific angle or a perfect one. And for a valve, you can get stainless needle valves on ebay now for about $20. Making one is not worth the hassle.
Re: Bokakob 54mm x 150cm column
Posted: Thu Aug 27, 2015 6:38 pm
by Plaincrazy
Hound Dog wrote: for about $20. Making one is not worth the hassle.
I don't disagree, but sometimes "making one" is the whole point