Page 1 of 3
Fasten your seatbelts. Let's build the Mashimizer !
Posted: Sat Jan 28, 2017 1:20 pm
by Fart Vader
Ok, where to start...
So much information available, so many clever people all over the place.
I've been reading, building, playing, dreaming...
I'm hoping to combine the best ideas I've come across into a working design. That's where you all come into play, chip in!
This thread is going to be about building a mash boiler/fermenter/stripper. Add distiller maybe once I build a flute (in the near future).
Design criteria:
Be able to mash, ferment and distill on the grain.
I've been frustrated at having to throw out 1/3 of my fermented washes locked up in trub!!!
Standard grain quantity: 25kg/55lbs sack of grain.
Volume of water 2lbs grain per gallon of water: 27 gallons.
Hey what do you know, a 30 gallon design falls right within the forum rules.

Double wall, bain-marie boiler with steam injection is what this is all about.
Here's where I'm at now.
I purchased some 16 gauge 304 stainless sheet, had it rolled and cut to spec.
Inner tube dimensions: 22 inches high with an OD of 21 inches.
Outer tube dimensions: 26 inches high with an OD of 22.5 inches.
This should result in a boiler volume (mash container) of roughly 30 gallons.
Water jacket thickness: 3/4"
Boiler section 4" deep plus water jacket should result in a boiler volume of around 12 gallons for the bain-marie.
Everybody likes pictures, so here we go...

- Cylinder bottoms
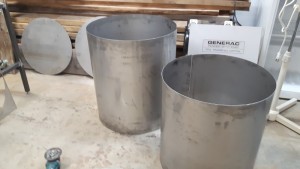
- The tubes.
Re: Fasten your seatbelts. Let's build the Mashimizer !
Posted: Sat Jan 28, 2017 1:26 pm
by Fart Vader
Ok, let's continue...
So I bought a TIG welder, a 30 year old transformer based Miller Syncrowave 250.
It's a tank! And weighs as much as one too!
So now I'm teaching myself to TIG. Why not make this project interesting, right?
Here are some of my first TIG welds EVER on 16 gauge stainless.
Using 40 amps with a .04" 2% Lanthanated electrode and a gas lens (sounds impressive eh?)
I'm practising on scraps before the real McCoy!
Fusion weld, no filler
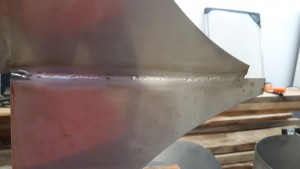
- Practice
I think it looks pretty good.

Re: Fasten your seatbelts. Let's build the Mashimizer !
Posted: Sat Jan 28, 2017 1:33 pm
by Fart Vader
Looking for some help already!
I'm going to be welding (planning to anyhow) some 1/2" NPT half couplers to the sheet metal.
Of course I tried to do this but failed miserably. (:
I tried cranking up the amperage (120A) to melt the coupler, that succeeded in melting my electrode pretty fast.
Any tips for this one?
Note that this is a 1/4" coupler for this test.
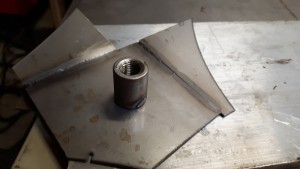
- Coupler
Re: Fasten your seatbelts. Let's build the Mashimizer !
Posted: Sat Jan 28, 2017 1:55 pm
by Fart Vader
An overall view of the final design.
The pigtail on the top left is for the vacuum relief valve.
The other part next to it is the 1psi cracking pressure check valve. This will inject steam into the mash once the boiler pressure reaches 1psi. The check valve also prevents mash being sucked into the boiler when the system cools down.
The plan is to put a 10" manway cover on the top to make loading and dumping easier. The whole shabang mounted on a pivot to make dumping easy.

- The Mashimizer
Re: Fasten your seatbelts. Let's build the Mashimizer !
Posted: Sat Jan 28, 2017 3:19 pm
by rgreen2002

- popcorn.jpg (33.99 KiB) Viewed 9395 times
This.....is going to be interesting.

Re: Fasten your seatbelts. Let's build the Mashimizer !
Posted: Sat Jan 28, 2017 3:32 pm
by MichiganCornhusker
Sitting down and subscribed...
Re: Fasten your seatbelts. Let's build the Mashimizer !
Posted: Sat Jan 28, 2017 4:50 pm
by Bushman
Also following with interest. Once it's finished a video of it in action would be nice to share!
Re: Fasten your seatbelts. Let's build the Mashimizer !
Posted: Sat Jan 28, 2017 5:43 pm
by Pooch
As far as the welding, use 3/32 tungsten, sounds like maybe yours is 1/16 if it melted down with high heat setting, and you can probably lighten up on your amps a little. You should be able to run a nice fillet weld around it. Concentrate your heat a little more on the coupler and you should be fine.
Re: Fasten your seatbelts. Let's build the Mashimizer !
Posted: Sun Jan 29, 2017 1:01 am
by bronctoad
just by your pic. it would help to clean your stainless with a SS wire brush or cup brush on a drill to break surface oxide. then use a filler rod to start the pieces flowing together. the beauty of tigging if you don't like how it comes out just go back over it again to make'r purdy. just for curiosity why don't you want to use filler rod for the welds? I understand the thin sheet to thin sheet but a coupling to sheet is much easier with filler, and IMHO easier to not sugar the back side of the sheet when directing the heat at a fed weld puddle. one last thing watch for any breezes it's really weird how small an air flow , or to high of a gas flow, can suck oxygen into the weld(never good) for shits and giggles your gas lens flow should be 15 to 25 cfm. hope I helped a little bit

good luck
bronctoad
Re: Fasten your seatbelts. Let's build the Mashimizer !
Posted: Sun Jan 29, 2017 2:16 am
by Fart Vader
That's why I'm posting here folks, I need advice.
Thanks for the replies, I need advice I've never done anything like this before.
I started without filler rod 'cause that seemed like the way to go.
I'll clean up before I start the next practice welds.
I'll also try with some filler rod and post my results.
Any more advice, keep it coming.
Re: Fasten your seatbelts. Let's build the Mashimizer !
Posted: Sun Jan 29, 2017 3:18 pm
by Fart Vader
Ok, so after practising on scraps I finally built up the courage to tackle welding the tube seams.
I clamped on aluminium bar I had sitting around to the back of the seam and proceeded to weld.
Tacks at first, then stitching about an inch at a time. My experiments and practice gave me the confidence to fusion weld the seam. No filler.
Had a couple of rags by my side to cool the welds. A wet rag to cool the welds, the other to wipe up the water.
I must say, I'm pretty pleased with the results!
Not the prettiest welds, but for my first ones, I'm stocked!

I cleaned up the welds, but didn't go bananas. The whole thing will be insulated.

- The twins.
The bottoms aren't welded yet, I just wanted to see how stiff 16 gauge would be.
Plenty stiff if you ask me.
Re: Fasten your seatbelts. Let's build the Mashimizer !
Posted: Sun Jan 29, 2017 4:23 pm
by shadylane
Nice build Fart

Just a thought.
Make at least one of the parts to be TIG welded bigger than needed,
So the excess material can be used as filler. So you don't need filler rod.
That's what I do, because I shake so bad, that it takes two hands to hang on

Re: Fasten your seatbelts. Let's build the Mashimizer !
Posted: Sun Jan 29, 2017 4:32 pm
by shadylane
Fart Vader, Here's a link that might be of use
http://homedistiller.org/forum/viewtopi ... 83&t=59138
On a side note. Ain't it fun to have a Tig welder to play with.

Re: Fasten your seatbelts. Let's build the Mashimizer !
Posted: Mon Jan 30, 2017 5:43 am
by Fart Vader
Thanks for the link Shady, going to check that out right now ...
shadylane wrote:
Make at least one of the parts to be TIG welded bigger than needed,
So the excess material can be used as filler. So you don't need filler rod.
Yup, that's the plan. The bottoms are oversize by 1/2" which gives me a generous 1/4" all the way around.
I wasn't sure how distorted my cylinders were going to be when I started.
I must have done it correctly, because there is basically zero distortion from the welding.

Re: Fasten your seatbelts. Let's build the Mashimizer !
Posted: Mon Jan 30, 2017 5:45 am
by Fart Vader
Oh, yes that link.
Where do you think I got my inspiration from ?
You da man!

Re: Fasten your seatbelts. Let's build the Mashimizer !
Posted: Mon Jan 30, 2017 6:45 am
by corene1
Fart Vader wrote:Looking for some help already!
I'm going to be welding (planning to anyhow) some 1/2" NPT half couplers to the sheet metal.
Of course I tried to do this but failed miserably. (:
I tried cranking up the amperage (120A) to melt the coupler, that succeeded in melting my electrode pretty fast.
Any tips for this one?
Note that this is a 1/4" coupler for this test.
coupler.jpg
Just some thoughts. Are you running pure argon for a shielding gas? How is your tip ground on the tungsten. A conical sharp point works best ground in the direction of the point.You can pre-heat the collar so it will weld easier. Are you running a tight gap with the tip of the electrode? On small stuff I like to keep the tip within about 1/16 of an inch from the puddle give or take a bit. Get some 1/16 308 filler rod to help get the puddle started if you want to do a fusion weld. Also fusion welds need a tight metal to metal fit to work well, no gaps.
Re: Fasten your seatbelts. Let's build the Mashimizer !
Posted: Mon Jan 30, 2017 7:06 am
by shadylane
Fart Vader wrote:Looking for some help already!
I tried cranking up the amperage (120A) to melt the coupler, that succeeded in melting my electrode pretty fast.
Any tips for this one?
Don't crank the power up to 120A

If I remember correctly around 30 or 40A was the max I used, when welding fittings to the sheet metal.
Concentrate the heat on the thick fitting, melt the puddle and flow it into the sheet metal.
You only need high amps when welding copper or aluminum.
Re: Fasten your seatbelts. Let's build the Mashimizer !
Posted: Mon Jan 30, 2017 10:01 am
by Fart Vader
Hi Corene, I was hoping you would find this thread and share some of your valuable advice.
100% Argon, around 20CFH using a gas lens with a #6 cup (I also have #5 and #8).
1/16 308L filler is what I have. (Also have some 309L and 347ER)
Conical point, ground in the direction of the point is what I've been doing. Nice tight arc.
I'm actually quite surprised that I have not dipped it in the puddle as much as I thought I would have.
I guess my coordination is still relatively good

Shady, 40A is what I've been using on the 16 gauge. I cranked up the current practicing on the coupler.
Here's another question. How do I prevent cratering when I finish the weld?
Maybe 10% of my stiches ended up with a small crater.

Re: Fasten your seatbelts. Let's build the Mashimizer !
Posted: Mon Jan 30, 2017 2:26 pm
by shadylane
If you have a foot pedal, slowly reduce the current to 0
Re: Fasten your seatbelts. Let's build the Mashimizer !
Posted: Mon Jan 30, 2017 2:52 pm
by Fart Vader
shadylane wrote:If you have a foot pedal, slowly reduce the current to 0
That sounds way too easy.
Re: Fasten your seatbelts. Let's build the Mashimizer !
Posted: Mon Jan 30, 2017 4:14 pm
by shadylane
Hells fire, is this a post about Tig welding or building a Mashimizer

Your idea of ....."The plan is to put a 10" manway cover on the top to make loading and dumping easier. The whole shabang mounted on a pivot to make dumping easy"...... sounds like an excellent idea

Much simpler than how I did my build and easier to operate. That damn drain valve on my rig is a pain in the butt.
It never drained right and usually I had to dip out the spent grain.
The water seal I used, wasn't a bad idea but it also was more complicated than it needed to be.
Re: Fasten your seatbelts. Let's build the Mashimizer !
Posted: Mon Jan 30, 2017 9:11 pm
by TxBrewing
Not sure but this might give you some ideas
https://www.morebeer.com/products/tippy ... re-v4.html" onclick="window.open(this.href);return false;" rel="nofollow
A little bit of progress... Sort of.
Posted: Thu Feb 02, 2017 3:05 pm
by Fart Vader
Thanks for the link TxBrewing, definitely some ideas there to incorporate.
Through my research, I've seen some homebrewers turn down coulpers on a lathe so that the OD fits inside the drilled holes of the mash tun.
Good idea, the coupler OD is actually larger than 1 inch.
Now, if I only had a lathe.

Think, think, think.
Have a drink.
Think, have another drink.
Think some more.
Hmm, I have a milling machine.
Hmm, I have a boring bar.
What if I was to mount the boring bar backwards in the head, run the milling machine in reverse?
That might just work.
Let's try...
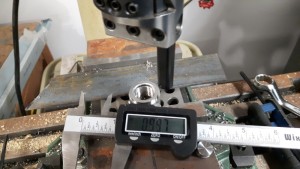
- Turned the coupler.
Ok, let's drill a 1" hole in a piece of scrap with the hole saw to check out the fit.
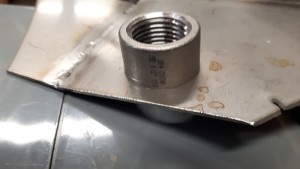
- Outside fit up.
]

Now the inside.

- Inside fit.
I didn't clean up the hole, just a test.
I think this is going to work!
More progress. I think.
Posted: Thu Feb 02, 2017 3:11 pm
by Fart Vader
So I grabbed the check valve I purchased to prevent mash suck back.
It's a 1 psi cracking pressure check valve.
Easy to test, I'll just blow through it.
Holy crap man! I've got sore cheeks trying to crack this thing.
Is there something wrong with it?
Hmmm, how can I calibrate/test this thing?
Think, think, think.
Have a drink.
Think, have another drink.
Think some more.
Of course, 1psi is roughly 28" of water column.

- Water column.
Easy test, put 28+ inches of tubing on the valve, fill it with water. It should leak.
What do you know. It worked!
Amazing that 1 psi is really hard to generate using mouth power!
Pigtail anyone?
Posted: Sun Feb 05, 2017 8:27 am
by Fart Vader
The vacuum break valve needs to be mounted on a pigtail for steam service.
I've never tried anything like this before, but it worked like a charm.
3/8 stainless tubing bent around a piece of pipe using a spring bender.
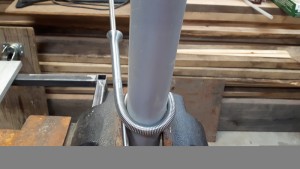
- Bending
The resulting pig tail ready for installation. Soon.

- Pigtail
Actually a lot easier to do than I initially thought.
Re: Fasten your seatbelts. Let's build the Mashimizer !
Posted: Sun Feb 05, 2017 3:08 pm
by shadylane
"Inner tank dimensions: 22 inches high"
"Of course, 1psi is roughly 28" of water column"
That will protect the boiler from developing a vacuum of over 1psi
But me thinks there is still going to be mash sucked into the plumbing on shut down

Re: Fasten your seatbelts. Let's build the Mashimizer !
Posted: Sun Feb 05, 2017 3:22 pm
by Fart Vader
Hi Shady
shadylane wrote:But me thinks there is still going to be mash sucked into the plumbing on shut down

Not possible, it's a check valve. It cannot flow backwards.
One psi is the cracking pressure, the pressure required to allow the valve to open in the direction of flow (from boiler to mash).
Boiler pressure can't exceed 1 psi.
The second valve is the vacuum relief that will prevent the boiler from collapsing on cool down.
I had suck back issues on my steam injection wand until I installed a swing check valve.
That fixed the problem on that setup.

- Swing check valve.
Re: Fasten your seatbelts. Let's build the Mashimizer !
Posted: Mon Feb 06, 2017 5:45 pm
by shadylane
Gotcha

On a side note, it's been over 24 hours since you posted pics, get it in gear

Re: Fasten your seatbelts. Let's build the Mashimizer !
Posted: Tue Feb 14, 2017 12:34 pm
by MidnightThunder
Let me recommend to swap your idea of a 10" manway, to a 12" tri clamp tri clamp and cap if you can afford it, for hookups to your column down the road.
Re: Fasten your seatbelts. Let's build the Mashimizer !
Posted: Tue Feb 14, 2017 2:32 pm
by Fart Vader
Sheesh, have you seen the price of 12" hardware?
BTW I have a 4" trip clamp connection for the future column, so that base is covered.
Also, more pictures on the way soon.
