Page 1 of 1
Thumper build plans.
Posted: Fri Jan 17, 2025 5:28 am
by TxBrewing
When I was here back a few years ago, I thought there were plans for building a thumper downcomer and vent.
Look specifically for a set that the whole assembly sits on a 2-inch Tri-Clamp for a keg, both top and side feed because I am not sure how I want to rebuild yet.
Much like this, thank you in advance
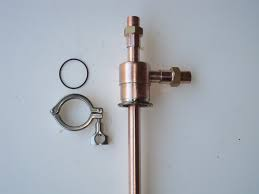
- image.png (38.61 KiB) Viewed 5763 times
Re: Thumper build plans.
Posted: Fri Jan 17, 2025 5:53 am
by Yummyrum
Hi Tx
The two ways are quite different .
The simplest way is to go in the top and out the side .
viewtopic.php?p=7447280&sid=25f3f02b5ee ... 3#p7447280
The more difficult to construct is in the side and out the top
.
https://homedistiller viewtopic.php?p=7475122&sid=98d5a63c5ee ... 1#p7475122
Both ways will make identical hooch .
Only difference is condenser on the top or off the side .
Re: Thumper build plans.
Posted: Fri Jan 17, 2025 7:25 am
by TxBrewing
In the side will support a cleaner build, but I have not decided on what I want to do yet
Thank you
Re: Thumper build plans.
Posted: Fri Jan 17, 2025 7:49 am
by Rusty Ole Bucket
Hi Tex. This is how I put mine together, in the side out the top. You just have to plan it a bit, so you don't unsolder something.
On the thump keg.
Rusty
Re: Thumper build plans.
Posted: Fri Jan 17, 2025 8:27 am
by TxBrewing
Rusty Ole Bucket wrote: ↑Fri Jan 17, 2025 7:49 am
Hi Tex. This is how I put mine together, in the side out the top. You just have to plan it a bit, so you don't unsolder something.
Thumper top.jpg
On the thump keg.
Thumper top 2.jpg
Rusty
I can wrap my head around all the outside parts, for the side inlet, it is the downcomer that I just cant see how to fabricate
Re: Thumper build plans.
Posted: Fri Jan 17, 2025 8:35 am
by Rusty Ole Bucket
This is how mine works, dashed parts are inside the 2" copper. The threaded connection you see at the bottom of the tee in the pictures is to be able to break down the thump tube or swap it out for something different.
Rusty
Re: Thumper build plans.
Posted: Fri Jan 17, 2025 8:46 am
by TxBrewing
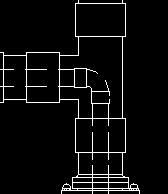
- image.png (2.48 KiB) Viewed 5717 times
the 90 inside the Tee, is that threaded or soldered, that is my main hang up I think.
If soldered, how????
I guess, the easy way would be to just do 2 top inlets.
Sidebar on downsizing pipe diameter; I have a 4-inch opening in the keg, that has a 4x2 reducer into the head, the rest of the piping would be 3/4.
So 3/4 out of the head into the thumper, the goal is to set up 2 thumpers, they would all be piped with 3/4, to include the 1 over 3/4 jacketed condenser arm.
Re: Thumper build plans.
Posted: Fri Jan 17, 2025 8:46 am
by Bolverk
Like this
You just need to remove the stop in the tee (file or sanding drum) so you can put the spear all the way through
I just got one of these
https://www.ebay.com/itm/255471495236?m ... media=COPY
Re: Thumper build plans.
Posted: Fri Jan 17, 2025 8:54 am
by Rusty Ole Bucket
TxBrewing wrote: ↑Fri Jan 17, 2025 8:46 am
image.png
the 90 inside the Tee, is that threaded or soldered, that is my main hang up I think.
If soldered, how????
It's soldered, 3/4" M. I did it first, put it inside the 2" tee, slipped the 2" connector and reducer on the 3/4" arm and soldered all those connections to the 2" tee. Last I added the 2" spacers and ferrules to the top & bottom of the tee. Check out my build thread, it's all lined out in there how I did it.
Rusty
Re: Thumper build plans.
Posted: Fri Jan 17, 2025 9:41 am
by TxBrewing
Rusty Ole Bucket wrote: ↑Fri Jan 17, 2025 8:54 am
TxBrewing wrote: ↑Fri Jan 17, 2025 8:46 am
image.png
the 90 inside the Tee, is that threaded or soldered, that is my main hang up I think.
If soldered, how????
It's soldered, 3/4" M. I did it first, put it inside the 2" tee, slipped the 2" connector and reducer on the 3/4" arm and soldered all those connections to the 2" tee. Last I added the 2" spacers and ferrules to the top & bottom of the tee. Check out my build thread, it's all lined out in there how I did it.
Rusty
Ok, I see, was not sure all that would fit through a tee, but I see how you used the PVC to test fit!!!!
Re: Thumper build plans.
Posted: Fri Jan 17, 2025 9:56 am
by Rusty Ole Bucket
TxBrewing wrote: ↑Fri Jan 17, 2025 9:41 am
Ok, I see, was not sure all that would fit through a tee, but I see how you used the PVC to test fit!!!!
Yep, it was easy enough with a little test fitting.
Rusty
Re: Thumper build plans.
Posted: Fri Jan 17, 2025 10:05 am
by TxBrewing
Guess it is time to see if sourcing local or just ordering a DIY kit from Olympic Distillers is better - and I hope it is....
Re: Thumper build plans.
Posted: Fri Jan 17, 2025 10:09 am
by Rusty Ole Bucket
Lion Brewing Solutions on Ebay has them to, I've gotten several things from them. Good seller.
Check out Alcohol Distiller Moonshine Thumper For Sankey Keg Stainless Tri Clamp DIY Kit on eBay!
https://www.ebay.com/itm/272214361281?m ... edia=EMAIL
Rudy
Re: Thumper build plans.
Posted: Fri Jan 17, 2025 10:45 am
by TxBrewing
TxBrewing wrote: ↑Fri Jan 17, 2025 8:46 am
Sidebar on downsizing pipe diameter; I have a 4-inch opening in the keg, that has a 4x2 reducer into the head, the rest of the piping would be 3/4.
So 3/4 out of the head into the thumper, the goal is to set up 2 thumpers, they would all be piped with 3/4, to include the 1 over 3/4 jacketed condenser arm.
Wondering if I can get a follow up to this
and
I am going tomorrow to pick up the thumper kegs, they guy has several 5 gallon (1/6) and a 7.75 gallon.
Understanding that I am going to run 2 thumpers at some point, Is there any upside to having the 7.75 gallon keg in the set up?
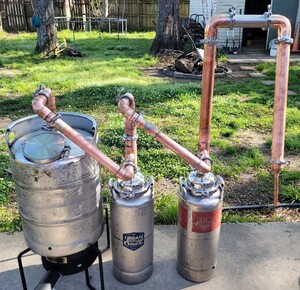
- image.png (215.86 KiB) Viewed 5680 times
This what I keep seeing, and after I saw it last night, I could not go back to sleep!!!
Re: Thumper build plans.
Posted: Fri Jan 17, 2025 11:23 am
by Rusty Ole Bucket
I have a 1" over 3/4" Liebig condenser that's 54" long. Works great.
I'm moving up to a double thumper of sorts, I'll be running a 15.5 keg into a 15.5 keg into a 7.5 keg to a 2" shotgun. At least that's the offseason upgrade plans. I've used a 7.5 gallon thumper from the go, it works great. It gives you the extra capacity to run enough wash in your thumper to make it count. I made my down tube so that I could run with as little as 2 gallons or as much as 4.
Rusty
Re: Thumper build plans.
Posted: Fri Jan 17, 2025 11:47 am
by TxBrewing
Not sure mine is that long, but I can run slow as I am electric,
I will insulate the thumpers with reflective foil.
Just checked my condenser is only 32"
I am looking into a 2 inch shotgun
TxB
Re: Thumper build plans.
Posted: Fri Jan 17, 2025 1:36 pm
by Rusty Ole Bucket
You might be just fine with a 32" condenser, give 'er a run and see. You'll be able to tell with just water.
Rusty
Re: Thumper build plans.
Posted: Fri Jan 17, 2025 2:00 pm
by TxBrewing
Indeed, she worked last time like a champ, and in Colorado, our ground water is pretty cold
Re: Thumper build plans.
Posted: Fri Jan 17, 2025 2:21 pm
by Yummyrum
TxBrewing wrote: ↑Fri Jan 17, 2025 10:45 am
I am going tomorrow to pick up the thumper kegs, they guy has several 5 gallon (1/6) and a 7.75 gallon.
Understanding that I am going to run 2 thumpers at some point, Is there any upside to having the 7.75 gallon keg in the set up?
I used an 80l Boiler into two 50litres although one is a squat 50 and the other is a tall 50 .
After a run the one closest to the Boiler has filled the most .
So you might want to use a slightly bigger Keg for that one .
Re: Thumper build plans.
Posted: Fri Jan 17, 2025 2:28 pm
by TxBrewing
Thanks, the kegs are in great shape and a GREAT price, $25 USD....
Re: Thumper build plans.
Posted: Fri Jan 17, 2025 2:47 pm
by Twisted Brick
TxBrewing wrote: ↑Fri Jan 17, 2025 8:46 am
the 90 inside the Tee, is that threaded or soldered, that is my main hang up I think.
If soldered, how????
Here's how I did the incoming 1" steam pipe. The ss unions were for ease of breakdown/storage and to add future steam wands.
Re: Thumper build plans.
Posted: Fri Jan 17, 2025 2:49 pm
by Yummyrum
TxBrewing wrote: ↑Fri Jan 17, 2025 2:28 pm
Thanks, the kegs are in great shape and a GREAT price, $25 USD....
At that price buy them all . You can’t have enough kegs for aging and low wine storage
Re: Thumper build plans.
Posted: Fri Jan 17, 2025 3:04 pm
by TxBrewing
The new dishwasher is trumping that plan...guy told us today would cost more than 1/2 a brand new, better, quieter one
Re: Thumper build plans.
Posted: Sat Jan 18, 2025 3:36 pm
by TxBrewing
So I picked up the 2 kegs today a 7.75g tall and 5 gallon....both in great shape for $50 total.
While i was in the middle of the 3 hour round trip I got to thinking.
Eventually I want to run both kegs as thumpers, for rum...
Until I get there the bulk will be grain or UJ runs using the thumper as a flavor pot and for the extra distilling power.
What follows needs to be prefaced with " I know very little about bubble plates" I know that act like a thumper in the fact that they allow for a higher proof output.
What I do not know is if they strip flavor to achieve that.
Now I know there is nothing new under the sun really, but my question is; is there any usefulness in stacking a plate column on top of the thumper, and combining the processes?
The end goal is clean flavor, efficiency of time and resources, not overly hot neutral spirits.
Very well may be a silly question, and I am sure I would need to manage over-pressure, and need to look into that anyway because even if I cant use it on the thumper, I still want a plate rig
TxB
Re: Thumper build plans.
Posted: Sat Jan 18, 2025 3:43 pm
by TxBrewing
Re: Thumper build plans.
Posted: Tue Jan 21, 2025 8:41 am
by TxBrewing
TxBrewing wrote: ↑Fri Jan 17, 2025 8:46 am
image.png
the 90 inside the Tee, is that threaded or soldered, that is my main hang up I think.
If soldered, how????
I guess, the easy way would be to just do 2 top inlets.
Sidebar on downsizing pipe diameter; I have a 4-inch opening in the keg, that has a 4x2 reducer into the head, the rest of the piping would be 3/4.
So 3/4 out of the head into the thumper, the goal is to set up 2 thumpers, they would all be piped with 3/4, to include the 1 over 3/4 jacketed condenser arm.
Do you think you could have got a 1" line in the Tee?
Re: Thumper build plans.
Posted: Wed Jan 29, 2025 6:15 pm
by TxBrewing
So, once again the last part of this discussion has been lost, LOL
I think I have my way forward
This is the inspiration, bit on the outlet I will add a union.
The idea is next year to run a double thumper Rum rig, the union will allow me to stay 1 inch into the next thumper or reduce to 3/4 for the Liebig.
I will build a 2-inch vapor path for running the thumper, and when I am just stripping, I will just put on the elbow still head that I already have.
Re: Thumper build plans.
Posted: Wed Apr 16, 2025 6:03 pm
by TxBrewing
Ok, so after a bunch of this and a bunch of that, I am picking up the copper parts tomorrow.
Decided to just run a 3/4 inch line out of the head into a top feed thumper set up.
I will add a union to connect the run and one off the thumper exit, this will allow me me to switch between a regular pot and a thumper set up.
I have not soldered in about 10 years, but I do not think the small stuff will be an issue, but I am worried about the 2 inch ferrule to the 2 inch tee.
It is a copper to copper connection, is there a video to watch for copper to copper, or does anyone have any pointers.
last will propane be hot enuff? Or should I get Mapp gas?
Re: Thumper build plans.
Posted: Wed Apr 16, 2025 6:33 pm
by Yummyrum
You only need propane for soldering . MAPP will be too hot unless you have it turned right down close to the point where the flame is going to go out .
Soldering Copper to copper is dead easy . It’s soldering Copper to Staino when it starts to get a bit challenging .
Re: Thumper build plans.
Posted: Wed Apr 16, 2025 7:03 pm
by TxBrewing
Yummyrum wrote: ↑Wed Apr 16, 2025 6:33 pm
You only need propane for soldering . MAPP will be too hot unless you have it turned right down close to the point where the flame is going to go out .
Soldering Copper to copper is dead easy . It’s soldering Copper to Staino when it starts to get a bit challenging .
Yeah, I will watch a quick tutorial to freshen up my understanding, I was just worried about the ferrul being a heat sink