
Warning! Working with high voltage AC is dangerous! The voltage is high enough to break the electrical barrier of your skin. If you become part of the circuit, there is a possibility you could be killed. If you are not completely confident in your own skills I don't recommend you make this on your own. Always unplug from the wall when there are exposed conductors that you could possibly touch!
This is an arduino phase controller that can handle up to 30A at 240V, I'm using it for a 4000W electric element. This works on 60hz, you'll need to do some modification to work on 50Hz.
Here are the parts you will need:
1 - Arduino UNO or equivalent
1 - 10K linear potentiometer
1 - a nice big knob that goes up to 11
1 - prototyping board for soldering the components to (approx 2" by 3")
1 - 4N25 or H11AA1
1 - 10k 1/4W resistor
1 - 400V Bridge Rectifier
2 - 30k 1/2W resistors
1 - red LED
1 - MOC3021
1 - 330ohm 1/4W resistor
1 - 560ohm 1/2W resistor
1 - BTA41-600B (or any other triac that will handle your current)(get the insulated kind for added safety)
1 - heatsink to fit your triac
2 - 6pin dip sockets
1 - 12VDC brushless fan
1 - 12VDC "wall wart" AC power adapter ~1amp
misc small wires for making connections
6' or more stranded heavy gauge wires for high current side (I believe #8 copper is code for 30A ATM) (depends on how far away your receptacle is)
1 - grommet for power cable
1 - 30A 240VAC "push to reset" single pole circuit breaker
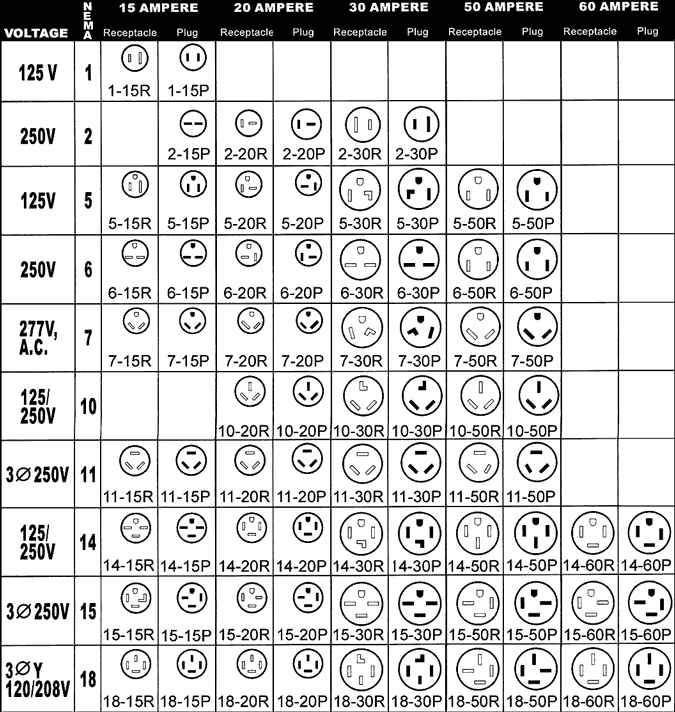
1 - Cord end plug* (i'll be using L6-30P)
1 - Cord end receptacle** (i'll be using L6-30R)
1 - A box to fit it all in (mine will be about 4" by 4" by 6")
* It depends what you're plugging into really I assume most of you will either use your stove plug or dryer plug. look it up in this chart:
** this starts to get expensive because you need to buy a second cord end plug. If you want to save some dough, just use a 3 pole screw terminal.
Here is the circuit diagram:

The values in this diagram are off, use the ones I've given.
Solder this up on the prototyping board with your heavy wires going to the triac and thin wires for the signals and DC. Use rosin core electrical solder, not the plumbing stuff.

Use the Datasheets to compare the pins in the circuit diagram to the real part you have.
4N25http://www.vishay.com/docs/83725/4n25.pdf
MOC3021http://www.deradiobeurs.nl/GetPDF.ashx? ... =100090021
BTA41http://www.st.com/web/en/resource/techn ... 002263.pdf
LEDs have polarity, resistors don't. ICs like the 4N25 and MOC3021 have a little dimple in one corner to show pin 1. Triacs are picky about which terminal is used for input and which is output.
The arduino only has one part attached to it, the potentiometer. Middle pin goes to the analog input, one of the others (doesn't matter which) goes to +5V the other goes to GND.
Arduino pin connections:
Digital 2 - input from the 4N25
Digital 3 - output to the MOC3021
Analog 5 - input from the potentiometer
5V - to VCC on prototype board and one end of potentiometer
GND - to "earth symbol" on prototype board and the other end of the potentiometer

The Code:
You can find test code here: http://playground.arduino.cc/Main/ACPhaseControl
I modified it a bit to use the potentiometer:
Code: Select all
// AC Control V1.1
//
// This arduino sketch is for use with the heater
// control circuit board which includes a zero
// crossing detect fucntion and an opto-isolated triac.
//
// AC Phase control is accomplished using the internal
// hardware timer1 in the arduino
//
// Timing Sequence
// * timer is set up but disabled
// * zero crossing detected on pin 2
// * timer starts counting from zero
// * comparator set to "delay to on" value
// * counter reaches comparator value
// * comparator ISR turns on triac gate
// * counter set to overflow - pulse width
// * counter reaches overflow
// * overflow ISR truns off triac gate
// * triac stops conducting at next zero cross


// The hardware timer runs at 16MHz. Using a
// divide by 256 on the counter each count is
// 16 microseconds.  1/2 wave of a 60Hz AC signal
// is about 520 counts (8,333 microseconds).


#include <avr/io.h>
#include <avr/interrupt.h>

#define DETECT 2  //zero cross detect
#define GATE 3    //triac gate
#define PULSE 4   //trigger pulse width (counts)
int i=483;
int potValue;

void setup(){

  // set up pins
  pinMode(DETECT, INPUT);     //zero cross detect
  digitalWrite(DETECT, HIGH); //enable pull-up resistor
  pinMode(GATE, OUTPUT);      //triac gate control

  // set up Timer1
  //(see ATMEGA 328 data sheet pg 134 for more details)
  OCR1A = 100;      //initialize the comparator
  TIMSK1 = 0x03;    //enable comparator A and overflow interrupts
  TCCR1A = 0x00;    //timer control registers set for
  TCCR1B = 0x00;    //normal operation, timer disabled


  // set up zero crossing interrupt
  attachInterrupt(0,zeroCrossingInterrupt, RISING);
    //IRQ0 is pin 2. Call zeroCrossingInterrupt
    //on rising signal

}

//Interrupt Service Routines

void zeroCrossingInterrupt(){ //zero cross detect
  TCCR1B=0x04; //start timer with divide by 256 input
  TCNT1 = 0;   //reset timer - count from zero
}

ISR(TIMER1_COMPA_vect){ //comparator match
  digitalWrite(GATE,HIGH);  //set triac gate to high
  TCNT1 = 65536-PULSE;      //trigger pulse width
}

ISR(TIMER1_OVF_vect){ //timer1 overflow
  digitalWrite(GATE,LOW); //turn off triac gate
  TCCR1B = 0x00;          //disable timer stopd unintended triggers
}

void loop(){ // sample code to exercise the circuit

//i--;
//OCR1A = i;     //set the compare register brightness desired.
//if (i<65){i=483;}
potValue = analogRead(A5);
OCR1A = map(potValue, 0, 1023, 483, 64);
delay(15);

}
Wire the circuit breaker in series with the incoming power first. This is a must! Do not test without it.
At this point you can test it out with a lamp (remember to match your input voltage to what you're powering ex: 120V input for 120V lamp)
Ac wiring goes like this:
all neutrals (white) are joined
ground or earth (green) can go to your case (if it's metal) otherwise, just link it through to your output ground so that you can attach it to your boiler body.
"hot" or "live" (black) comes from the wall, through the circuit breaker, into the triac, out of the triac, out of the controller towards your boiler.
(will add photo later on)
Please don't touch the AC parts while it's plugged in. This may include the Triac heatsink!!!
If your potentiometer seems like it's backwards ("turning up the volume" makes the light dimmer) swap the +5V and GND connections on the potentiometer. Or if you prefer to go the programming route (like if you already soldered everything). On the 4th last line it says OCR1A = map(potValue, 0, 1023, 483, 64); change it to OCR1A = map(potValue, 1023, 0, 483, 64);
I'm still working on a case for mine, but it's pretty straight forward. Hole on top for the potentiometer, hole on one side for power cable in, hole on other side for power cable out (or screw terminal). If you're really savvy you can power the arduino from the ac that's already in the box (but it requires a few more bits). If not, make another hole for the DC plug to power the arduino with a "wall wart" adapter. It ABSOLUTELY needs a fan as well.
Enjoy!
https://vimeo.com/149363219
May add an ammeter or some other kind of display in the future.
Will post pictures when case is done.
useful links:
http://playground.arduino.cc/Main/ACPhaseControl Use this code!
http://www.instructables.com/id/Arduino ... e-circuit/ Use everything but the code!
http://www.electronics-tutorials.ws/power/triac.html Learn about triacs

