The official 5" Flute build...
Moderator: Site Moderator
-
jimmyjames1981
- Bootlegger
- Posts: 148
- Joined: Fri Mar 23, 2012 8:22 pm
Re: The official 5" Flute build...
I was asking about the a id for removing the oxidation after silver soldering, I've used it before but can't seem to find any that's not diluted down to damn near water
-
jimmyjames1981
- Bootlegger
- Posts: 148
- Joined: Fri Mar 23, 2012 8:22 pm
Re: The official 5" Flute build...
Hey guys another question, I'm silver soldering all of the stainless to copper connections, now if I were to silver solder every piece on the still its going to cost me in the neighborhood of at least $200 in solder, now are there any drawbacks to soft soldering all of the copper to copper.connections? Doing this will be much easier, heating up the 5"x60" column body for hard soldering is going to be tough, I've soft soldered many things and I'm confident that this would be plenty strong to do it this way, any thoughts?
Re: The official 5" Flute build...
Soft solder is just fine, its actually the norm. The Harris Stay Brite 8 I mentioned in an earlier post is great for this application. Should cost about $80 a roll, and that would last ya quite a few builds. Its a silver bearing solder (i think around 5-6%) with no nasties in it (i.e. cadmium, antimony, of course no lead). It can be used for stainless-copper connections as well, I and others have had good results with it. Since you have the skills and equp. to braze, I'd braze any connections you felt were going to be under a lot of stress, and then soft solder the rest with the cheap stuff 
-
King Of Hearts
- Distiller
- Posts: 1503
- Joined: Wed Jul 21, 2010 2:09 pm
Re: The official 5" Flute build...
Hard solder/braze the chiller plates & tubes, site glasses, the rest could be soft, put the steel flanges in the copper tube, maybe soft could work on those.
-
emptyglass
- Distiller
- Posts: 1543
- Joined: Sat Oct 09, 2010 3:59 am
- Location: Victoria, Australia.Usually the shed. Sometimes the cellar.
Re: The official 5" Flute build...
Do all your hard solder work before the soft solder. The higher temps needed for hard solder will often give problems/ruin with any soft soldered joint nearby.
You design it, I make it. Copper and Stainless. Down under. PM me.
Re: The official 5" Flute build...
This may be a dumb question but is there a point where adding extra plates becomes a lot of work for diminishing returns. I know 4 plates can really produce 90 % abv if run slow but easily can prodcue 80-90% abv even by a newbie. Adding 2 plates can increase this further, adding 2 more even further. Don't get me wrong, I check this build thread everyday JJ has the skill to pull this off but I view this as the Rolls Royce of Flutes and maybe that is what JJ is going for. Please don't take this as a negative thread but one that I'm trying to learn how many plates is alright and how many is really ok. I would also be curious on the heating unit for a flute this big.
-
jimmyjames1981
- Bootlegger
- Posts: 148
- Joined: Fri Mar 23, 2012 8:22 pm
Re: The official 5" Flute build...
I believe by running more plates will allow it to run faster, well as fast as the downcomer tubes will let me anyway, and also the more plates the less flavor that gets carried through isn't necessarily the case either, if ran faster it will carry more flavor through regardless of plates, I've seen some commercial stills with 50 or 100 plates but that's for making the most Mistral spirit imaginable. As for heating and the boiler, I have 2 5500 watt electric elements for this, I would like to build a boiler out of a 30 gallon stainless stock pot and add a heavy gauge copper mixing bowl as the top(like the large stills with the copper dome on top of the boiler with the large port hole in the front ) and then insulate around the boiler with rockwool insulation and then skin it with light gauge engine turned stainless sheet, I found the engine turned sheet online for a really good price, I was going to turn some sheet myself but the cost of buying it already done is only $9 more than what I would pay locally for the bare sheet, and I don't think it would be fun trying to put 20,000 swirls on a sheet.....
-
jimmyjames1981
- Bootlegger
- Posts: 148
- Joined: Fri Mar 23, 2012 8:22 pm
Re: The official 5" Flute build...
Just thought I would share my experience with phosphoric acid, its a godsend! I called around and I ended up purchasing kleen strip prep and etch from home depot in a gallon jug for $10, its used for concrete etching and removing rust from metal. Looking for the msds its about 30% acid, alot of the other stuff I have come across is about 10%, I diluted it 3 part water and 1 part acid. I found that mix good for soaking over night, some of my used copper tubes are used from the scrap yard and had some buildup in them, after a soak overnight I pulled the pieces out and scrubbed them with a scrubby and the oxidation is completely gone along with any buildup whatsoever, I highly recommend this stuff to anyone building anything out of copper, on one of my site.glasses I got it to hot for soldering and burnt the flux, stupid me I left it sit overnight and the flux corroded the crap out of the copper and stainless ferrule to where I couldn't get them apart, after soaking overnight they fell apart and were good as new, just rinsed off, resanded and refluxed and got it soldered together, all my sight glasses are done, now on to the big ferrules for the column
-
jimmyjames1981
- Bootlegger
- Posts: 148
- Joined: Fri Mar 23, 2012 8:22 pm
Re: The official 5" Flute build...
Just soldering the ferrules to the site tubes I have about $50 in hard silver solder, I think I may go a cheaper route, also heating my 5"x66" column tube even using a weed burner is gonna be tough unless I go the oxygen acetylene route which may be so hot it might still warp the tube, I may just.low temp silver solder them, going to do some.test on some scrap copper to test joint strength and go from there, the site glasses aren't gonna have much stress on them anyway, plus I have a nice tight fitting cope on my site glass tubes to the column so soldering them low temp would be a piece of cakemash rookie wrote:Harris sells two types of flux for silver soldering stainless. Low temp and high temp for using with hard solder “safety silv” The real key for successfully soldering stainless is indirect heat and not overheating and burning the flux. Of course joints should be clean and well fit. Use the same hard solder for the copper to copper site glass joints using a borax type flux.
When I solder site glasses I use a fluffy torch (propane weed burner) to heat the inside of the column pipe to near soldering temp. Carefully adding just enough heat at the joint to get solder flow is much easier. If you really want to be anal and prep well, paint kiln shelf primer where you don’t want solder, paint flux where you do, place a pre-formed ring of solder and clamp your work perfectly. Once the big torch has everything up to an even heat a map torch will be enough heat at the point of attack to get an even flow if you don’t have an oxy rig.
The bonus of this method is less warping of the column pipe so your plates fit better. After soldering all site glass flanges leave the fluffy torch running for a few minutes to let the heat even out on the whole piece. Done correctly, your pipe will still be round.
MR
-
freespirited
- Swill Maker
- Posts: 258
- Joined: Thu Jan 13, 2011 2:49 pm
Re: The official 5" Flute build...
After building several columns using SS ferrules. I have found that Lenox sterling flux (lowes) and soaking the spot to solder in muratic acid over night works great. The hold is strong, I have no intensions of using expensive silver solder on my flute build. As for soldering large fittings, I prep as usual for soft soldering and then heat just below the joint with my oxy act torch. Takes 10 seconds as opposed to 20 minutes on a 3" fitting. Anytime I solder something inside a tube I prep the areas, make a ring of solder formed to the joint and heat from the outside. I only flux where I intend to solder. i also try to only heat just enough to get the solder to melt, then I walk the heat around til it has all melted. I usually jump from the first point of heat up to 1/4 way around the pipe to help from overheating the first spot. If I find I do overheat and the solder flows out of the joint, I then heat the pipe about 1" above the place I lost the solder and hold my solder (inside the pipe) on the flame (outside the pipe). The solder will run down and cool as it reaches the joint, filling the joint back in.
Last edited by freespirited on Sun Apr 22, 2012 10:00 pm, edited 1 time in total.
-
jimmyjames1981
- Bootlegger
- Posts: 148
- Joined: Fri Mar 23, 2012 8:22 pm
Re: The official 5" Flute build...
I think I have figured out that brazing this stuff together isn't needed, I think its pointless to achieve such a strong joint considering this will hold 0psi, I think I will soft soldering the rest of the build, just for shits and giggles I used some stay clean flux and plumbers solder on a piece of copper scrap and a stainless coupler and it is a strong joint, the solder had no problem flowing right up and adhering to the stainless, after cooling I tried to rip it off, I did succeed but all it did was tear the solder after folding the copper along the solder jointfreespirited wrote:After building several columns using SS ferrules. I have found that Lenox silver flux (lowes) and soaking the spot to solder in muratic acid over night works great. The hold is strong, I have no intensions of using expensive silver solder on my flute build. As for soldering large fittings, I prep as usual for soft soldering and then heat just below the joint with my oxy act torch. Takes 10 seconds as opposed to 20 minutes on a 3" fitting. Anytime I solder something inside a tube I prep the areas, make a ring of solder formed to the joint and heat from the outside. I only flux where I intend to solder. i also try to only heat just enough to get the solder to melt, then I walk the heat around til it has all melted. I usually jump from the first point of heat up to 1/4 way around the pipe to help from overheating the first spot. If I find I do overheat and the solder flows out of the joint, I then heat the pipe about 1" above the place I lost the solder and hold my solder (inside the pipe) on the flame (outside the pipe). The solder will run down and cool as it reaches the joint, filling the joint back in.
-
jimmyjames1981
- Bootlegger
- Posts: 148
- Joined: Fri Mar 23, 2012 8:22 pm
Re: The official 5" Flute build...
well i got a little done today, soldered up all the downcomers and traps today, i havent cleaned them up yet, they are now soaking in detergeant to get rid of the flux residue and then i will clean them up

hopefully i will get some time this week to machine the 6" tri clamp caps into 5" ferrules so i can get those soldered to the column, deflag and gin basket, then i can solder on the site tubes to the column and also finish the deflag and product condensor, after that theres not much left, well except for building a boiler
hopefully i will get some time this week to machine the 6" tri clamp caps into 5" ferrules so i can get those soldered to the column, deflag and gin basket, then i can solder on the site tubes to the column and also finish the deflag and product condensor, after that theres not much left, well except for building a boiler
-
freespirited
- Swill Maker
- Posts: 258
- Joined: Thu Jan 13, 2011 2:49 pm
Re: The official 5" Flute build...
Looks great! After I get these two 3" and two 4" detachable sectioned flutes built I think a buddy and I are going to make a 6" one out of SS. He just bought a lathe and I get a great deal on 6" SS ferrules. JJ a video of this thing running would be sweet so I can compare the output to my 4" to give me an idea on what the 6" will be like. Two 4500w elements, 55 gallon boiler, on 40 amp power supply with a 6" flute... That should be interesting. 
-
jimmyjames1981
- Bootlegger
- Posts: 148
- Joined: Fri Mar 23, 2012 8:22 pm
Re: The official 5" Flute build...
Well I think I will be doing easy flanges for the column instead of machining 6" sanitary caps into ferrules, using 2 caps and a clamp makes each joint cost me about $130, having 4the joints that going to be too expensive, I found 5" clamps for $40 and I have all of the tools to make the jig etc for hammering out the easy flanges and I have a piece of 5" scrap I can practice on, I need to find the dimensions of a 5" ferrule so I can make the easy flange the same size. Going the easy flange route each joint will only cost me $40 and change which is much more acceptable, the scary part is beating on this big pipe trying to not screw it up, and also my plates have such a tight tolerance I may have some grinding on the inside of the flange to do so I can get my tree to slide in.
-
Richard7
- Distiller
- Posts: 1858
- Joined: Wed Jan 04, 2012 4:13 pm
- Location: Central Alabama, Heart of Dixie!
Re: The official 5" Flute build...
Do you solder for a living? If not I think you could make some good $$$ at it on the side! 


"yeah? yeah? the maple flavored kind?" A dog on you tube.
-
jimmyjames1981
- Bootlegger
- Posts: 148
- Joined: Fri Mar 23, 2012 8:22 pm
Re: The official 5" Flute build...
Nope but I have done quite a bit of it, its easy, its all about the heat, solder will flow to the heat as long as there's flux there. I don't know about doing it for a living but I do like building stuff.Richard7 wrote:Do you solder for a living? If not I think you could make some good $$$ at it on the side!
-
emptyglass
- Distiller
- Posts: 1543
- Joined: Sat Oct 09, 2010 3:59 am
- Location: Victoria, Australia.Usually the shed. Sometimes the cellar.
Re: The official 5" Flute build...
Jimmy, you only need the O.D. of a 5" triclover ferrule to make an easy, easy flange.jimmyjames1981 wrote:Well I think I will be doing easy flanges for the column instead of machining 6" sanitary caps into ferrules, using 2 caps and a clamp makes each joint cost me about $130, having 4the joints that going to be too expensive, I found 5" clamps for $40 and I have all of the tools to make the jig etc for hammering out the easy flanges and I have a piece of 5" scrap I can practice on, I need to find the dimensions of a 5" ferrule so I can make the easy flange the same size. Going the easy flange route each joint will only cost me $40 and change which is much more acceptable, the scary part is beating on this big pipe trying to not screw it up, and also my plates have such a tight tolerance I may have some grinding on the inside of the flange to do so I can get my tree to slide in.
2" is a bit on the flimsy side, 4" is quite self supporting, with a little ability to take some load, your 5" column will be sweet.
Just hammer out a flange about the right size (right size being the difference in OD of your 5" column and the OD of a 5" triclover ferrule flange). Annealing helps. Air cool annealed joints and they will turn out a lot cleaner. There is a fair bit of slack on the actual size.
Then you have to find a gasket thickness that will work, somewhere between 3/16" and 1/4" is good. Cork gaskets work well, as they allow for some imperfections in a hand formed flange. You will need the 5" clamp itself to do this trial and error bit. The combination of the flange OD, and the gasket thickness is what gives you your final fit, not the flange OD itself.
But the bit that helps most is get yourself a bit of pipe/billet and turn up a bung to the same diameter as your plates, with a small taper one end. Pass this through your column and/or your deflag (with the aid of a long bit of shaft and a mallet), and your plate tree or header plates will fit nice. You may want to use some olive/vegetable oil as a lube. It will swage your easy flange necked area back to size, and also help with any warpage from attaching the sightglasses.
You design it, I make it. Copper and Stainless. Down under. PM me.
-
jimmyjames1981
- Bootlegger
- Posts: 148
- Joined: Fri Mar 23, 2012 8:22 pm
Re: The official 5" Flute build...
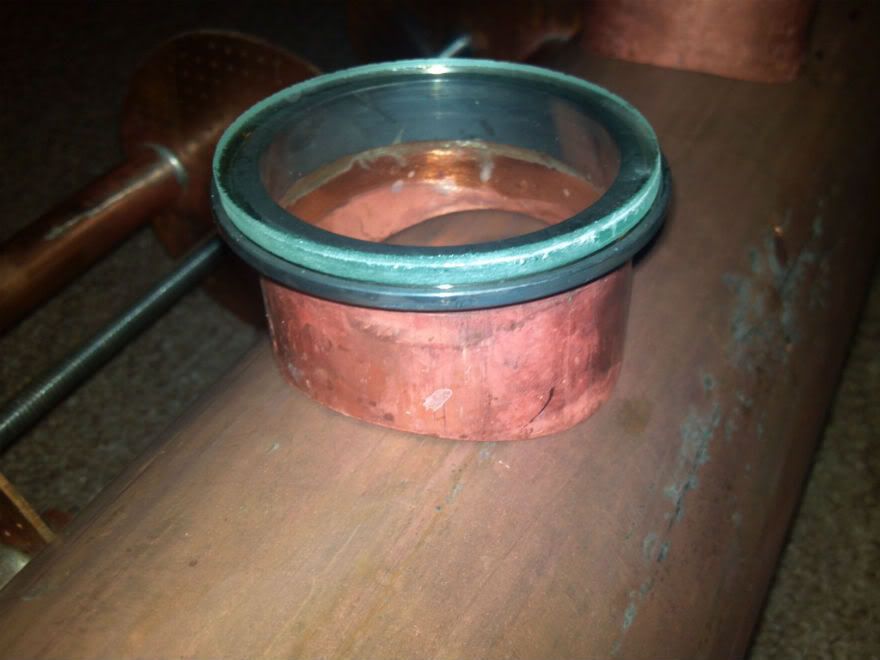
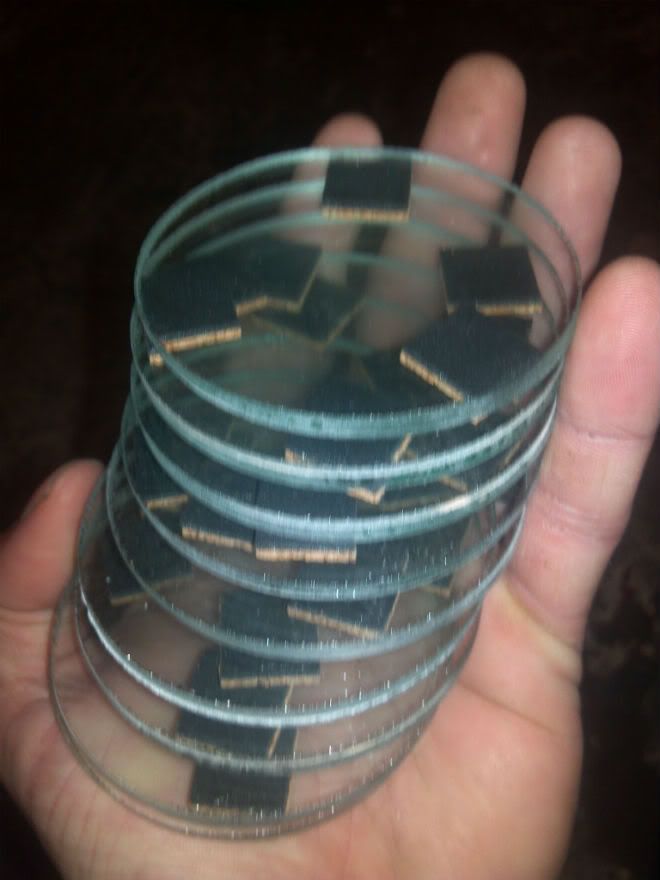
got my sight glasses this week, local shop made them up for me
-
jimmyjames1981
- Bootlegger
- Posts: 148
- Joined: Fri Mar 23, 2012 8:22 pm
Re: The official 5" Flute build...
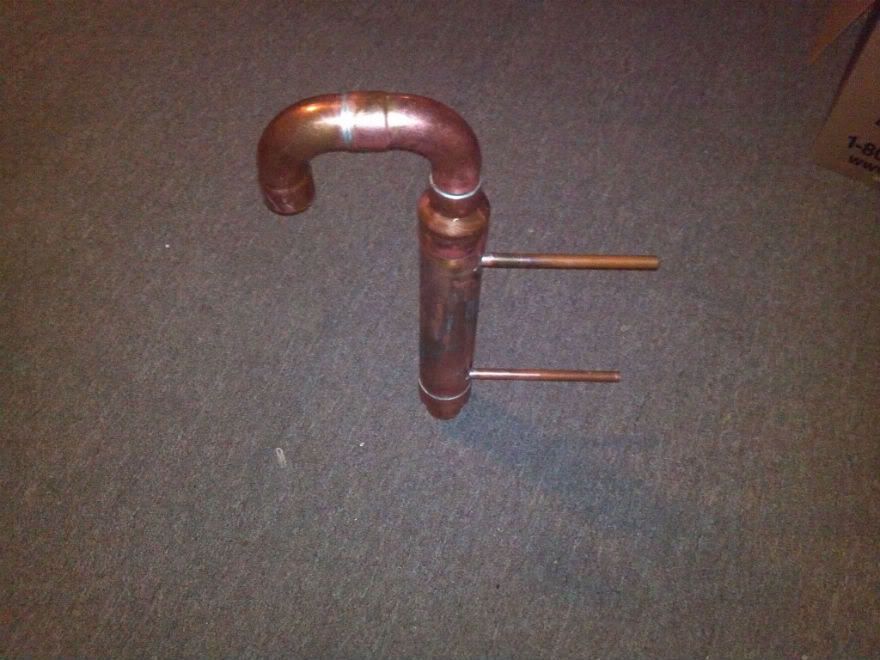
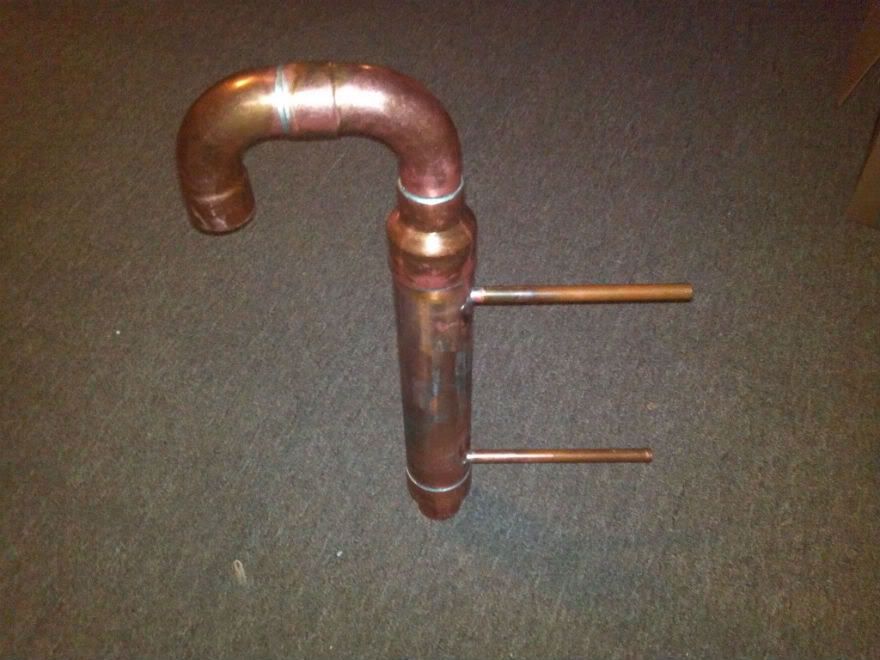
also got the shotgun product condenser all soldered up, still need to add the coolant lines but haven't decided how i will be configuring them as of yet

-
jimmyjames1981
- Bootlegger
- Posts: 148
- Joined: Fri Mar 23, 2012 8:22 pm
Re: The official 5" Flute build...
ok.... lolrockchucker22 wrote:Great work Jimmy, uh oh I mean pure crap send it to me and ill fix it.
ive decided to make my own ferrules, im having some 1/4" stainless plate water jetted into rings and will throw them on the lathe to make them into ferrules. i couldnt bring myself to start beating on this 5" pipe, if i were to screw it up there wouldnt be any finding more..., next im gonna have to start thinking about the boiler and get started on that
-
jimmyjames1981
- Bootlegger
- Posts: 148
- Joined: Fri Mar 23, 2012 8:22 pm
Re: The official 5" Flute build...
on a 6" flute im thinking that 9000 watts isnt going to be enough heat, with this 5" i will be using 2-5500w elements, with only 9000w and 6" the vapor speed is going to be really really slow and you would have a hard time filling the plates. on a 4" flute they usually run around 20 amps while distilling which is about 4600 watts, now the 6" has 2.3 times the surface area, assuming that it will take at least 11,000 watts of heat to work properly in theory, over on adi forums theres a 6" plated still using 3-5500 watt emersion elements..freespirited wrote:Looks great! After I get these two 3" and two 4" detachable sectioned flutes built I think a buddy and I are going to make a 6" one out of SS. He just bought a lathe and I get a great deal on 6" SS ferrules. JJ a video of this thing running would be sweet so I can compare the output to my 4" to give me an idea on what the 6" will be like. Two 4500w elements, 55 gallon boiler, on 40 amp power supply with a 6" flute... That should be interesting.
-
Prairiepiss
- retired
- Posts: 16571
- Joined: Sat Dec 18, 2010 7:42 am
- Location: Somewhere in the Ozarks
Re: The official 5" Flute build...
You got a nice little build going on here Jimmy.
It'snotsocoldnow.
Advice For newbies by a newbie.
CM Still Mods
My Stuffs
Fu Man
Mr. Piss
That's Princess Piss to the haters.
Advice For newbies by a newbie.
CM Still Mods
My Stuffs
Fu Man
Mr. Piss
That's Princess Piss to the haters.
-
jimmyjames1981
- Bootlegger
- Posts: 148
- Joined: Fri Mar 23, 2012 8:22 pm
Re: The official 5" Flute build...
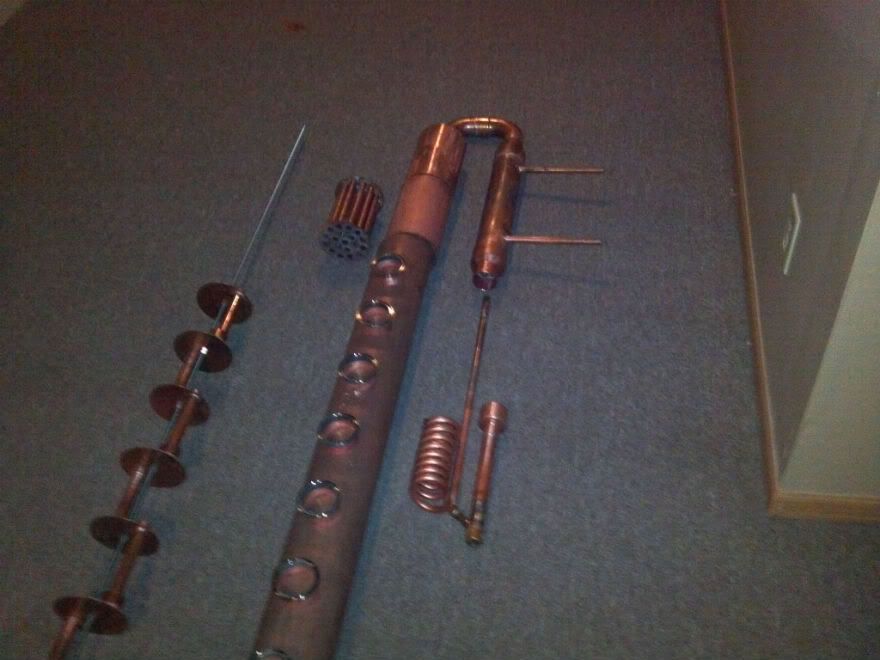
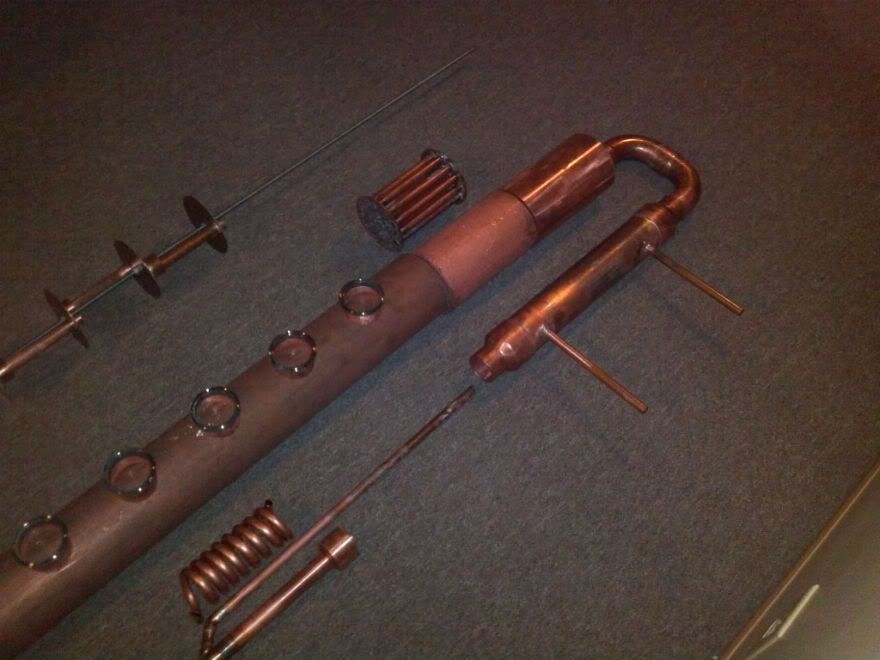
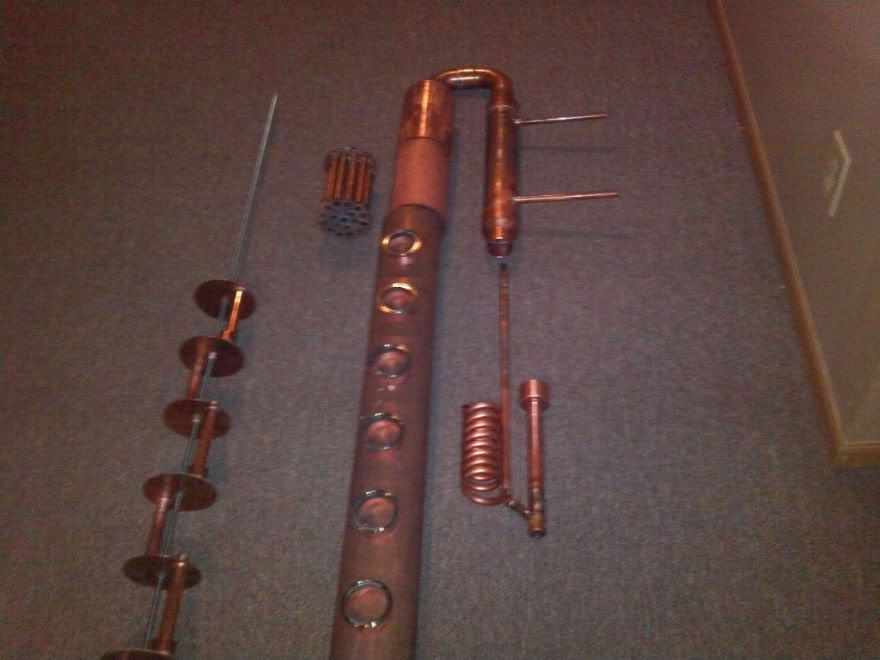
heres the 5" and parts sitting next to a 3"x50" mile hi clone


Re: The official 5" Flute build...
She is looking great. Keep it up.
........WHY?.....Because I can......
My 4 inch Hybrid 2 Stage Build. . .
The Cooling Tower Project
My 3" Valved Flute Build. . .
My 4 inch Hybrid 2 Stage Build. . .
The Cooling Tower Project
My 3" Valved Flute Build. . .
Re: The official 5" Flute build...
Wow, great build. I just finish reading the entire thread from the beginning. I'm inspired to build my own now.
-
jimmyjames1981
- Bootlegger
- Posts: 148
- Joined: Fri Mar 23, 2012 8:22 pm
Re: The official 5" Flute build...
well i got some progress done, picked up a couple of elbows and reducers for the product condensor, need to pick up some more fittings for the water lines etc. Waiting on some 6" sanitary caps and clamps for making my ferrules.
started making the parrot, made a coil out of 1/2" OD. soft copper pipe by filling it the coil with water and crimping the ends shut and then freezing it, then wrapped it around a 1 1/2" piece of pvc pipe, worked pretty good, not perfect but no kinks in it

god this think is going to be tall
hopefully i will get all of the sight glass tubes installed and soldered and the holes cut, just need more parts!!
started making the parrot, made a coil out of 1/2" OD. soft copper pipe by filling it the coil with water and crimping the ends shut and then freezing it, then wrapped it around a 1 1/2" piece of pvc pipe, worked pretty good, not perfect but no kinks in it
god this think is going to be tall
hopefully i will get all of the sight glass tubes installed and soldered and the holes cut, just need more parts!!
-
jimmyjames1981
- Bootlegger
- Posts: 148
- Joined: Fri Mar 23, 2012 8:22 pm
Re: The official 5" Flute build...
my pictures look like crap compared to most peoples, everybody has theyre stuff all polished up for pictures, i dont feel like polishing the stuff and then soldering on it more and then having to polish it again and on and on..... i will polish everything and cleacoat it when im done, it will have a mirror shine i promise!
Re: The official 5" Flute build...
Nice progress. I like the patina of old pipe. And its less work.
........WHY?.....Because I can......
My 4 inch Hybrid 2 Stage Build. . .
The Cooling Tower Project
My 3" Valved Flute Build. . .
My 4 inch Hybrid 2 Stage Build. . .
The Cooling Tower Project
My 3" Valved Flute Build. . .
Re: The official 5" Flute build...
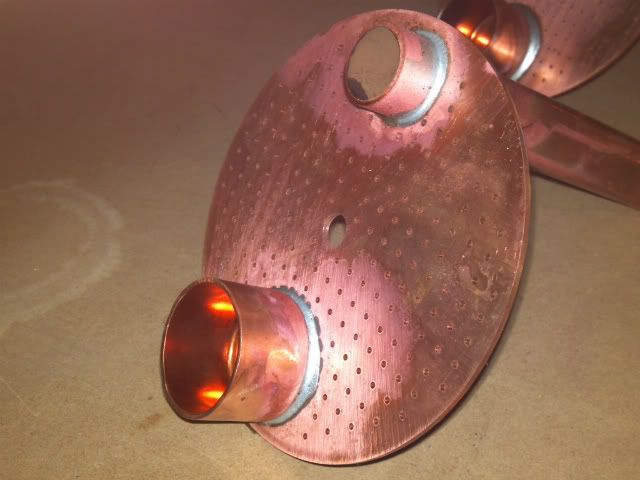
looks great man, what was the hole count on the plates and what size?
-
jimmyjames1981
- Bootlegger
- Posts: 148
- Joined: Fri Mar 23, 2012 8:22 pm
Re: The official 5" Flute build...
Its to go around my parrot for a little character