Thoughts on my reflux column design.
Moderator: Site Moderator
Re: Thoughts on my reflux column design.
You shouldn't have the boiling in the coil when running a real wash. Although, it is going to get plenty hot when you slow it down for take-off. Might consider changing to copper or maybe stainless brake line for the outflow on the reflux coil.
It is the very things that we think we know, that keep us from learning what we should know.
Valved Reflux, 3"x54" Bok 'mini', 2 liebig based pots and the 'Blockhead' 60K btu propane heat
Valved Reflux, 3"x54" Bok 'mini', 2 liebig based pots and the 'Blockhead' 60K btu propane heat
-
chunkystyles
- Novice
- Posts: 55
- Joined: Mon Aug 04, 2008 7:36 am
- Location: Arkansas
Re: Thoughts on my reflux column design.
I'm considering that. We also are going to switch out the coils. One coil has a lot more tubing in it. My father wasn't exactly sure how much was half out of a 50' roll of copper. So the first coil ended up with less length. I had run the bigger coil for the first condenser because I wanted to make absolutely sure that it could do full reflux. By changing it I will be able to run the water faster through the smaller coil to achieve the same amount of heat removed from the column. That should mean that the water will be coming out at a higher speed and lower temperature.Hawke wrote:You shouldn't have the boiling in the coil when running a real wash. Although, it is going to get plenty hot when you slow it down for take-off. Might consider changing to copper or maybe stainless brake line for the outflow on the reflux coil.
-
chunkystyles
- Novice
- Posts: 55
- Joined: Mon Aug 04, 2008 7:36 am
- Location: Arkansas
Re: Thoughts on my reflux column design.
It's been a little over a month since my last post on my still and a lot has happened since then. Unfortunately I have not been able to get digital pics of the setup yet. I'm very pleased by the setup. We have an enormously powerful water pump to circulate the cooling water. I think it's 4914 gallons per hour with a 9.5 meter head. We also got a hold of a nice, large radiator. It will take the extremely hot water off of the condensers and bring it right back to ambient temperature.
I don't think I've mentioned this yet, but this is my first foray into the world of distilling.
I have finally run a sugar wash and I'm fairly pleased with the results. There is obvious room for improvement. One problem with my experience is that my hydrometer got the top busted off of it so I have no idea how accurate my abv readings were. I'm in the process of having another one shipped to me so I will measure the abv again.
Last weekend I stripped the roughly 30 gallon wash using only one condenser on the still, no packing in the column, and the column length was shortened quite a bit. It worked very nicely and was no harder to setup than it is in reflux mode. I ended up with about 7 gallons of quite harsh smelling stuff that tasted awful (I had to at least try it ).
).
This weekend I was able to do the spirit run. I ended up with 3 gallons of roughly 88% abv stuff. I'm disappointed by this. No amount of tweaking seemed to change the abv. The abv stayed pegged at 88% the whole run, barring one or two .5% changes in the middle. It was pretty easy to adjust the take-off rate once I got the hang of it. I was able to go from something like 2 gallons an hour to .4 gallons an hour with no problem. I'd say that I stayed around 3-4 quarts per hour for most of the run. I tried running it slower, but it didn't seem to make a difference, so I just plugged away at that rate.
Next time I'm going to add a couple extra feet to the column. I also think that maybe my packing was a little tight, is that possible? The packing was really tight at the top of the column, but it was much looser at the bottom. I wasn't too concerned about it at the time, but it may have played a part in it. I'm hoping that my problem isn't due to the liquid running down the sides of the column (can't remember what that is called) because I'm not sure how to fix that one or how to tell if that is the case in the first place.
I did not taste the product after it was finished. It has a bit of an off smell to it, but it isn't too bad. I have let it aerate for 24 hours and I did a taste test this evening. It tasted ok, probably close to store bought vodka when diluted. I think the problems with the taste were due to the wash not being completely cleared before being run. I did not rack off the wash during the fermenting, so I'm pretty sure I ended up with at least a little bit of the lees in the boiler. I did rack it off right before running it, but I just don't think it was clear enough. This is just due to my inexperience and I've learned a lot about it just in this first go. I'll be using a different fermenter in a different location and I will rack off the wash at least once during the ferment next time.
Anyway, I've just been rambling on since I'm exhausted but can't seem to fall asleep. I will try to post some pictures next time.
I don't think I've mentioned this yet, but this is my first foray into the world of distilling.
I have finally run a sugar wash and I'm fairly pleased with the results. There is obvious room for improvement. One problem with my experience is that my hydrometer got the top busted off of it so I have no idea how accurate my abv readings were. I'm in the process of having another one shipped to me so I will measure the abv again.
Last weekend I stripped the roughly 30 gallon wash using only one condenser on the still, no packing in the column, and the column length was shortened quite a bit. It worked very nicely and was no harder to setup than it is in reflux mode. I ended up with about 7 gallons of quite harsh smelling stuff that tasted awful (I had to at least try it
This weekend I was able to do the spirit run. I ended up with 3 gallons of roughly 88% abv stuff. I'm disappointed by this. No amount of tweaking seemed to change the abv. The abv stayed pegged at 88% the whole run, barring one or two .5% changes in the middle. It was pretty easy to adjust the take-off rate once I got the hang of it. I was able to go from something like 2 gallons an hour to .4 gallons an hour with no problem. I'd say that I stayed around 3-4 quarts per hour for most of the run. I tried running it slower, but it didn't seem to make a difference, so I just plugged away at that rate.
Next time I'm going to add a couple extra feet to the column. I also think that maybe my packing was a little tight, is that possible? The packing was really tight at the top of the column, but it was much looser at the bottom. I wasn't too concerned about it at the time, but it may have played a part in it. I'm hoping that my problem isn't due to the liquid running down the sides of the column (can't remember what that is called) because I'm not sure how to fix that one or how to tell if that is the case in the first place.
I did not taste the product after it was finished. It has a bit of an off smell to it, but it isn't too bad. I have let it aerate for 24 hours and I did a taste test this evening. It tasted ok, probably close to store bought vodka when diluted. I think the problems with the taste were due to the wash not being completely cleared before being run. I did not rack off the wash during the fermenting, so I'm pretty sure I ended up with at least a little bit of the lees in the boiler. I did rack it off right before running it, but I just don't think it was clear enough. This is just due to my inexperience and I've learned a lot about it just in this first go. I'll be using a different fermenter in a different location and I will rack off the wash at least once during the ferment next time.
Anyway, I've just been rambling on since I'm exhausted but can't seem to fall asleep. I will try to post some pictures next time.
Re: Thoughts on my reflux column design.
Expecting to make good cuts on your first spirit run is a stretch. You'll have several runs under your belt before it all starts to come together. The key is collecting in small containers whilst making changes to the still (heat, water flow, etc) and the understanding the impact each change had on the distillate. You also don't mention whether or not you equalized before heads removal or if you used baking soda in the spirit run?chunkystyles wrote:I don't think I've mentioned this yet, but this is my first foray into the world of distilling.
.
At these collection rates you were sending tails up the column for sure. You don't mention vapor temperature after your reflux condenser. That'll be the key to knowing whats going to the product condenser.chunkystyles wrote: This weekend I was able to do the spirit run. I ended up with 3 gallons of roughly 88% abv stuff. I'm disappointed by this. No amount of tweaking seemed to change the abv. The abv stayed pegged at 88% the whole run, barring one or two .5% changes in the middle. It was pretty easy to adjust the take-off rate once I got the hang of it. I was able to go from something like 2 gallons an hour to .4 gallons an hour with no problem. I'd say that I stayed around 3-4 quarts per hour for most of the run. I tried running it slower, but it didn't seem to make a difference, so I just plugged away at that rate.
It's pretty hard to pack a column too tight with stainless or copper scrubbers they're kinda spongy and tend to find their own space. Extra length on the column will definitely give you a cleaner product and might even allow a little faster takeoff rate.chunkystyles wrote: Next time I'm going to add a couple extra feet to the column. I also think that maybe my packing was a little tight, is that possible? The packing was really tight at the top of the column, but it was much looser at the bottom. I wasn't too concerned about it at the time, but it may have played a part in it. I'm hoping that my problem isn't due to the liquid running down the sides of the column (can't remember what that is called) because I'm not sure how to fix that one or how to tell if that is the case in the first place.
Relax, you made some 88% hooch on your first time outchunkystyles wrote: Anyway, I've just been rambling on since I'm exhausted but can't seem to fall asleep. I will try to post some pictures next time.
-
chunkystyles
- Novice
- Posts: 55
- Joined: Mon Aug 04, 2008 7:36 am
- Location: Arkansas
Re: Thoughts on my reflux column design.
I didn't make cuts, really. I was collecting in one quart mason jars. Pretty much seems like the heads were in the first two jars and the tails started coming out in the last* two jars. I did let the column equalize for 30 mins before starting the collection. Well...kinda. I wasn't quick enough to turn down my propane when the low wines started boiling so I did end up getting about 50ml out before I got it back to full reflux. After full reflux for 30 mins I collected another 100ml for the fores. I also used baking soda in the low wines. I used about 1 tablespoon per 2 quarts.
The vapor temperature stayed steady at 174f (~173f - 175f) in the column and 170f just before the product condenser. It stayed steady at those temps until the tails started showing and then it went up to 180f+.
*edit originally I had put second in place of last, heh.
The vapor temperature stayed steady at 174f (~173f - 175f) in the column and 170f just before the product condenser. It stayed steady at those temps until the tails started showing and then it went up to 180f+.
*edit originally I had put second in place of last, heh.
Re: Thoughts on my reflux column design.
Ok Chunky, I think you were running way too fast. My three inch column with a full 60 inches of packing will just barely get to 4 quarts an hour and only for the first part of the hearts cut. You need to slow WAY down especially when the alcohol in the boiler is getting depleted. It also sounds like you've got lots of cooling power and if your distillate was cooler than 20C your hydrometer will float higher in the alcohol and give you a false low reading. Punkin found that out not long ago.chunkystyles wrote: It was pretty easy to adjust the take-off rate once I got the hang of it. I was able to go from something like 2 gallons an hour to .4 gallons an hour with no problem. I'd say that I stayed around 3-4 quarts per hour for most of the run. I tried running it slower, but it didn't seem to make a difference, so I just plugged away at that rate.
good luck on your next run
-
bronzdragon
- Swill Maker
- Posts: 494
- Joined: Thu Sep 27, 2007 7:04 am
Re: Thoughts on my reflux column design.
Is there a way that you could change the rubber tubing that connects the two condensers with copper?
Just a thought. I don't like to have any vapor or liquid distalate come in contact with rubber or plastic.
That's my only only thought on the beautiful still.
cheers
~bd~
Just a thought. I don't like to have any vapor or liquid distalate come in contact with rubber or plastic.
That's my only only thought on the beautiful still.
cheers
~bd~
"If it weren't for the alcohol, beer would be a healthfood."
-
chunkystyles
- Novice
- Posts: 55
- Joined: Mon Aug 04, 2008 7:36 am
- Location: Arkansas
Re: Thoughts on my reflux column design.
There is no plastic or rubber in any of the vapor path. I made certain of that. It is all ss or copper. There is plastic/rubber but it is only used to circulate the cooling water.bronzdragon wrote:Is there a way that you could change the rubber tubing that connects the two condensers with copper?
Just a thought. I don't like to have any vapor or liquid distalate come in contact with rubber or plastic.
That's my only only thought on the beautiful still.
cheers
~bd~
Ok, cool. I'll have to slow it down a lot next time. I know I can do it with no problem. New hydrometer should be showing up in a day or two so I can get another reading. I'll also be able to account for temperature.minime wrote:Ok Chunky, I think you were running way too fast. My three inch column with a full 60 inches of packing will just barely get to 4 quarts an hour and only for the first part of the hearts cut. You need to slow WAY down especially when the alcohol in the boiler is getting depleted. It also sounds like you've got lots of cooling power and if your distillate was cooler than 20C your hydrometer will float higher in the alcohol and give you a false low reading. Punkin found that out not long ago.
good luck on your next run
-
bronzdragon
- Swill Maker
- Posts: 494
- Joined: Thu Sep 27, 2007 7:04 am
Re: Thoughts on my reflux column design.
Looks like a new stainless steel parrot's beak is in order!
~bd~
~bd~
"If it weren't for the alcohol, beer would be a healthfood."
Re: Thoughts on my reflux column design.
This type of cooling management is very widely used in eau de vie stills. Christian Carl and Holstein are the two major manufacturers and supply most of the stills used in US microdistilleries.
There are diagrams in Kris Berglund's on-line book Artisan Distilling. http://www.artisandistilling.org/publication.html" onclick="window.open(this.href);return false;" rel="nofollow
The first condenser (usually called a dephegmator in this design) needs to be capable of 100% reflux for equilibration. In the eau de vie stills, the product condenser is shell and tube and much larger than the dephlegmator. I think this is for efficiency and thermal mass. The two are plumbed so the output of the product condenser is the input of the dephlegmator.
The secret is the use of a temperature sensing valve (TSV)to keep a constant temperature in the dephlegmator. The temperature sensor is at the output of the product condenser and the valve itself is at the the input of the product condenser. There is a diagram on page 42 of Artisan Distilling.
The squiggley line from the outlet to the valve at the inlet of the product condenser is the control line. The valves are pneumatically operated. Setting the temperature sets the reflux rate. The valve in parallel with the TSV is opened to increase the flow to 100% reflux during equilibration. After everything has settled down, it is closed and the TSV takes over. On the Christian Carl stills, the adjustment is marked 1-10 and must be tweaked to compensate for seasonal variations in water supply temperature.
Here's one of the valves:
http://www.sterlco.com/index.cfm/datake ... /1782.html" onclick="window.open(this.href);return false;" rel="nofollow
What a neat piece of gear. Hat's off to your dad, Chunkystyles.
Time's a wasting!!!
Re: Thoughts on my reflux column design.
Great link snuffy, thanks for thatsnuffy wrote:This type of cooling management is very widely used in eau de vie stills. Christian Carl and Holstein are the two major manufacturers and supply most of the stills used in US microdistilleries.
There are diagrams in Kris Berglund's on-line book Artisan Distilling. http://www.artisandistilling.org/publication.html" onclick="window.open(this.href);return false;" rel="nofollow.
Re: Thoughts on my reflux column design.
that sure is beautiful. one of the nicest looking works ive seen on here.
i have had similar results and concerns as you. the 'clearing the wash' and 'heads into tails' must be common newbie issues. there is a good thread recently on clearing the wash. and what everyone said about the collection rate is what i need to work on too.
but that is beauty.
i have had similar results and concerns as you. the 'clearing the wash' and 'heads into tails' must be common newbie issues. there is a good thread recently on clearing the wash. and what everyone said about the collection rate is what i need to work on too.
but that is beauty.
Good friends, good drink, good food, ...
Three foot bokakob slant plate LM reflux column atop a propane fired half barrel boiler
Three foot bokakob slant plate LM reflux column atop a propane fired half barrel boiler
-
chunkystyles
- Novice
- Posts: 55
- Joined: Mon Aug 04, 2008 7:36 am
- Location: Arkansas
New Pics
Edit: A lot of the pictures are cut off when viewed in the thread here. I posted a link to whole image that will show the whole image.
Ok, I have a bunch of new pics from yesterday. I ended up doing a small stripping run (that's why I was using the smaller boiler) and then a full reflux run. It turned out much better this time. I ended up getting some very neutral stuff. I couldn't ever get above 93%, though. I think I need to add more column height. I would have done that yesterday, but I don't have enough packing right now, time to order more.
Here you can see the smaller boiler sitting in the heat shield and on top of the boiler and the stand.
http://i450.photobucket.com/albums/qq22 ... C01118.jpg" onclick="window.open(this.href);return false;" rel="nofollow
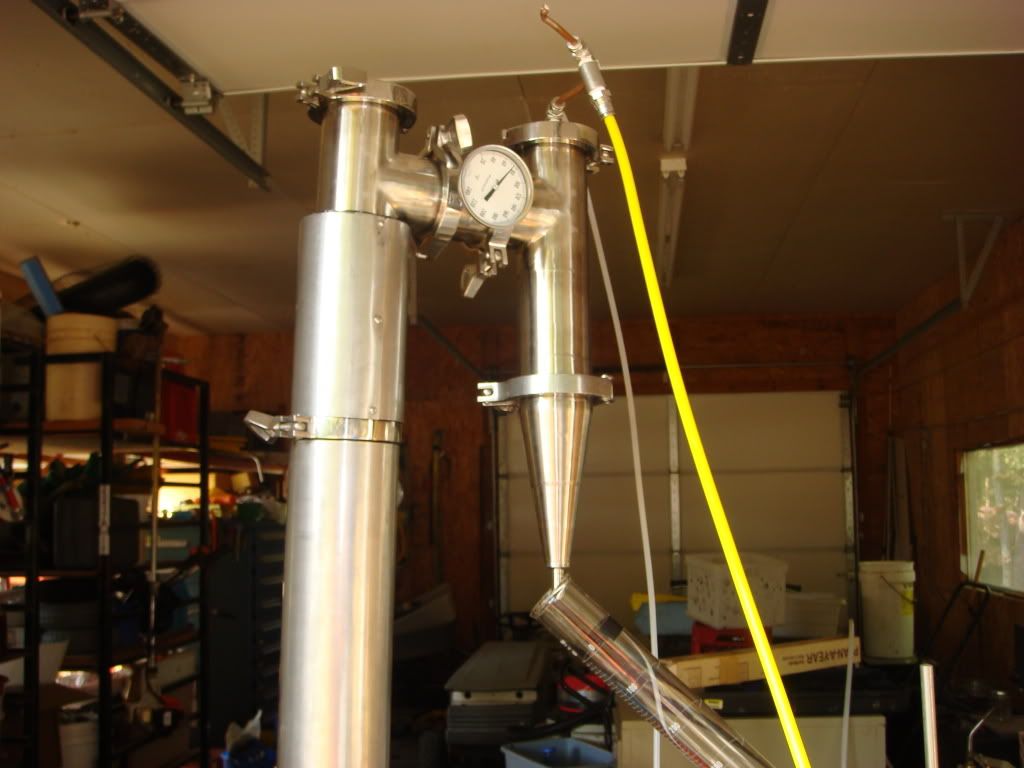
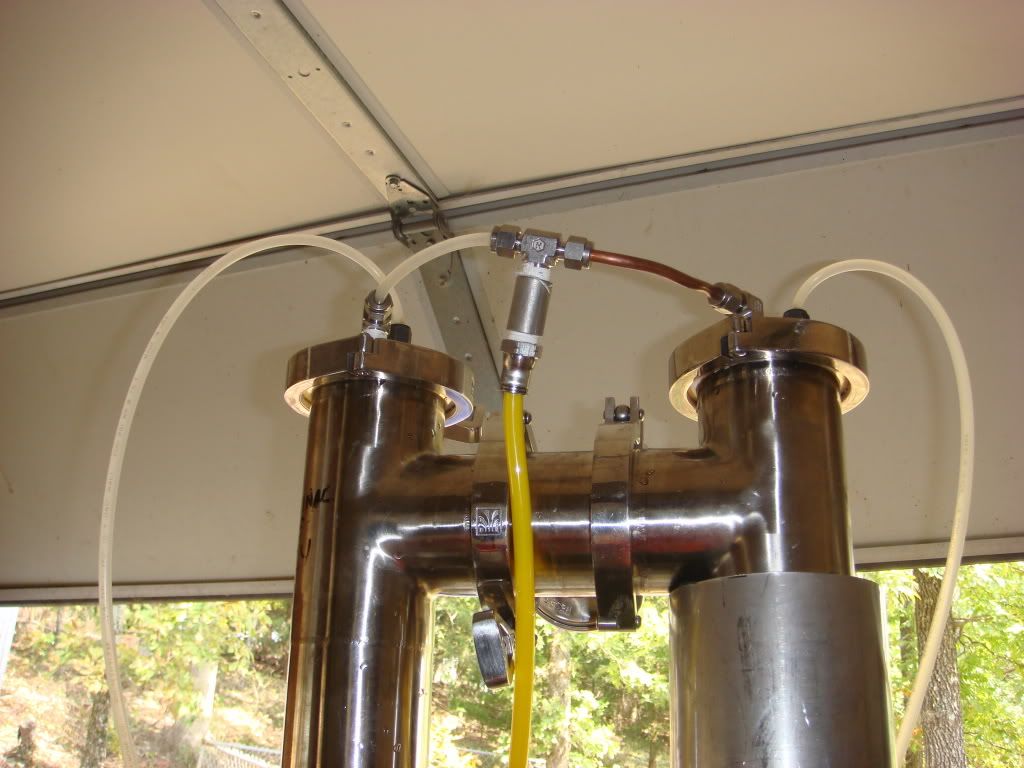
Here you can see the top of the column. I only have one condenser in right now. The yellow line is the output and the clear line is the input for the condenser. Also, you can see on the column on the left that it is insulated. It's some sort of closed cell foam wrapped in a sheet of SS.
http://i450.photobucket.com/albums/qq22 ... C01119.jpg" onclick="window.open(this.href);return false;" rel="nofollow
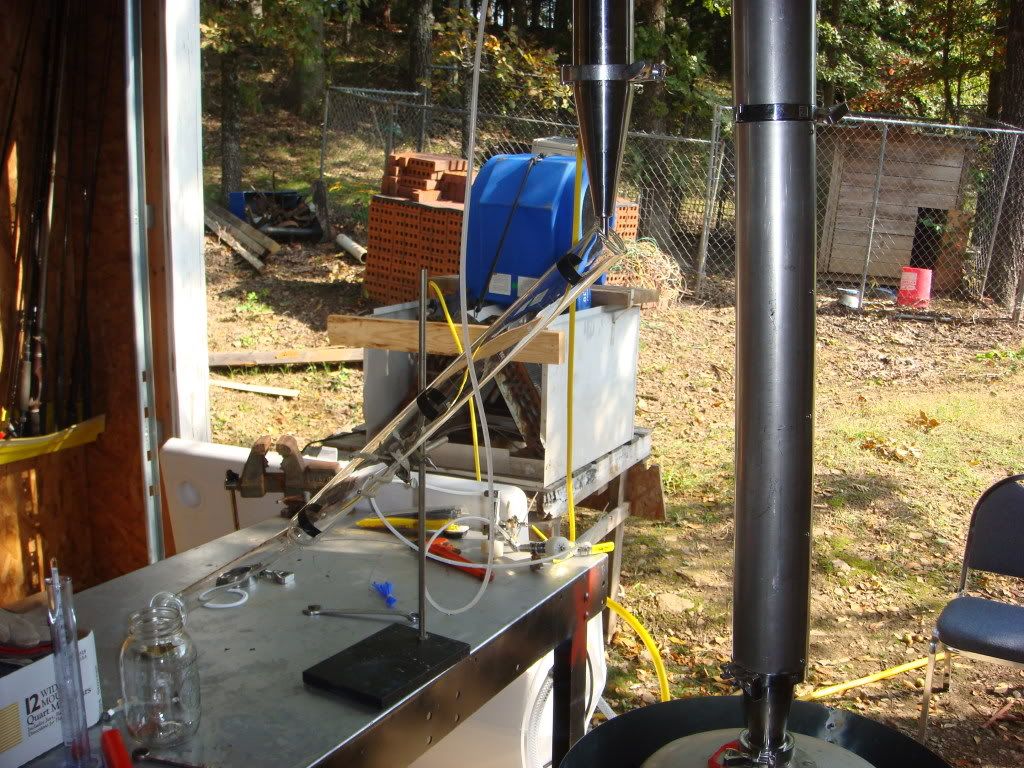
Here is just a shot from the inside of the shed. You can see the radiator and blower used to cool the water. The burette is really nice for collection.
http://i450.photobucket.com/albums/qq22 ... C01120.jpg" onclick="window.open(this.href);return false;" rel="nofollow
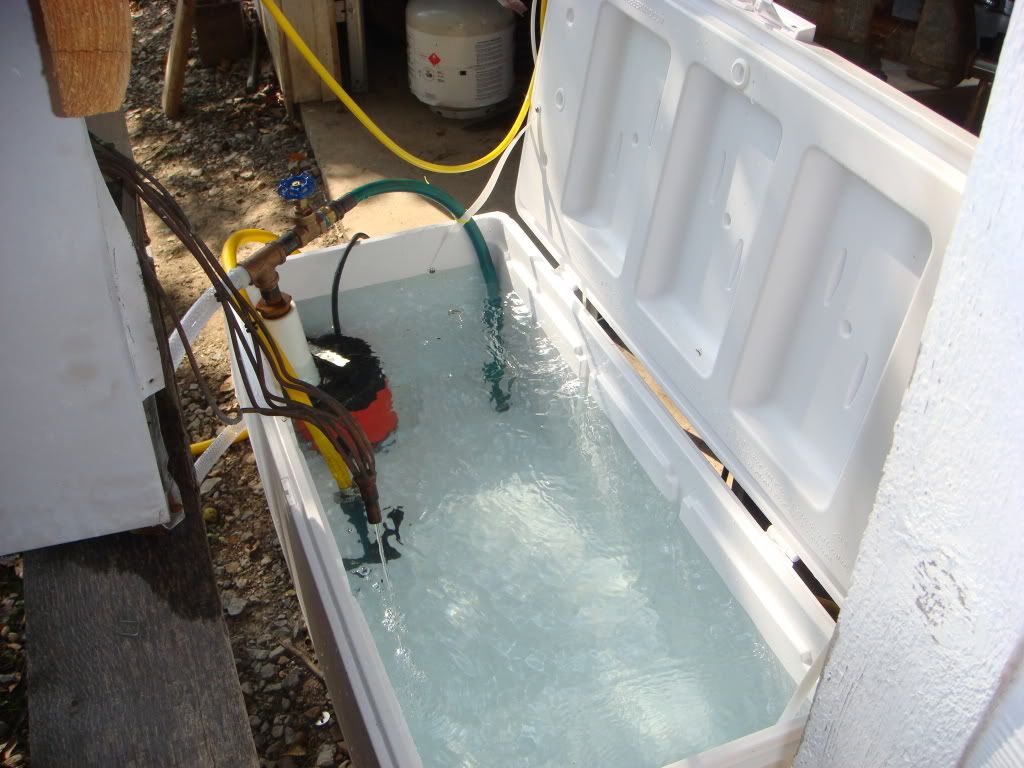
Here is the cooling water tank and the pump. The pump is a monster. It's something like 4,914 gallons per hour with a 9.5 meter head. The gate valve is for the back pressure relief.
http://i450.photobucket.com/albums/qq22 ... C01121.jpg" onclick="window.open(this.href);return false;" rel="nofollow
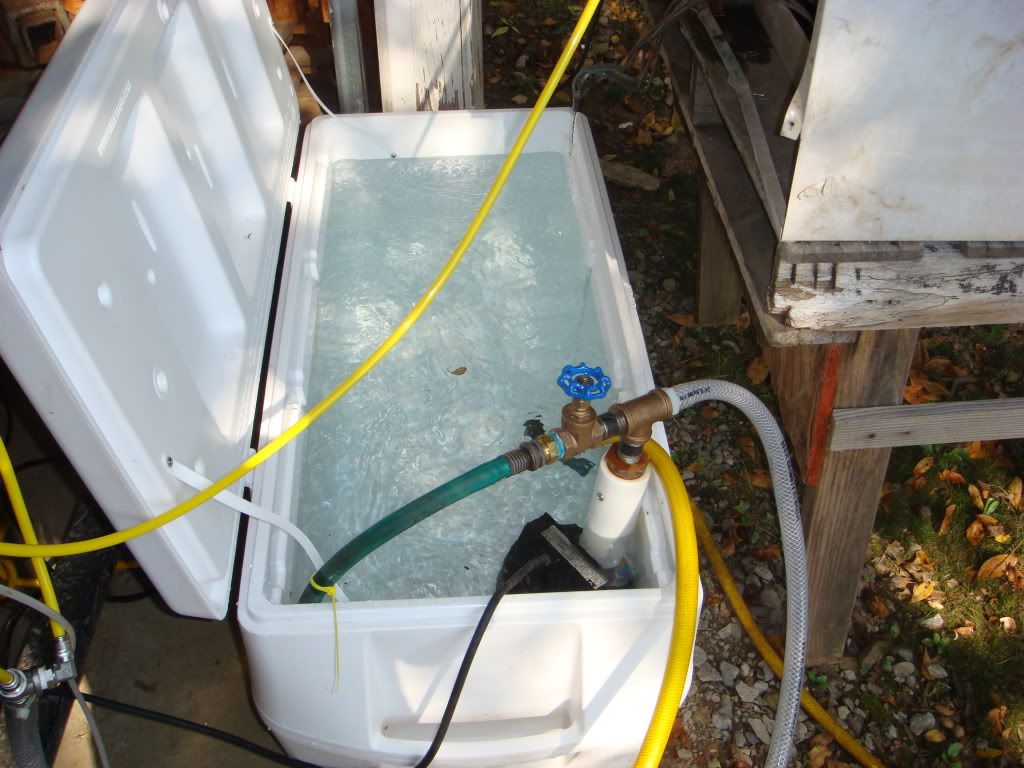
Here is just another angle, you can see the pump better. Also, you can barely see the stream of water coming out of the radiator.
http://i450.photobucket.com/albums/qq22 ... C01122.jpg" onclick="window.open(this.href);return false;" rel="nofollow
This is just a shot of the radiator.
http://i450.photobucket.com/albums/qq22 ... C01123.jpg" onclick="window.open(this.href);return false;" rel="nofollow
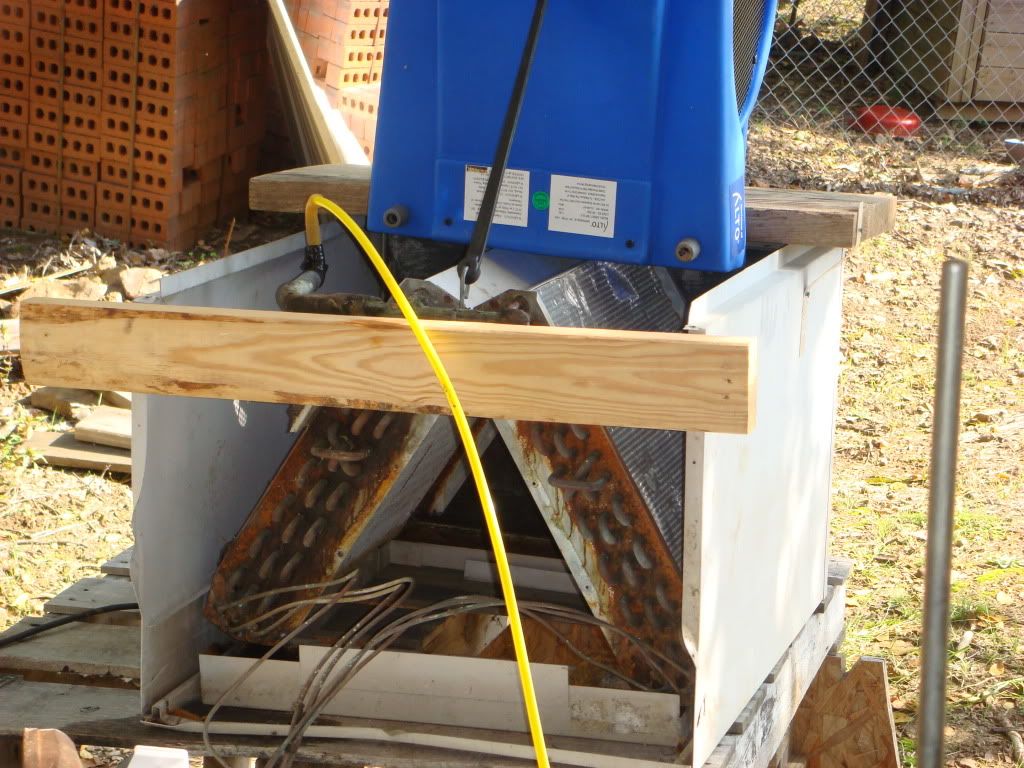
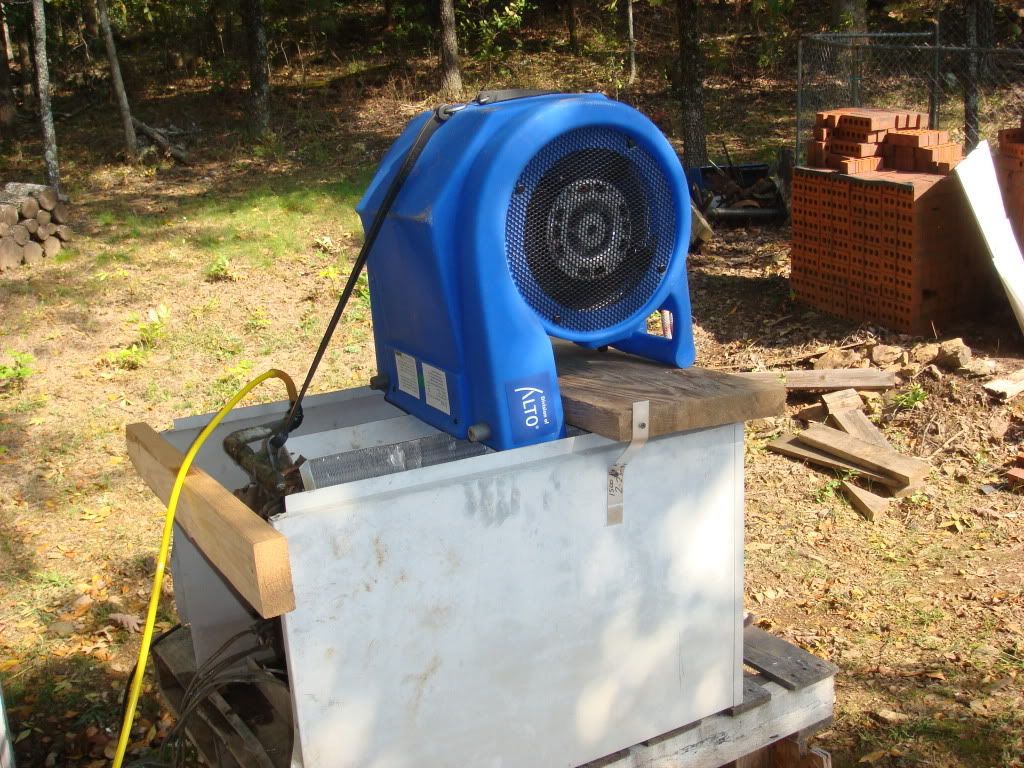
Here's the blower.
http://i450.photobucket.com/albums/qq22 ... C01124.jpg" onclick="window.open(this.href);return false;" rel="nofollow
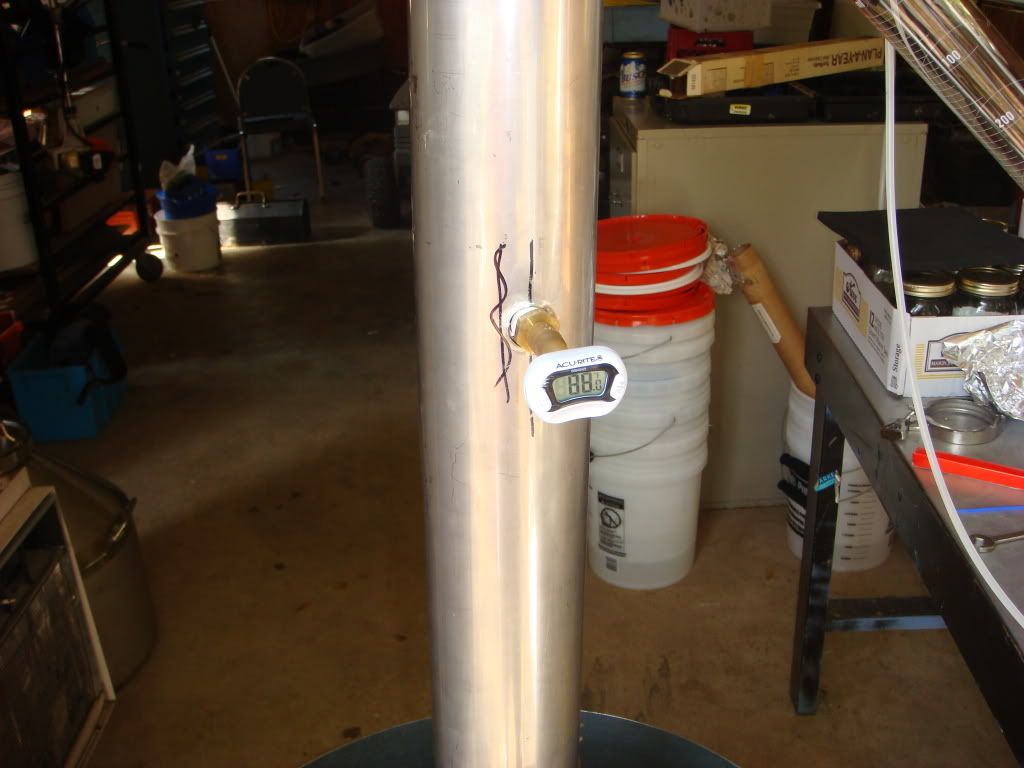
This is the thermometer in between the condensers.
http://i450.photobucket.com/albums/qq22 ... C01125.jpg" onclick="window.open(this.href);return false;" rel="nofollow
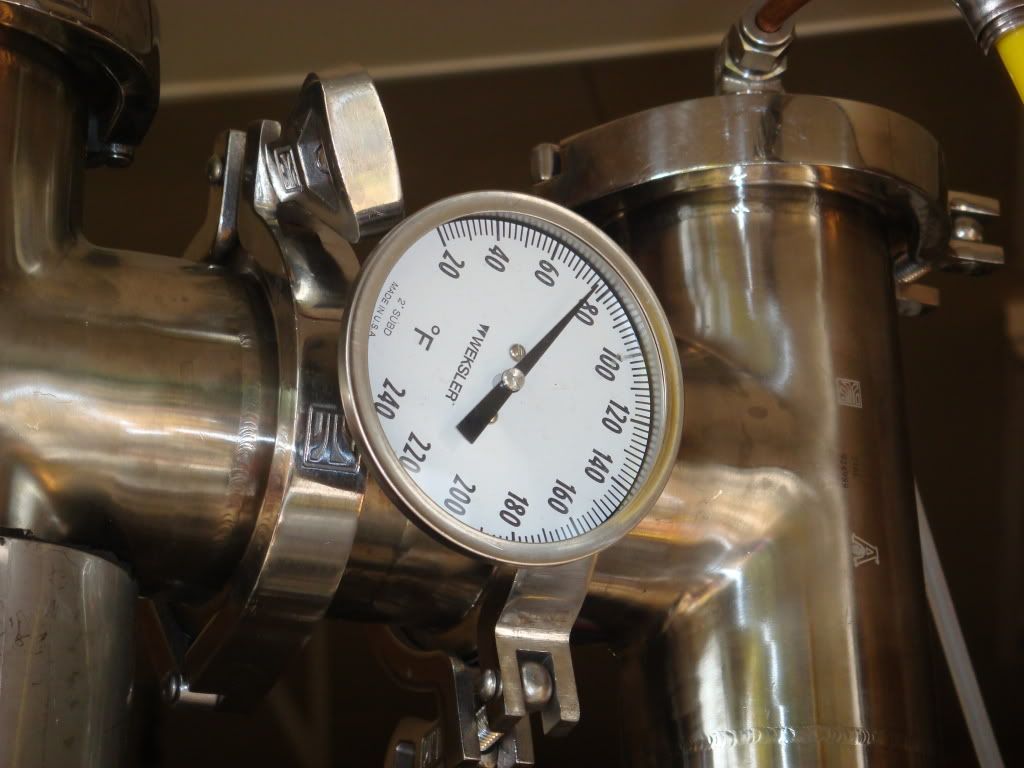
This is the thermometer in the column.
http://i450.photobucket.com/albums/qq22 ... C01126.jpg" onclick="window.open(this.href);return false;" rel="nofollow
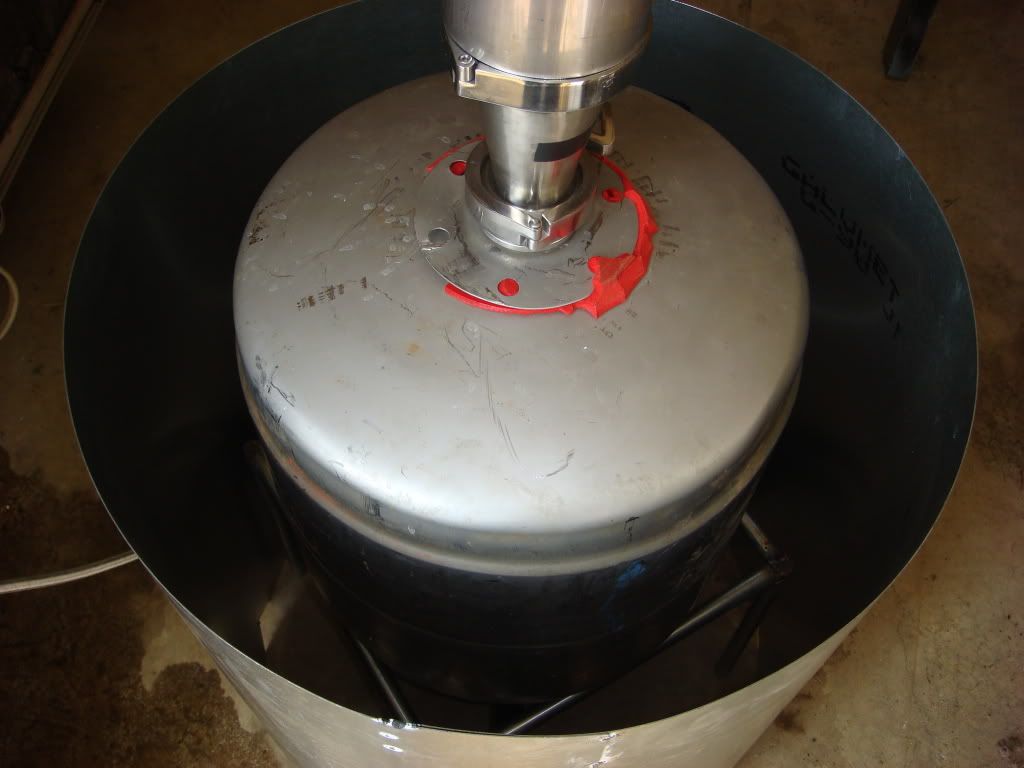
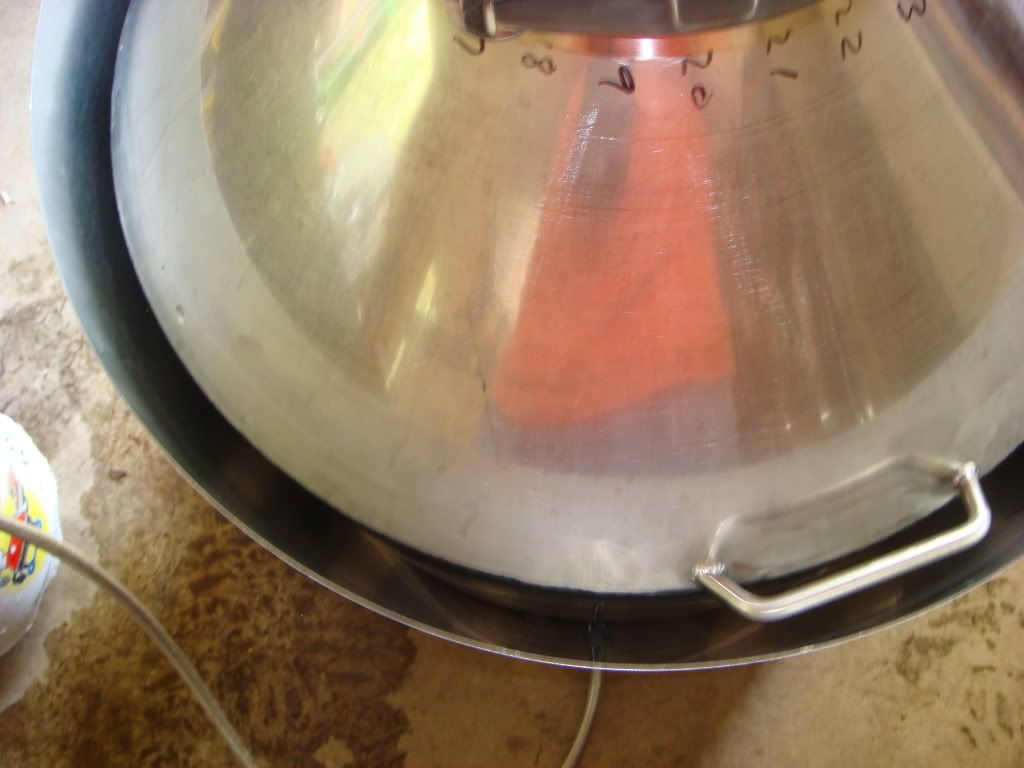
Here is my favorite part of this whole setup. This is the boiler that my dad made. It is very heavy duty SS. We estimate it to hold 28 gallons. The hole in the top is 8 inches, it's huge. This thing is awesome.
http://i450.photobucket.com/albums/qq22 ... C01127.jpg" onclick="window.open(this.href);return false;" rel="nofollow
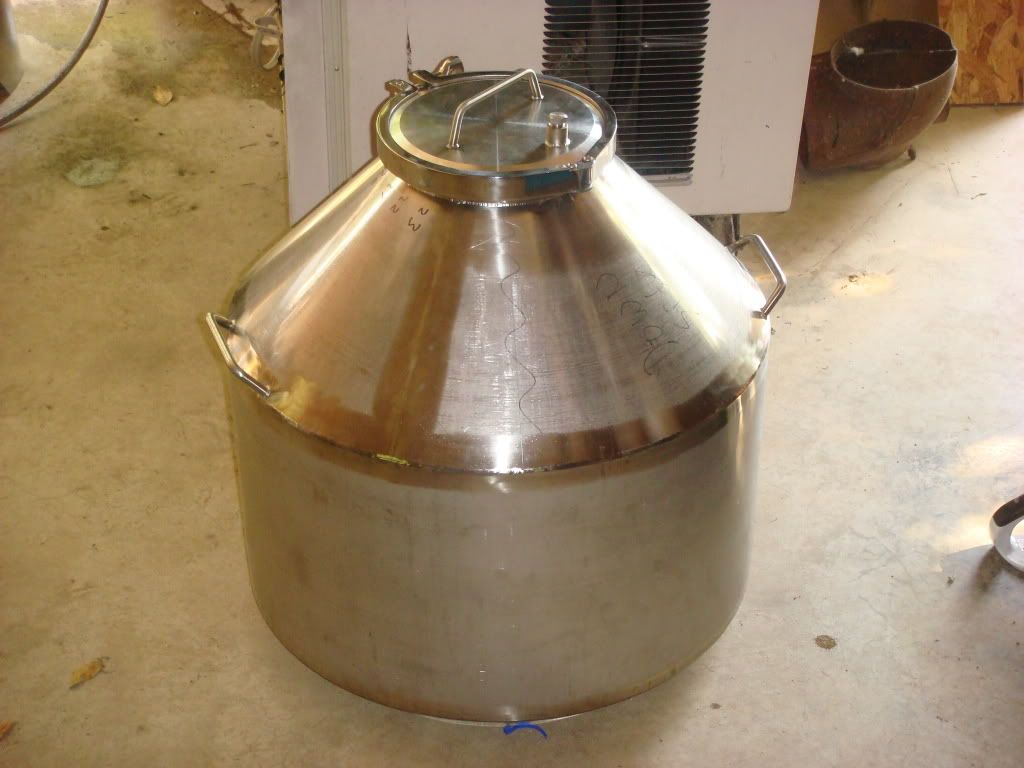
Here is a shot of the top of the boiler with the cap on.
http://i450.photobucket.com/albums/qq22 ... C01128.jpg" onclick="window.open(this.href);return false;" rel="nofollow
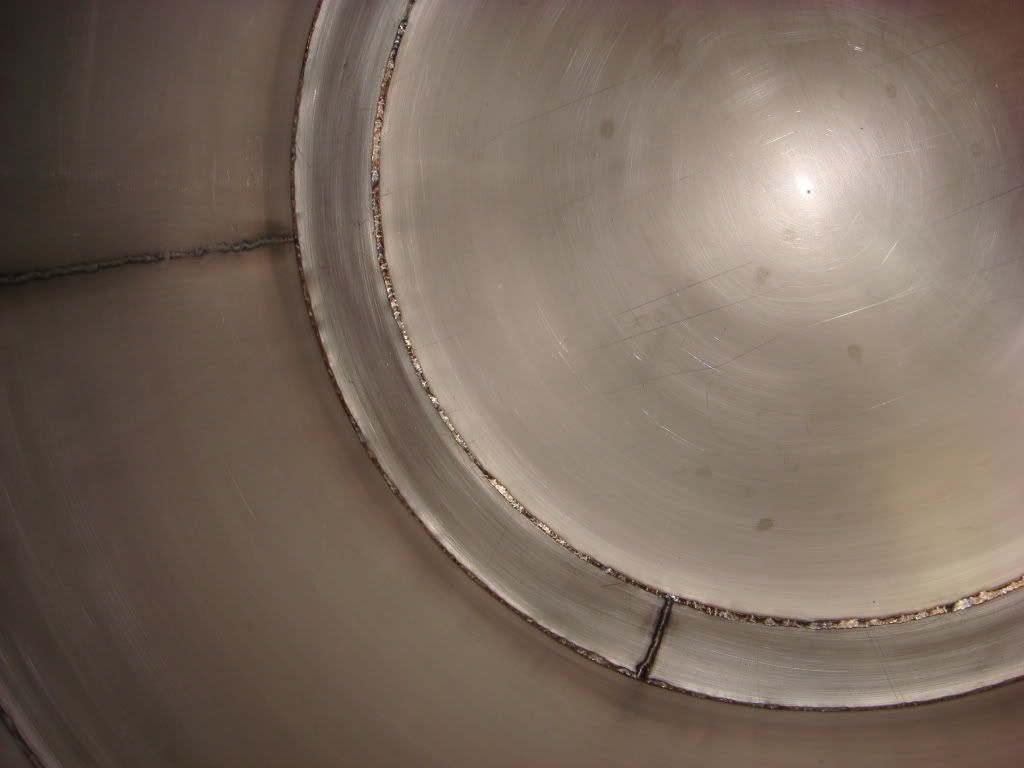
Here is a shot of the inside of the boiler. You'll notice that there are no 90 degree corners. This makes cleaning so much easier. I noticed when sanitizing it yesterday that I can take a squirt bottle and squirt right underneath the opening and the liquid will run smoothly all the way down the side of the boiler. You can hit every inch of the inside of this thing very easily.
http://i450.photobucket.com/albums/qq22 ... C01129.jpg" onclick="window.open(this.href);return false;" rel="nofollow
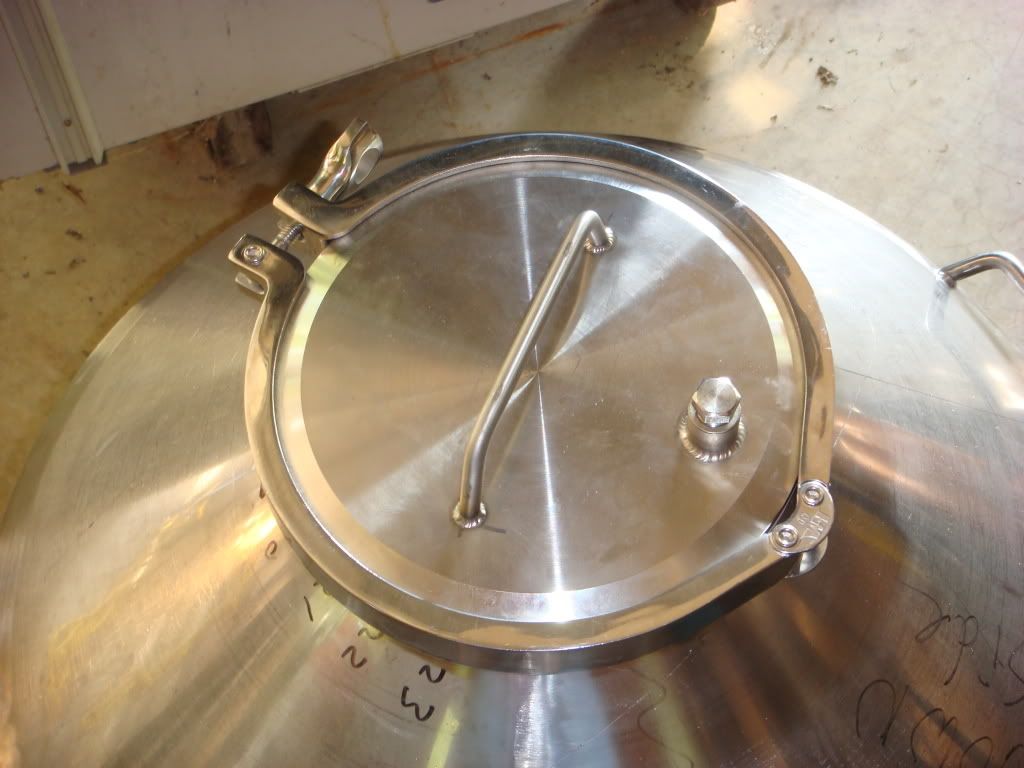
Here it is with the cap off.
http://i450.photobucket.com/albums/qq22 ... C01130.jpg" onclick="window.open(this.href);return false;" rel="nofollow

Here is a shot of the cooling control valves. There's a ball valve and a gate valve for each condenser.
http://i450.photobucket.com/albums/qq22 ... C01131.jpg" onclick="window.open(this.href);return false;" rel="nofollow
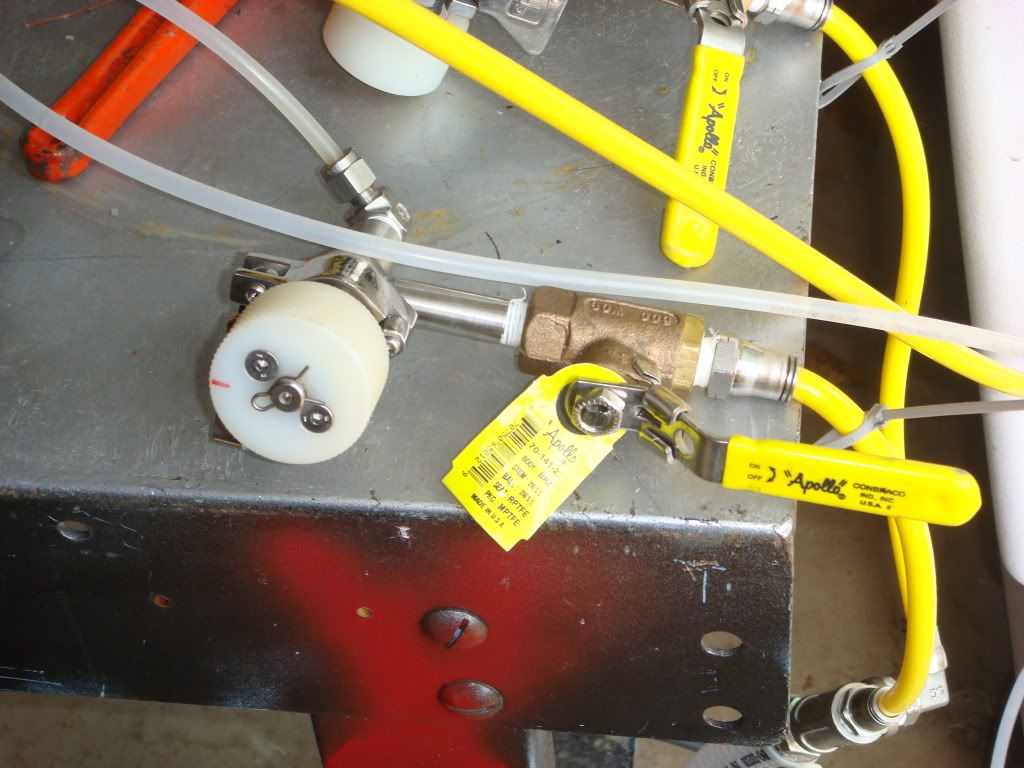
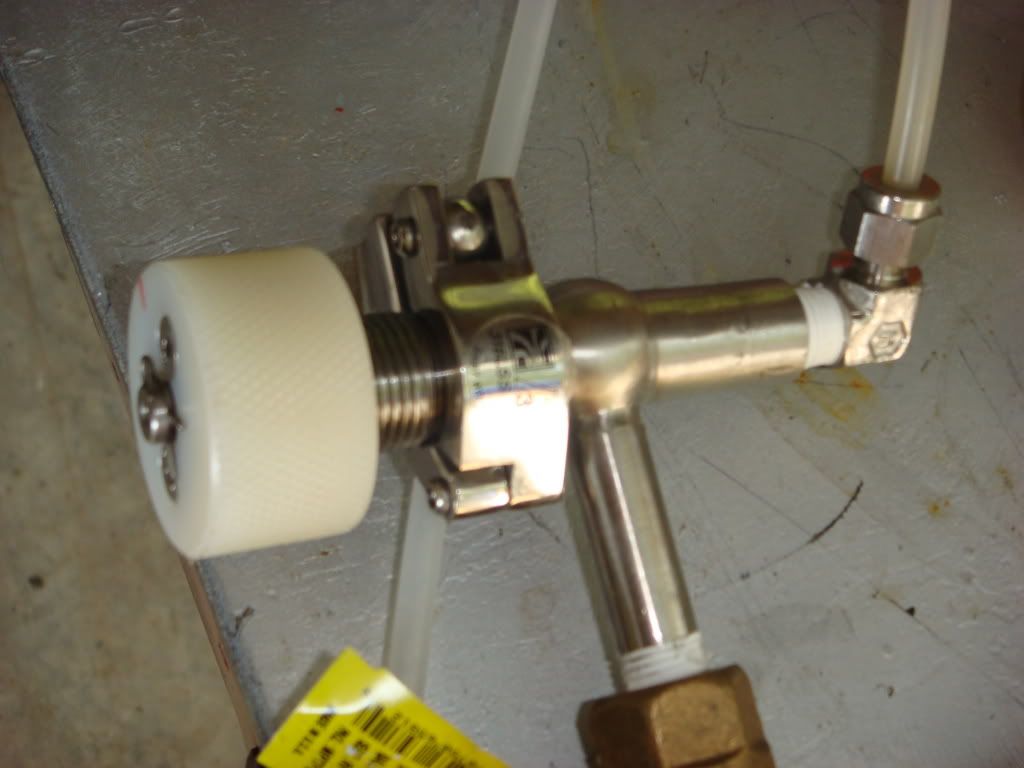
Here's a shot of the gate valve.
http://i450.photobucket.com/albums/qq22 ... C01132.jpg" onclick="window.open(this.href);return false;" rel="nofollow
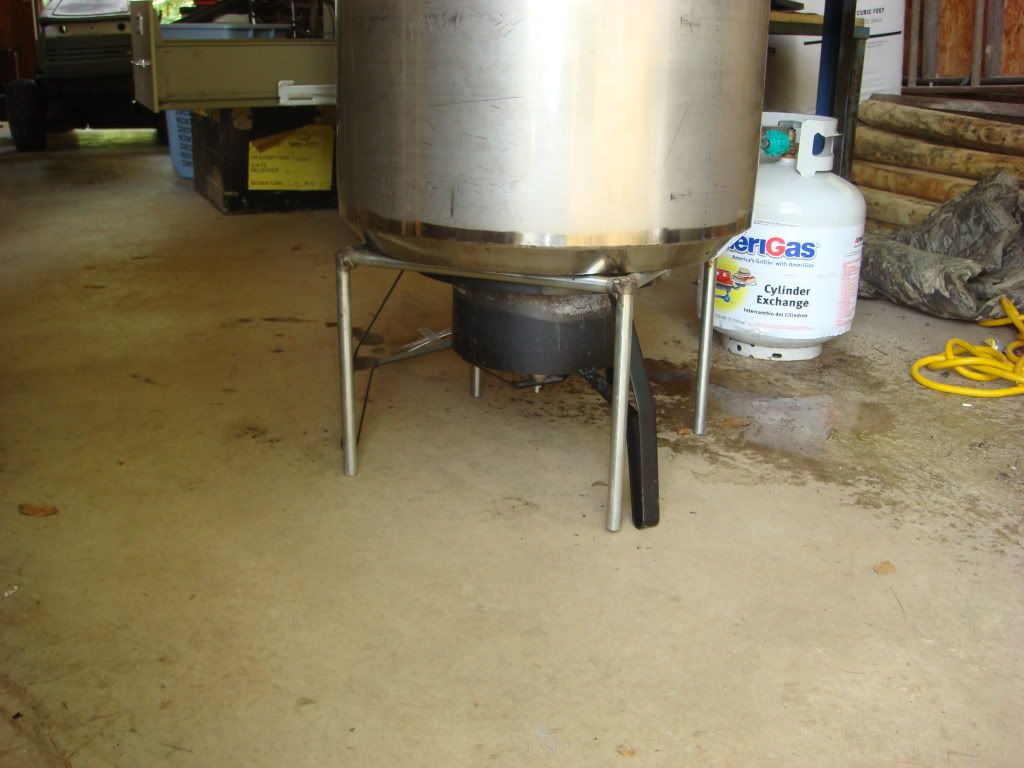
Here is the boiler sitting on the stand over the burner. The stand was made to make sure that the burner wasn't trying to support too much weight. The boiler by itself is pretty heavy, couple that with 20ish gallons of liquid and a heavy column and it gets pretty heavy fast.
http://i450.photobucket.com/albums/qq22 ... C01133.jpg" onclick="window.open(this.href);return false;" rel="nofollow
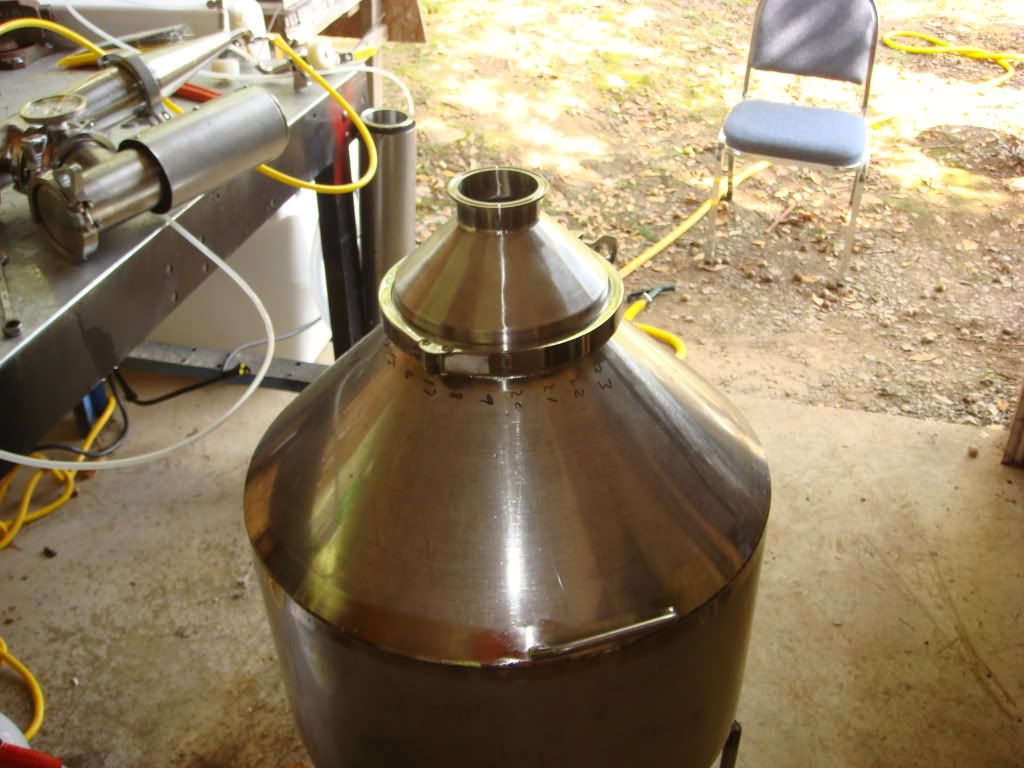
Here is a shot of the boiler with the 8 inch to 3 inch reducer.
http://i450.photobucket.com/albums/qq22 ... C01134.jpg" onclick="window.open(this.href);return false;" rel="nofollow

Another angle.
http://i450.photobucket.com/albums/qq22 ... C01135.jpg" onclick="window.open(this.href);return false;" rel="nofollow
Here is the whole thing assembled with the heat shield on. That's me in behind it, I'm setting up the burette.
http://i450.photobucket.com/albums/qq22 ... C01136.jpg" onclick="window.open(this.href);return false;" rel="nofollow
Another shot.
http://i450.photobucket.com/albums/qq22 ... C01137.jpg" onclick="window.open(this.href);return false;" rel="nofollow
And another.
http://i450.photobucket.com/albums/qq22 ... C01138.jpg" onclick="window.open(this.href);return false;" rel="nofollow
Here is another shot of the heat shield.
http://i450.photobucket.com/albums/qq22 ... C01139.jpg" onclick="window.open(this.href);return false;" rel="nofollow
And another.
http://i450.photobucket.com/albums/qq22 ... C01140.jpg" onclick="window.open(this.href);return false;" rel="nofollow

And one more.
http://i450.photobucket.com/albums/qq22 ... C01141.jpg" onclick="window.open(this.href);return false;" rel="nofollow
And here is a shot of the top of the column. You can see all of the water lines. You'll notice that one of the lines is copper. We changed that one from polyethylene to copper because that one gets extremely hot. When we were distilling water that line would have bubbles of steam running through it. It probably wasn't necessary, but oh well.
http://i450.photobucket.com/albums/qq22 ... C01142.jpg" onclick="window.open(this.href);return false;" rel="nofollow
A few notes. One thing is the new boiler works so much better than that stupid keg does. It took way less time to boil the liquid with the new boiler versus the keg. I also had to use way less heat. Also, cleaning the new boiler is tremendously easier than cleaning the keg.
Also, it was boiling in spurts very badly. I think I'm going to get some SS chain to put in the boiler. I didn't ever have that problem with the keg.
Ok, I have a bunch of new pics from yesterday. I ended up doing a small stripping run (that's why I was using the smaller boiler) and then a full reflux run. It turned out much better this time. I ended up getting some very neutral stuff. I couldn't ever get above 93%, though. I think I need to add more column height. I would have done that yesterday, but I don't have enough packing right now, time to order more.
Here you can see the smaller boiler sitting in the heat shield and on top of the boiler and the stand.
http://i450.photobucket.com/albums/qq22 ... C01118.jpg" onclick="window.open(this.href);return false;" rel="nofollow
Here you can see the top of the column. I only have one condenser in right now. The yellow line is the output and the clear line is the input for the condenser. Also, you can see on the column on the left that it is insulated. It's some sort of closed cell foam wrapped in a sheet of SS.
http://i450.photobucket.com/albums/qq22 ... C01119.jpg" onclick="window.open(this.href);return false;" rel="nofollow
Here is just a shot from the inside of the shed. You can see the radiator and blower used to cool the water. The burette is really nice for collection.
http://i450.photobucket.com/albums/qq22 ... C01120.jpg" onclick="window.open(this.href);return false;" rel="nofollow
Here is the cooling water tank and the pump. The pump is a monster. It's something like 4,914 gallons per hour with a 9.5 meter head. The gate valve is for the back pressure relief.
http://i450.photobucket.com/albums/qq22 ... C01121.jpg" onclick="window.open(this.href);return false;" rel="nofollow
Here is just another angle, you can see the pump better. Also, you can barely see the stream of water coming out of the radiator.
http://i450.photobucket.com/albums/qq22 ... C01122.jpg" onclick="window.open(this.href);return false;" rel="nofollow
This is just a shot of the radiator.
http://i450.photobucket.com/albums/qq22 ... C01123.jpg" onclick="window.open(this.href);return false;" rel="nofollow
Here's the blower.
http://i450.photobucket.com/albums/qq22 ... C01124.jpg" onclick="window.open(this.href);return false;" rel="nofollow
This is the thermometer in between the condensers.
http://i450.photobucket.com/albums/qq22 ... C01125.jpg" onclick="window.open(this.href);return false;" rel="nofollow
This is the thermometer in the column.
http://i450.photobucket.com/albums/qq22 ... C01126.jpg" onclick="window.open(this.href);return false;" rel="nofollow
Here is my favorite part of this whole setup. This is the boiler that my dad made. It is very heavy duty SS. We estimate it to hold 28 gallons. The hole in the top is 8 inches, it's huge. This thing is awesome.
http://i450.photobucket.com/albums/qq22 ... C01127.jpg" onclick="window.open(this.href);return false;" rel="nofollow
Here is a shot of the top of the boiler with the cap on.
http://i450.photobucket.com/albums/qq22 ... C01128.jpg" onclick="window.open(this.href);return false;" rel="nofollow
Here is a shot of the inside of the boiler. You'll notice that there are no 90 degree corners. This makes cleaning so much easier. I noticed when sanitizing it yesterday that I can take a squirt bottle and squirt right underneath the opening and the liquid will run smoothly all the way down the side of the boiler. You can hit every inch of the inside of this thing very easily.
http://i450.photobucket.com/albums/qq22 ... C01129.jpg" onclick="window.open(this.href);return false;" rel="nofollow
Here it is with the cap off.
http://i450.photobucket.com/albums/qq22 ... C01130.jpg" onclick="window.open(this.href);return false;" rel="nofollow
Here is a shot of the cooling control valves. There's a ball valve and a gate valve for each condenser.
http://i450.photobucket.com/albums/qq22 ... C01131.jpg" onclick="window.open(this.href);return false;" rel="nofollow
Here's a shot of the gate valve.
http://i450.photobucket.com/albums/qq22 ... C01132.jpg" onclick="window.open(this.href);return false;" rel="nofollow
Here is the boiler sitting on the stand over the burner. The stand was made to make sure that the burner wasn't trying to support too much weight. The boiler by itself is pretty heavy, couple that with 20ish gallons of liquid and a heavy column and it gets pretty heavy fast.
http://i450.photobucket.com/albums/qq22 ... C01133.jpg" onclick="window.open(this.href);return false;" rel="nofollow
Here is a shot of the boiler with the 8 inch to 3 inch reducer.
http://i450.photobucket.com/albums/qq22 ... C01134.jpg" onclick="window.open(this.href);return false;" rel="nofollow
Another angle.
http://i450.photobucket.com/albums/qq22 ... C01135.jpg" onclick="window.open(this.href);return false;" rel="nofollow
Here is the whole thing assembled with the heat shield on. That's me in behind it, I'm setting up the burette.
http://i450.photobucket.com/albums/qq22 ... C01136.jpg" onclick="window.open(this.href);return false;" rel="nofollow
Another shot.
http://i450.photobucket.com/albums/qq22 ... C01137.jpg" onclick="window.open(this.href);return false;" rel="nofollow
And another.
http://i450.photobucket.com/albums/qq22 ... C01138.jpg" onclick="window.open(this.href);return false;" rel="nofollow
Here is another shot of the heat shield.
http://i450.photobucket.com/albums/qq22 ... C01139.jpg" onclick="window.open(this.href);return false;" rel="nofollow
And another.
http://i450.photobucket.com/albums/qq22 ... C01140.jpg" onclick="window.open(this.href);return false;" rel="nofollow
And one more.
http://i450.photobucket.com/albums/qq22 ... C01141.jpg" onclick="window.open(this.href);return false;" rel="nofollow
And here is a shot of the top of the column. You can see all of the water lines. You'll notice that one of the lines is copper. We changed that one from polyethylene to copper because that one gets extremely hot. When we were distilling water that line would have bubbles of steam running through it. It probably wasn't necessary, but oh well.
http://i450.photobucket.com/albums/qq22 ... C01142.jpg" onclick="window.open(this.href);return false;" rel="nofollow
A few notes. One thing is the new boiler works so much better than that stupid keg does. It took way less time to boil the liquid with the new boiler versus the keg. I also had to use way less heat. Also, cleaning the new boiler is tremendously easier than cleaning the keg.
Also, it was boiling in spurts very badly. I think I'm going to get some SS chain to put in the boiler. I didn't ever have that problem with the keg.
-
punkin
- Master of Distillation
- Posts: 2711
- Joined: Fri Oct 05, 2007 12:36 pm
- Location: Northern NSW Oz Trail Ya
Re: Thoughts on my reflux column design.
Some nice work there mate, just one suggestion though, if you get y'self a plastic tank and run it from the rain water from your roof, you'll be able to dispense with that whole big cooling setup. My tank is 500l outside linked to anmother 100 inside and i can run the still (both stills actually) all day without having to worry about water temp. Even if you got 4 or 5 of those 55 gal blue plastic drums and linked em together, that's 1000 l closed system then.
Good looking setup though, wish i had that boiler.
AVeryJealousPunkin
Good looking setup though, wish i had that boiler.
AVeryJealousPunkin
Re: Thoughts on my reflux column design.
Very nice work on the boiler and column. Cooling system seems a bit over-engineered, but if it works, that's what counts.
If you go back into photobucket and reduce your pics to about 75%, they should fit better.
If you go back into photobucket and reduce your pics to about 75%, they should fit better.
It is the very things that we think we know, that keep us from learning what we should know.
Valved Reflux, 3"x54" Bok 'mini', 2 liebig based pots and the 'Blockhead' 60K btu propane heat
Valved Reflux, 3"x54" Bok 'mini', 2 liebig based pots and the 'Blockhead' 60K btu propane heat
-
new_moonshiner
- Trainee
- Posts: 964
- Joined: Sun Jan 21, 2007 7:15 am
Re: Thoughts on my reflux column design.
Excellent Job !!! looks like lots of pride and hard work went into this one .. and it shows... little heavy on the cooling system , but like already stated if it works for you then go with it ...
Re: Thoughts on my reflux column design.
Very Nice work, looks Excellent..
Looks like you have a fair bit of room there and it looks green in your are..
if i had the room i wood go with punkins sugestion on the 44's for cooling water..
if you are still set on useing the air coolers i would go with a car radiator with thermo fans, i used a refrigiration radiator but found it had to much back presure.
i tried somthing similar to your head designe except my output was a liberg condensor, the problem i had with the reflux condensor was that it was to dificult to control reflux accuratly, because regardles of how small i made the reflux condensor the vapor would get sucked back to reflux due to low presure caused by condensation, i over came this by recirculating hot condensor water through the reflux condensor, eventualy i just filed the reflux condensor with cold water and ice this caused 100% reflux for a few minutes and as the ice melted and the water reached 82 deg C it would maintain reflux ocasionaly toping it up with water, then i changed it to liquid managed setup. this could be why you cant hit 95% not that it matter that much 93% is still good.
reflux sugestions you can try:
1. i noticed you were running cold water to the reflux coil, try circulating the hot output from your condensor to the input of your reflux with valve on reflux to controll speed of circulation.
your column is setup to be easily adapted for difrent configurations.
2. try making the bokakob inline head
http://homedistiller.org/forum/viewtopi ... it=bokakob
this is a good designe with good simple control of reflux.
also what are you useing for packing?
cheers
excellent work...
-
chunkystyles
- Novice
- Posts: 55
- Joined: Mon Aug 04, 2008 7:36 am
- Location: Arkansas
Re: Thoughts on my reflux column design.
I like the rainwater idea. I will have to talk to my uncle since it is his shop. It may be difficult to do with a high pitched roof.decoy wrote:Looks like you have a fair bit of room there and it looks green in your are..
if i had the room i wood go with punkins sugestion on the 44's for cooling water..
The radiator that we have is working great and it was free. It takes the water from 150f + to ambient with no problems.if you are still set on useing the air coolers i would go with a car radiator with thermo fans, i used a refrigiration radiator but found it had to much back presure.
This hasn't been a problem. The reflux is quite easily adjustable. Actually, the only problem I've really been having with adjusting has been my propane. Since I got the new boiler and the heat shield that fits it so well, any tiny adjustment to the propane makes a big difference. Once I get that situated, the controlling of the water flow to the reflux changes the output very easily. The change is fairly quick to produce noticeable results.i tried somthing similar to your head designe except my output was a liberg condensor, the problem i had with the reflux condensor was that it was to dificult to control reflux accuratly, because regardles of how small i made the reflux condensor the vapor would get sucked back to reflux due to low presure caused by condensation, i over came this by recirculating hot condensor water through the reflux condensor, eventualy i just filed the reflux condensor with cold water and ice this caused 100% reflux for a few minutes and as the ice melted and the water reached 82 deg C it would maintain reflux ocasionaly toping it up with water, then i changed it to liquid managed setup. this could be why you cant hit 95% not that it matter that much 93% is still good.
I think it would be much easier to change it over to a VM still. If I do any changing, that is what I will be shooting for. I've also been thinking about maybe moving up to 4" or 5" tubing since I have far more heating than my current setup can handle.your column is setup to be easily adapted for difrent configurations.
2. try making the bokakob inline head
http://homedistiller.org/forum/viewtopi ... it=bokakob
this is a good designe with good simple control of reflux.
I'm using 60ft of copper mesh. I'm gonna order some more because I have 2 1ft sections that I can add to my column. I think that would probably get me up to 95%.also what are you useing for packing?
-
chunkystyles
- Novice
- Posts: 55
- Joined: Mon Aug 04, 2008 7:36 am
- Location: Arkansas
Re: Thoughts on my reflux column design.
Well, I'm back. I haven't been distilling anything for almost a year now. Life has kinda gotten in the way.
Anyway, I've decided to make a new head for this still. I'm pretty sure that I want to go with LM since I'm still very inexperienced and it seems to be the easiest to use. Since my still is all modular it will be really easy to make a new head and still be able to use almost everything else that I have.
I should have some more news in the coming weeks/months.
Re: Thoughts on my reflux column design.
LM works fine. But VM is generally regarded as being the easiest basic design to run that we currently have.
Be safe.
Be discreet.
And have fun.
Be discreet.
And have fun.
-
chunkystyles
- Novice
- Posts: 55
- Joined: Mon Aug 04, 2008 7:36 am
- Location: Arkansas
Re: Thoughts on my reflux column design.
Easier than LM, really?HookLine wrote:LM works fine. But VM is generally regarded as being the easiest basic design to run that we currently have.
Re: Thoughts on my reflux column design.
Yup. Columns don't get much easier to run than a VM.
Be safe.
Be discreet.
And have fun.
Be discreet.
And have fun.
-
chunkystyles
- Novice
- Posts: 55
- Joined: Mon Aug 04, 2008 7:36 am
- Location: Arkansas
Re: Thoughts on my reflux column design.
I understand the principals behind CM and LM and how they work. I don't quite understand VM. From the diagrams that I have seen the reflux condenser sits higher than the valve that controls the vapor. What is it that causes the vapors to go out through the side rather than just straight up to the reflux condenser?
Re: Thoughts on my reflux column design.
See this post, it should help...chunkystyles wrote:I understand the principals behind CM and LM and how they work. I don't quite understand VM. From the diagrams that I have seen the reflux condenser sits higher than the valve that controls the vapor. What is it that causes the vapors to go out through the side rather than just straight up to the reflux condenser?
-
chunkystyles
- Novice
- Posts: 55
- Joined: Mon Aug 04, 2008 7:36 am
- Location: Arkansas
Re: Thoughts on my reflux column design.
I had read that post but didn't see the link to the other thread where it was explained.
This cleared it up for me. Thanks.Ethanol vapour above about 50% strength is denser (heavier) than air, and so wants to fall. It will prefer to go into the product arm and fall down into the product condenser, rather than rise to the reflux coil.
Re: Thoughts on my reflux column design.
chunky, good to see youre back. didnt like the thought of that beautiful rig collecting dust.
Good friends, good drink, good food, ...
Three foot bokakob slant plate LM reflux column atop a propane fired half barrel boiler
Three foot bokakob slant plate LM reflux column atop a propane fired half barrel boiler
-
chunkystyles
- Novice
- Posts: 55
- Joined: Mon Aug 04, 2008 7:36 am
- Location: Arkansas
Re: Thoughts on my reflux column design.
Haha, thanks. I hate to see it not get used myself. If only I could keep and use it at my house and if only I could have more time in which to do it.
-
chunkystyles
- Novice
- Posts: 55
- Joined: Mon Aug 04, 2008 7:36 am
- Location: Arkansas
Re: Thoughts on my reflux column design.
Ok, I have a few questions about turning my still into a VM still. Since I have a 3" column, how big does the valve need to be? The connection from the column to the product condenser is also 3". I talked to my dad and the valves that he can get in that size are ridiculously big and heavy, like 50 pounds. That seems like overkill of the highest level. He said he could make a butterfly valve but that it would probably only be able to close about 95%. I told him that I was almost certain that that would not work. At this point the only idea that I have is to make a reducer to go to a smaller valve, but I'm wondering how small would be too small? With a 3" column, would a 1" valve work?
Re: Thoughts on my reflux column design.
Yes. But read on...chunkystyles wrote:With a 3" column, would a 1" valve work?
The critical feature is the ratio of the cross-sectional-areas of the column and take-off port, as this sets the minimum reflux ratio for a VM column. You can quickly reduce the size of the take-off arm after the take-off port, and in fact that is what almost everybody does.
For a 3" column, a 2" take-off port would work well. (Gives a reflux ratio of 2.25:1.)
From there go through a 2" x 90º bend down, then reduce it straight away down to 1/2", through a 1/2" gate or ball valve (preferably stainless), and finally into a Liebig condenser.
Be safe.
Be discreet.
And have fun.
Be discreet.
And have fun.
-
chunkystyles
- Novice
- Posts: 55
- Joined: Mon Aug 04, 2008 7:36 am
- Location: Arkansas
Re: Thoughts on my reflux column design.
Ok, there are quite a few pictures of my still in this thread but here I've attached a very rough diagram of it.
The way that my still is made is it is all 3" stainless with ferrules. Each condenser has it's own T and all of the openings on that T are 3 inches. As far as I can tell, the only way to setup VM on this still without heavy modification/rebuilding would be to just do a 3" to 1" reducer to a 1" gate valve and then another 3" to 1" reducer to connect the two Ts.
I can't seem to find much information on VM stills here. If you know where I can find more information I would love to read up more on them.
Let me know if my second diagram looks like it would work ok.
- Attachments
-
- current.GIF (3.03 KiB) Viewed 4478 times
-
- vm.GIF (3.89 KiB) Viewed 4475 times