My New Condensor

Anything cooling/condenser related.

Moderator: Site Moderator

punkin
Master of Distillation
Posts: 2711
Joined: Fri Oct 05, 2007 12:36 pm
Location: Northern NSW Oz Trail Ya

My New Condensor

Post by punkin »

That's the trouble with off topic posting, can't find the thread where i asked about putting a coil in a condensor, to have Pint draw me a neat idea for a tube condensor... :oops:

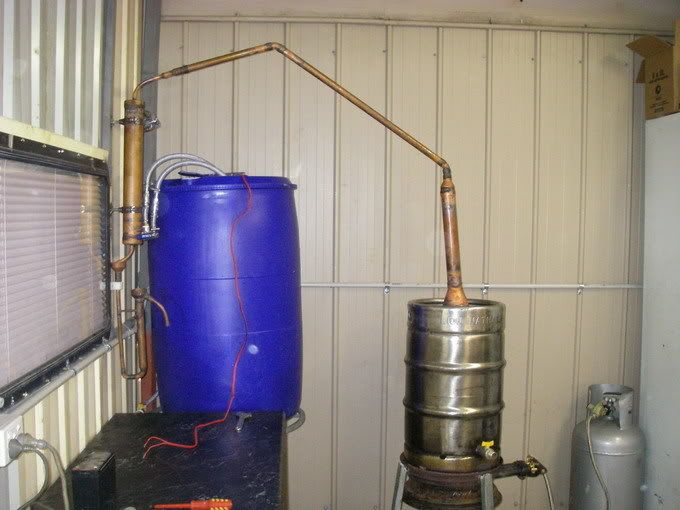
He didn't think it'd be an easy build, but i've made a start, and took some VERY bad pictures. In this case my piccies ARE worth a thousand words, cause thats how long it'll take for me to explain what you're looking at.... :oops: :roll:
If someone with a better memory than me ( or pint himself) could post that beautiful drawing he did might help people understand what i'm trying to accomplish

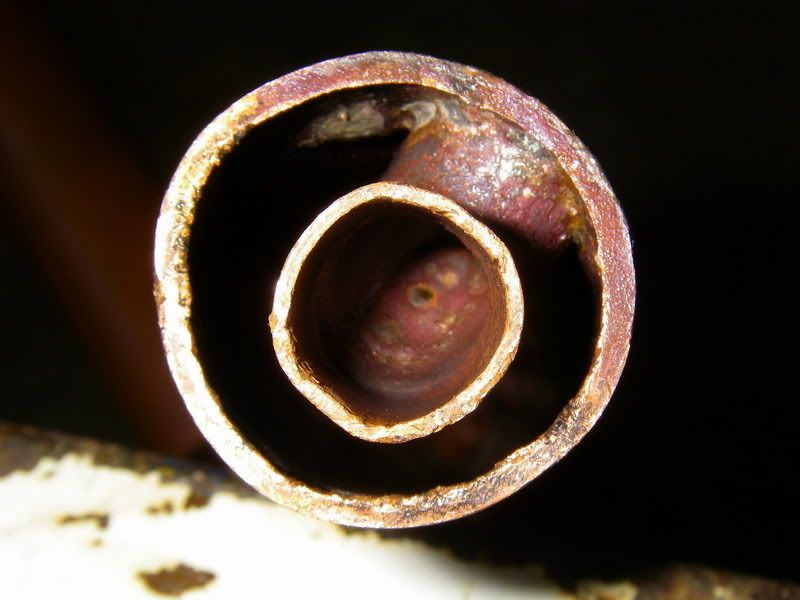
Piccie #1 shows looking down the top of a piece of inch and a quarter pipe.
I've drilled a hole in the pipe and soldered a cut down 90 degree 1/2 inch elbow on the inside close to the top.

I did the same thing on the bottom of the pipe

Image

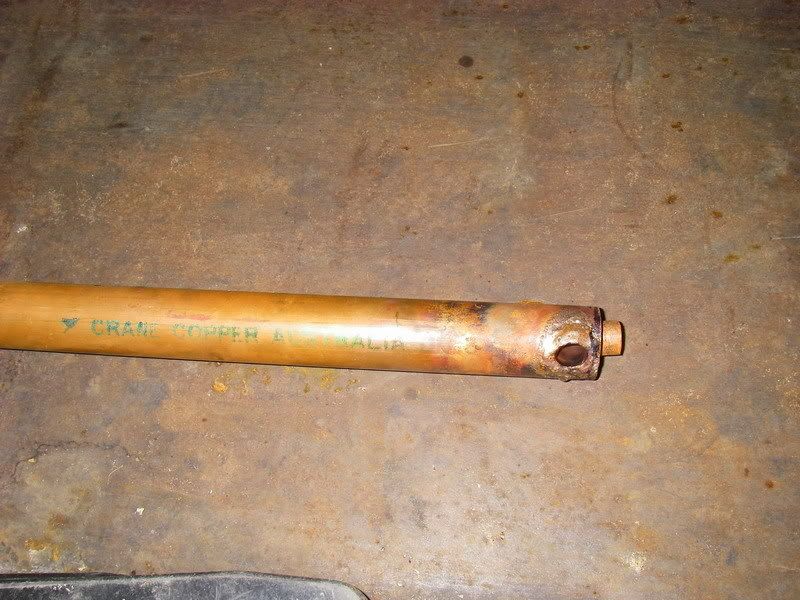
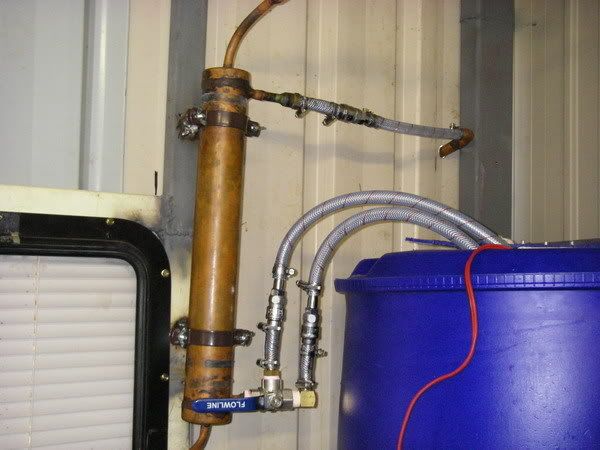
Piccie #2 shows a side on view, this is where the distillate vapour will enter the condensor and where the condensate will exit on the bottom

Image

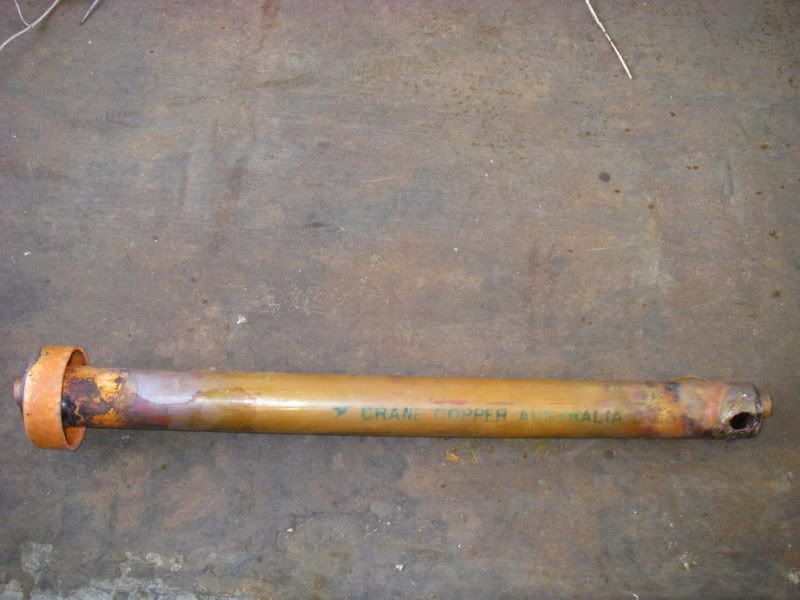
Piccie #3 shows fitting the cap thats explained in the next bit

Image


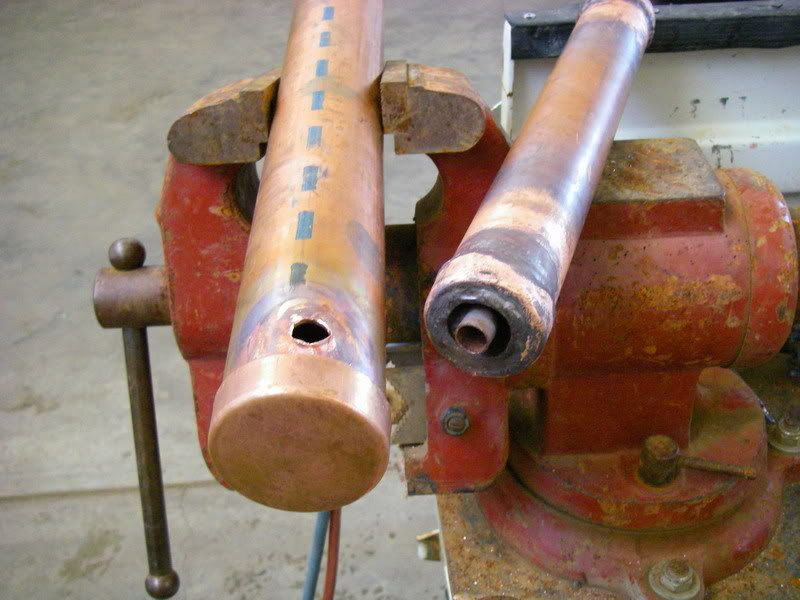
Piccie #4 shows the same bit of 1-1/4, inserted in a pice of two inch pipe. The two inch has a cap pushed on the top thats drilled out to 1&3/4 and soldered on (one at each end) to form a tube, with the elbows leading into it.

Image

Piccie #5 shows the piece of 65mm tube that is the outside shell of the condensor. You can see where i have branch formed a tee into the top and bottom outside of the pipe ready for the stubs to connect cooling lines.
I still need to drill or form 1/2 inch holes in the top caps for the distillate vapour to enter (joined to the center tunnel) and exit at the bottom.


Image


I know i've done a bastard job at trying to photograph and explain it, but i'm hoping someone will post the original drawing to help. :oops:

I think it'll be heavy, i'm hoping it'll be efficient, and it's definately short (which was the objective) at about 480mm (19 inches) long.

Any opinions or comments for improvement before i finnish soldering?

One thing i am wondering about is whether to have the inlet and oultet for the cooloing water poking in a bit to encourage the water to go up the inside of the tube as well as up the outside?
HookLine
retired
Posts: 5628
Joined: Sun May 13, 2007 8:38 am
Location: OzLand

Post by HookLine »

Is this the design you are talking about? I don't know who did this drawing, I just picked it up somewhere on the net.

http://i152.photobucket.com/albums/s197 ... ngHead.jpg" onclick="window.open(this.href);return false;" rel="nofollow

EDIT: Apparently not the same design!
Be safe.
Be discreet.
And have fun.
punkin
Master of Distillation
Posts: 2711
Joined: Fri Oct 05, 2007 12:36 pm
Location: Northern NSW Oz Trail Ya

Post by punkin »

Yeah mate it's different. mines the same as what Pint has drawn, but i have the distillate in/out and the water in/out reversed from his drawing.ie. the vapour comes in the top with the cooling water coming in the bottom side...
pintoshine
Distiller
Posts: 1132
Joined: Sun Aug 20, 2006 1:30 pm

Post by pintoshine »

That is great. You figured out the geometry in a fashion that makes it more efficient to build. I'll have to update the drawing and call it a punkin condenser. Brilliant you are. So what are the measurements on the condnser part? It looks like 1.25" inside 2" inside 65mm but I didn't see how long each was. it looks like 300mm long. You reversed the input to the inside of the shell and pushed the water to the outside and made it so you could use caps.

It always takes more than one viewpoint, doesn't it? I don't think water flow will be a problem at all. If it is mounted vertically or at an angle the warm water on the inside will rise through convection and will cool really well.

The equivalent surface area is a liebig 1/2" x 77" long. Great job.
HookLine
retired
Posts: 5628
Joined: Sun May 13, 2007 8:38 am
Location: OzLand

Post by HookLine »

Pinto, can you leave both versions up on your site? It is good to be able to see the history of the evolution of a design.

Cheers
Be safe.
Be discreet.
And have fun.
punkin
Master of Distillation
Posts: 2711
Joined: Fri Oct 05, 2007 12:36 pm
Location: Northern NSW Oz Trail Ya

Post by punkin »

pintoshine wrote:That is great. You figured out the geometry in a fashion that makes it more efficient to build. I'll have to update the drawing and call it a punkin condenser. Brilliant you are. So what are the measurements on the condnser part? It looks like 1.25" inside 2" inside 65mm but I didn't see how long each was. it looks like 300mm long. You reversed the input to the inside of the shell and pushed the water to the outside and made it so you could use caps.

It always takes more than one viewpoint, doesn't it? I don't think water flow will be a problem at all. If it is mounted vertically or at an angle the warm water on the inside will rise through convection and will cool really well.

The equivalent surface area is a liebig 1/2" x 77" long. Great job.
Yes that's it Pint, 1-1/4" inside 2". The inside is about 18" long and the whole thing is 19".

Should be efficient enough anyway.

I'll just clip it to the wall above my bench, expand the 1/2" vapour line into a piece of 3/4" and then have an expanded, unsoldered joint to wrap with thread tape. The thread tapes how i do it now for my worm and seems to work ok. there's very little contact tween the vapour and the tape, safe, cheap and easy.


Thank you very much for the OTT compliments, i saw the solution when you first posted the design, that's why i said i could build it :wink:

Bit of mucking around, but it's saved me the height, which is what i wanted.

ThinkIllPaintItPurplePunkin
CoopsOz
Distiller
Posts: 1172
Joined: Wed Aug 16, 2006 4:00 am
Location: Didjabringyabongalong

Post by CoopsOz »

I must be stupid 'cos I'm a little confused! :oops: Can someone please explain? Is there an overflow in the cooling water thats not represented on the updated diagram?
It is most absurdly said, in popular language, of any man, that he is disguised in liquor; for, on the contrary, most men are disguised by sobriety. ~Thomas de Quincy, Confessions of an English Opium-Eater, 1856
punkin
Master of Distillation
Posts: 2711
Joined: Fri Oct 05, 2007 12:36 pm
Location: Northern NSW Oz Trail Ya

Post by punkin »

CoopsOz wrote:I must be stupid 'cos I'm a little confused! :oops: Can someone please explain? Is there an overflow in the cooling water thats not represented on the updated diagram?
No mate, the cooling water will come in one side of the 65mm pie and go out up the top...?
Ricky
Swill Maker
Posts: 459
Joined: Fri Jan 13, 2006 2:38 pm
Location: Gods Mtn

Post by Ricky »

isnt this basically like pints condenser for his big still just inside a jacket?
Day Late;Dollar Short
Usge
retired
Posts: 3243
Joined: Sat Aug 18, 2007 8:22 am

Post by Usge »

It's the punkindenser :)
Last edited by Usge on Sun Jan 06, 2008 10:52 am, edited 1 time in total.
punkin
Master of Distillation
Posts: 2711
Joined: Fri Oct 05, 2007 12:36 pm
Location: Northern NSW Oz Trail Ya

Post by punkin »

Ricky wrote:isnt this basically like pints condenser for his big still just inside a jacket?
Yes ricky, basiclly the same concept on a smaller scale.

There is a much larger gap in the chamber for the vapour to condense. When i tried the piece of 1-1/4" pipe inside a piece of 1-1/2" the fit was too ttight for my liking....Pint has a small gap but larger surface area, and i din't want to restrict it more than the halfinch pipe in.
So that's exactly what it is, a double walled cylinder inside a jacket. Both walls of the cylinder (up the inside and round the outside) are washed by the cooling water, thus increasing your surface area by a large amount.
This simply enables the condensor to be shorter and squatter, which suits my purpose. :)
The difference tween this modified design of Pints, and his first design, is that it can be built by anyone of us, with parts puchased from the store, rather than handcrafted by someone with a much higher grade of metalsmithing skills. 8)
Ricky
Swill Maker
Posts: 459
Joined: Fri Jan 13, 2006 2:38 pm
Location: Gods Mtn

Post by Ricky »

thats what makes this forum such a treasure. :D theres always more than one way to skin a cat! :shock:
Day Late;Dollar Short
pintoshine
Distiller
Posts: 1132
Joined: Sun Aug 20, 2006 1:30 pm

Post by pintoshine »

So is this project done yet? If it is I would like to hear the results. Does it knock down vapor well? how much power are you hitting it with stripping?
It looked from your chart in another post you are averaging about 1 liter every 12.5 minutes in the 50 to 60% range. So this is about 2.8 to 3.2kw? Were you using the condenser for that run?
punkin
Master of Distillation
Posts: 2711
Joined: Fri Oct 05, 2007 12:36 pm
Location: Northern NSW Oz Trail Ya

Post by punkin »

No pint, the condensor is built, but i'm waiting to fit it up when i move Gonzo to his new home.
ATM trying to convert from my coil to a pumped system would be too difficult, so it's only a couple more weeks now till the fitout of the new sheds complete and i work out how to recirculate the water.

Trying to think of a way to know if the pump stops or something? I'm a little scared of leaving my simple, foolproof worm in a bucket and going to a system that has all the possibilities of failure built in.
I wanna know (either visible or audible) when the pumps working, and i wanna be able tell if it fails.

Atm, i'm thinking of pumping to a holding tank in the roof and gravity feeding while the runs on?


As for power, i'm using a three ring gas burner to heat, and turn the center ring off once temp is hit. I turn down the other two rings to a small flame.
pintoshine
Distiller
Posts: 1132
Joined: Sun Aug 20, 2006 1:30 pm

Post by pintoshine »

I guess I am just a bit impatient. Keep us posted.
punkin
Master of Distillation
Posts: 2711
Joined: Fri Oct 05, 2007 12:36 pm
Location: Northern NSW Oz Trail Ya

Post by punkin »

Sure thing.
I guess the other thing i can do is hook it up and drop my little fountain pump in my barrel to run the condensor water through it as a test run. There's about 100 odd litres i reckon, do ya think that'd be enough for a small strip run of twenty five litres or so?
punkin
Master of Distillation
Posts: 2711
Joined: Fri Oct 05, 2007 12:36 pm
Location: Northern NSW Oz Trail Ya

Re: My New Condensor

Post by punkin »

Well it took longer than expected, but the condensor is now hooked up, had it's cleaning runs and breakin strip run yesterday.

Here she is...

Image

Image

The 205 litre drum is connected in the bottom to a 500 litre rainwater tank outside the shed.
It's designed to be self levelling at about 4/5ths full when the tank hits the overflow.

This is the condensor all plumbed up with quick disconnects..

The inside line at the bottom of the condensor is connected to the pump, it runs into a three-way ballvalve that can be used to adjust the flow of water into the condensor without pressurising the pump (hopefully). The excess water flows out of the hose next to the input back into the barrell.

The top hose is the outlet, it flows directly into the top of the outside tank. The inlet to the blue drum is connected to the bottom of the outside tank, so hopefully i'll be able to use the bulk of the water before there's too much mixing wit hot and cold. I'm also hoping that i can run for a long time on the six or seven hundred litres without having to worry about ice or anything hopefuly the condensor is going to be as efficient as possible.

It'll be good to be able to work on the bench, so thanks to Pint, once again, for his condensor design that'll allow me to straighten my back.

Cleaning and test run was interesting, bought a little twelve volt power supply to run my 360 gph submersible bilge pump, put about 5 litres mixed vinegar, water and foreshots into the boiler and fired her up.
Allowed a bita steam to run out the condensor for a while, then switched the pump on.
Well it knocked it down within ten seconds, and despite twiddling so the bulk was running back through the diverter valve, it stayed at 15-16 degreez C at the outlet. I could get the return line from the condensor to feel hot by switching the water till it was a tiny trickle, but still no steam till it was turned completely off. One day soon i'll switch the return to a measuring jug, and see just how efficient this condensor is....I suspect it'd work at half the length i made it.

One question i ended up with was gas expelling from the condensor. i know it may be different with wash in the boiler, but the condensor made a real sighing sound as it pushed the gas and distillate out...a wooshing if you will .... i've never noticeded this with my worm and don't know if it's usual or not, but you could put your finger over the output and feel a very strong breeze coming out, no steam, just cold air.
Is that normal with a liebig?

Just finnished a strip run on the peaches and corn. Output is roughly the same as Gonzo Mk1, maybe up alittle on the same burner setting.
Getting 4-1/2 litres an hour rather than the 4 i was getting, but the thing that catches my attention is the steadyness of it.

Worm used to surge and splutter and it was a matter of waiting till the hydrometer was steady in the parrot to take a reaing. Now the whole thing is rock steady....hydro sits at a constant, just going down steady as the % drops.

Wooshing is only there if i run flat out, harder than normal , when the staem first starts comming across, before i cut the gas back.

Condensor runs like a dream, just ticking over with a warm trickle going back to the tank.


Sorry to those who read this stuff already, but copy and paste was easier for a fatfingered bumbler than typing all that out again.

Anyway, that's the new condensor, if anyone ever wants to build an extremely space efficient, short but efficient condensor that uses only two large caps, two smaller caps and two small elbows as fittings...well here it is. 8)

I used a lot of expensive fittings hooking it up, but that's only cause i had them, it could be run just as easy by connecting two bits of tube with hose clamps.
punkin
Master of Distillation
Posts: 2711
Joined: Fri Oct 05, 2007 12:36 pm
Location: Northern NSW Oz Trail Ya

Re: My New Condensor

Post by punkin »

A niggly little question i should know the answer too, but don't...

When i fire the still right up to strip tails etc and especially now i've insulated my lyne arm, i can hear and feel a very strong draft coming through the end of my condensor. I figure it's just really efficient as the water leaving at a trickle is still only barely warm and the distillate leaving the condensor is coming out at 16 C, so it must be working very well and the breeze whooshing out of it is the sound of the vapour collpsing hard.

Then i think, what if the water temp is not high because the condensor is very inefficient, that it's actually vapour escaping and i just can't see it as steam?

Can anyone tell a simple man a simple answer?
alice
Swill Maker
Posts: 175
Joined: Fri Oct 19, 2007 1:14 am
Location: Where women glow and men plunder

Re: My New Condensor

Post by alice »

punkin wrote:Then i think, what if the water temp is not high because the condensor is very inefficient, that it's actually vapour escaping and i just can't see it as steam?
My first instinct would be to hold a small mirror over it to see if it fogs up.

My second instinct would be to make sure the mirror's not facing me in case it cracks.. 8) :)
punkin
Master of Distillation
Posts: 2711
Joined: Fri Oct 05, 2007 12:36 pm
Location: Northern NSW Oz Trail Ya

Re: My New Condensor

Post by punkin »

Tried it just then, definately no condensation on the mirror, and i faced it away from you (pointed it north).
Dnderhead
Angel's Share
Angel's Share
Posts: 13666
Joined: Sun Dec 23, 2007 8:07 pm
Location: up north

Re: My New Condensor

Post by Dnderhead »

two things come to mind
1) if it is before you git distillate , could be purging air
2) if it during the run and it is vapor collapsing , I would thank that it would be air rushing in not out. maybe smoke test?
or if got s@#$ to run you could place a clear tube over the end place end in a jar with water and see if its sucking in or blowing out
alice
Swill Maker
Posts: 175
Joined: Fri Oct 19, 2007 1:14 am
Location: Where women glow and men plunder

Re: My New Condensor

Post by alice »

punkin wrote:Tried it just then, definately no condensation on the mirror, and i faced it away from you (pointed it north).
:D :D :D :D
rad14701
retired
Posts: 20865
Joined: Wed Dec 19, 2007 4:46 pm
Location: New York, USA

Re: My New Condensor

Post by rad14701 »

punkin,as your distillate vapor collapses into condensate it will create a vacuum effect which explains why you can detect outside air actually sucking into the end of the condenser... Nothing to worry about but it can come as a surprise until you become accustomed to this condition... This can actually be the cause of surging in long small diameter condensers...
Hornblower
Novice
Posts: 15
Joined: Wed Nov 28, 2007 8:25 pm
Location: Down Under

Re: My New Condensor

Post by Hornblower »

Hi All

I'm Building one of these along the lines of Punk's design. The major difference is that the inlet will be upsized slightly to 25mm for more vapor volume 8) .
IMG_0330.jpg
IMG_0330.jpg (47.76 KiB) Viewed 5640 times
IMG_0332.jpg
IMG_0332.jpg (42.69 KiB) Viewed 5640 times
Obviously the 25mm is a tight fit in 40mm but the calcs say the vapour path is fairly free even after it feeds into the gap. BTW Pipe sizes are 25mm (vapour Inlet) to 40mm and 50mm (inner shell) to 65mm (outer casing). My apologies to the non-metric users here, If you can translate go ahead, it just confuses me if I mix the two!

Its now time to decide what to do with the outlet. Punkin designed this to work vertically. My question is: will flavor be affected by mounting it straight up & down as opposed to on a downward 45Deg like I plan to run my lyne arm? Fast strip runs & slow flavourful spirit spirit runs are the go here. Any thoughts or comments are appreciated

If I do mount it at 45 degs The outlet could go something like this:
punkincondenser45.jpg
punkincondenser45.jpg (28.45 KiB) Viewed 5628 times
Am I fiddling over nothing here?
pintoshine
Distiller
Posts: 1132
Joined: Sun Aug 20, 2006 1:30 pm

Re: My New Condensor

Post by pintoshine »

punkin's I can follow in the assembly but the 45 tube I can't see how you would ever get it together.
Hornblower
Novice
Posts: 15
Joined: Wed Nov 28, 2007 8:25 pm
Location: Down Under

Re: My New Condensor

Post by Hornblower »

pintoshine wrote:punkin's I can follow in the assembly but the 45 tube I can't see how you would ever get it together.
Yeah sure, I'd have to shorten & slot the outer shell & then close it up with the bottom end cap. Seems a bit convoluted for the benefit don't it?
punkin
Master of Distillation
Posts: 2711
Joined: Fri Oct 05, 2007 12:36 pm
Location: Northern NSW Oz Trail Ya

Re: My New Condensor

Post by punkin »

Hornblower wrote:
pintoshine wrote:punkin's I can follow in the assembly but the 45 tube I can't see how you would ever get it together.
Yeah sure, I'd have to shorten & slot the outer shell & then close it up with the bottom end cap. Seems a bit convoluted for the benefit don't it?
It'd work, as i told ya, and i don't think it'd be that hard.

Just drill a hole (or cut a slot) in the cap and then cut the outer pipe at the end of the hole, slip it together and solder it up.

Good on ya fitting the inch elbow in the top, ya did better than we expected even with a 3/4 elbow.

I'd face the top elbow so it is pointing downwards at the exit, i think you may get some pooling there...it's more efficient than you think.


WellDonePunkin
RumBull
Bootlegger
Posts: 123
Joined: Thu Mar 20, 2008 7:16 am
Location: Ozarks

Re: My New Condensor

Post by RumBull »

Hornblower wrote:Its now time to decide what to do with the outlet. Punkin designed this to work vertically. My question is: will flavor be affected by mounting it straight up & down as opposed to on a downward 45Deg like I plan to run my lyne arm? Fast strip runs & slow flavourful spirit spirit runs are the go here. Any thoughts or comments are appreciated
Angle should have no effect on flavor. Once it enters the condenser, no matter what the angle (except pointing upward), it is headed to your output. I have made my own version of this design after seeing this and Pints posts that can be adjusted to any angle with the use of a bronze union. This allows me to set the angle to match the height to the recieving jar or parrot. http://homedistiller.org/forum/viewtopi ... =16&t=8448" onclick="window.open(this.href);return false;" rel="nofollow
Last edited by RumBull on Thu Jan 22, 2009 3:10 pm, edited 1 time in total.
7.5 gal and 15.5 gal SS keg with copper Super Sankey Scotch Style Still head.http://homedistiller.org/forum/viewtopi ... =16&t=8550
I make Rum and um... Rum
Hornblower
Novice
Posts: 15
Joined: Wed Nov 28, 2007 8:25 pm
Location: Down Under

Re: My New Condensor

Post by Hornblower »

Well I'm pushing on here. For the heck of it, I have gone for the sloped takeoff, But I seem to have hit a snag.

The 45deg takeoff is in:
still3.jpg
still3.jpg (10.77 KiB) Viewed 5472 times
the shell is slotted:
still4.jpg
still4.jpg (12.1 KiB) Viewed 5472 times
All is good , but I am having trouble getting silver solder to flow on my joints over 1". I am using a MAPP torch, 2% silver rods & the white water based flux all with not much luck.
Everything is clean as a whistle before I start, but goes black pretty quickly as I heat up. It seems like as I add each part, the mass of the thing gets bigger & the heat is being sucked away from the joints before I can get them up to temp. I am going for the cherry red glow before bringing in the rod but just cant seem to get it there. It's never been a problem before as I've been using soft solder. I'd like to keep using the silver If I can.

Am I missing something, or do I need a bigger torch? Thanks in advance

Horatio.
Ayay
Distiller
Posts: 1656
Joined: Tue Sep 16, 2008 1:25 am
Location: Planet Erf...near the bottom.

Re: My New Condensor

Post by Ayay »

Yes the heat drains into the mass and not much happens until the mass is filled with heat. The heat loss to the air further down from the area being soldered can mean the mass never gets full enough.

Try heating the whole thing up deliberately until it seems full and then concentrate the heat at the joint being soldered.

Surrounding the object with fire bricks will keep more heat in the mass and makes better use of the whole flame by directing it onto more metal. Vermiculite or lightweight heater insulation bricks or boards are even better.

The flux loses power when it is hot and dissolving the oxides; if heating takes a long time then more flux must be added to keep it working.

An oxy/gas or oxy/acetylene torch puts in so much heat that the drain into the mass doesn't matter unless the copper is very thick and heavy, then the above remedies can be used as well. Good luck!
cornflakes...stripped and refluxed
Post Reply