Assembling my first still

Putting older posts here. Going to try to keep the novice forum pruned about 90 days work. The 'good' old stuff is going to be put into appropriate forums.

Moderator: Site Moderator

kronicd
Novice
Posts: 21
Joined: Wed Jan 21, 2009 4:08 am

Assembling my first still

Post by kronicd »

I thought I'd start documenting the process of building a still as it might help some of those who are in the same situation as me. That is, those who have no experience working with metal, building anything, distilling, making homebrew... So I will continue to update this thread as I move on with this project.

So I started out by reading pretty much everything I could find on the topic, starting with these forums and the wiki. I learnt a lot from this and really suggest reading through the static menu at least once.

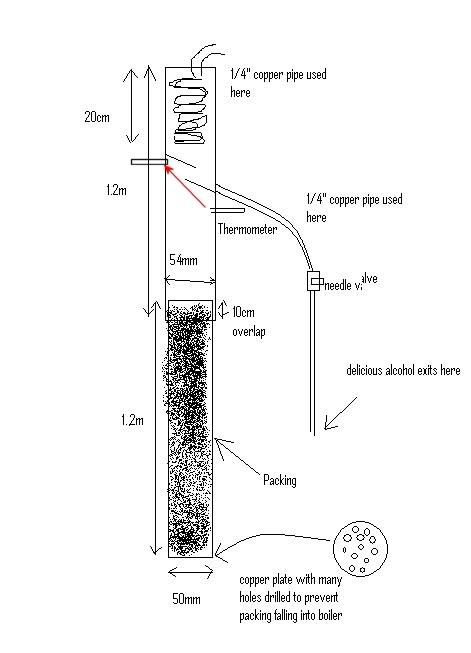
Initially I had planned on purchasing a commercial 5L still, however the members of this forum quickly informed me that this was a bad idea and that I would be far better off building my own (it looks like it will end up being cheaper & much higher capacity). So I went back to the wiki and read some more and eventually came across the mini-still plans. I chose these as it is a simple design that I should be able to construct, in addition to this it would be possible to add additional pipe later to increase the length of the still if desired.

For the boiler I have decided to add a heating element to a keg to create a 50L boiler as shown here. So I asked around and pretty quickly I had three kegs, two were of the sanke type and one of the german flat top type. I plan to use the other two kegs as containers for fermenting.

I then went out to a local scrap metal place and asked about copper pipe and ended up with the 24" of 2" copper pipe that I needed for the mini still, for an excellent price of $5 AUD! I had to go to a plumbing store in order to get the 1/4" copper pipe for the condenser coil, this set me back around $55. So I'm not doing too badly at the moment. My goal is to keep the cost below $300 AUD, but we shall see how things go!

Below you can see what I've got so far (click for larger image). Hopefully I'll be able to get the coil wound sometime this weekend! I am currently searching for local sources (within Australia) for appropriate heating elements / dimmers for this project.

Image

I should update again within the next few days!
irish69
Novice
Posts: 24
Joined: Sun Jan 25, 2009 4:20 pm

Re: Assembling my first still

Post by irish69 »

It looks like you're well on your way to having a still, kronicd!I'm in the middle of building my first still too. Are you making a reflux still or a pot still?
kronicd
Novice
Posts: 21
Joined: Wed Jan 21, 2009 4:08 am

Re: Assembling my first still

Post by kronicd »

irish69 wrote:It looks like you're well on your way to having a still, kronicd!I'm in the middle of building my first still too. Are you making a reflux still or a pot still?
I'm building a reflux still,

I just attempted making the condenser coil, it looks a little weird, however I've checked it and water flows through it well and it is the right size. So that is dealt with. What are you working on building and how far have you gotten?
irish69
Novice
Posts: 24
Joined: Sun Jan 25, 2009 4:20 pm

Re: Assembling my first still

Post by irish69 »

Well I plan on making whiskey and brandy, so I'm building a pot still. I'm going the keg route also. So far I have built my arm and I have cut a hole in the keg. Now I just need to attach the arm to a ss mixing bowl. This will then go over the hole in my keg. I'm going to weld or braze some bolts to the keg and these will be used to clamp the bowl down with washers, and the joint will get sealed with flour paste. I've already made a condenser out of 3/8'' copper tubing and a bucket. Hopefully I'll be doing my first run by next week. What are you planning to run through your still?
kronicd
Novice
Posts: 21
Joined: Wed Jan 21, 2009 4:08 am

Re: Assembling my first still

Post by kronicd »

I'm going to be producing neutral spirits, so I'll just be running sugar washes. Mmmm ethanol :P
maoule
Bootlegger
Posts: 134
Joined: Sun Nov 02, 2008 9:24 am
Location: misery

Re: Assembling my first still

Post by maoule »

kronicd wrote:I'm going to be producing neutral spirits, so I'll just be running sugar washes. Mmmm ethanol :P
That'll last about two runs :) but it's easy enough to make a pot still head. The reflux will be handy for running the heads and tails that accumulate. Have fun & be safe.
2" Bokmini, VM and potstill heads
7.75gal. & 15.5gal electric boilers
Hawke
retired
Posts: 2471
Joined: Tue Mar 25, 2008 1:39 am

Re: Assembling my first still

Post by Hawke »

That'll last about two runs :) but it's easy enough to make a pot still head. The reflux will be handy for running the heads and tails that accumulate. Have fun & be safe.
Ran my valved reflux twice, the 3" boka 'mini' three times. Working on my 15th, 2x run on a pair of potstills. :mrgreen: Neutral spirits were.....just too neutral. :lol:
It is the very things that we think we know, that keep us from learning what we should know.
Valved Reflux, 3"x54" Bok 'mini', 2 liebig based pots and the 'Blockhead' 60K btu propane heat
kronicd
Novice
Posts: 21
Joined: Wed Jan 21, 2009 4:08 am

Re: Assembling my first still

Post by kronicd »

Has anyone here used the mini still? I've heard that it doesn't produce good neutral spirits? I'm going to head back out to the scrap yard today and see if I can get some more copper pipe to make a taller still.
rad14701
retired
Posts: 20865
Joined: Wed Dec 19, 2007 4:46 pm
Location: New York, USA

Re: Assembling my first still

Post by rad14701 »

kronicd wrote:Has anyone here used the mini still? I've heard that it doesn't produce good neutral spirits? I'm going to head back out to the scrap yard today and see if I can get some more copper pipe to make a taller still.
Yikes...!!! You must be pretty new here because these forums, as well as the parent site, contain plenty of information about this design... That is an older revision of the Bokakob slant plate column design and it has been improved upon in several ways over the past few years... Read up and you'll learn more...
Hawke
retired
Posts: 2471
Joined: Tue Mar 25, 2008 1:39 am

Re: Assembling my first still

Post by Hawke »

As I said, I ran my Bokakob 3" 'mini' a few times. Real easy to build using the modified plans. Very easy to run. It made very clean neutrals. Made several gallons of vodka in those 3 runs, gave most of it all away after trying a couple of essences and macerations. They just don't compare to a good potstilled whiskey or rum and I couldn't care less for drinking vodka.
It will sit in the corner until I have enough heads and tails to make it worth doing a feints run.
It is the very things that we think we know, that keep us from learning what we should know.
Valved Reflux, 3"x54" Bok 'mini', 2 liebig based pots and the 'Blockhead' 60K btu propane heat
kronicd
Novice
Posts: 21
Joined: Wed Jan 21, 2009 4:08 am

Re: Assembling my first still

Post by kronicd »

Hawke wrote:As I said, I ran my Bokakob 3" 'mini' a few times. Real easy to build using the modified plans. Very easy to run. It made very clean neutrals. Made several gallons of vodka in those 3 runs, gave most of it all away after trying a couple of essences and macerations. They just don't compare to a good potstilled whiskey or rum and I couldn't care less for drinking vodka.
Thanks for the input Hawke, you just made me reconsider VM vs Mini Boka :P

! I've talked to a few more people both on these forums and locally and was leaning heavily towards a VM still. I've found a local who is quite happy to assist me with the welding side of things once I have all the parts, which I am quite happy about.

My trip to the scrapyard today to get additional copper pipe didn't go too well, a truck left with the rest of the copper as I pulled in, however they are expecting a lot more over the weekend, so I should be able to get the remainder of the pipe I need on Monday. My top concerns at the moment are getting a suitable heating element (I'm now considering gas too, ugh.. damn options).

If I go with the VM I'll likely try going the brass route with the valve, treating it to deal with the lead etc. I'm still unsure however. The price of copper when it comes to pipe isn't a major issue as I'm getting that very cheaply, connections and the like are a different matter however.
xx7777xx
Novice
Posts: 79
Joined: Sun Nov 30, 2008 6:08 am

Re: Assembling my first still

Post by xx7777xx »

Kronicd:

I'd suggest taking a look at this thread that talks about VM vs LM:
http://homedistiller.org/forum/viewtopi ... =15&t=9156

I've also been recommending to people that are planning their first build to consider a rig that can be easily converted between reflux and pot still setup. This gives you an easy way to do stripping runs or tryout whiskeys and brandies without having to build another still.

My 10 cents-

x7
Good spirits are like the weather, some like it clear and some like cloudy...
HookLine
retired
Posts: 5628
Joined: Sun May 13, 2007 8:38 am
Location: OzLand

Re: Assembling my first still

Post by HookLine »

kronicd wrote:If I go with the VM I'll likely try going the brass route with the valve, treating it to deal with the lead etc. I'm still unsure however.
Spend the extra bucks and get stainless. You won't regret it.
xx7777xx wrote:I've also been recommending to people that are planning their first build to consider a rig that can be easily converted between reflux and pot still setup. This gives you an easy way to do stripping runs or tryout whiskeys and brandies without having to build another still.7
+1
Be safe.
Be discreet.
And have fun.
maoule
Bootlegger
Posts: 134
Joined: Sun Nov 02, 2008 9:24 am
Location: misery

Re: Assembling my first still

Post by maoule »

xx7777xx wrote:Kronicd:

I'd suggest taking a look at this thread that talks about VM vs LM:
http://homedistiller.org/forum/viewtopi ... =15&t=9156

I've also been recommending to people that are planning their first build to consider a rig that can be easily converted between reflux and pot still setup. This gives you an easy way to do stripping runs or tryout whiskeys and brandies without having to build another still.

My 10 cents-

x7
This is excellent advice; make your column in two pieces with the shorter piece just long enough to allow you to clear the side of your boiler once the head and condenser are mounted.
2" Bokmini, VM and potstill heads
7.75gal. & 15.5gal electric boilers
gunner
Novice
Posts: 3
Joined: Tue Feb 03, 2009 1:46 pm

Re: Assembling my first still

Post by gunner »

Hi
I'm starting my first still it will be a 9gal Alex's (Bokakob) mini reflux still. I'm starting with a Orion cooker. I need to know if a Brinkmann's 1500-watt electric heating element is the right size for a 9 gal. still and should I put the heating element inside the still ?or use it on the outside of the still?. My reflux tower will be 24" tall 2" copper pipe and cooling coil how many coils should I have? The picture show 9 coils. For packing I have copper scrabber how much should I put in the pipe 8 to 10" of packing? and should it be loose packed? I will post a picture when done.
Thank you
gunner
Last edited by gunner on Wed Feb 04, 2009 6:54 am, edited 2 times in total.
rad14701
retired
Posts: 20865
Joined: Wed Dec 19, 2007 4:46 pm
Location: New York, USA

Re: Assembling my first still

Post by rad14701 »

Welcome to the forums, gunner...

Don't go putting solder to copper before you have done a thorough reading of these forums and the parent site... The Bokakob column you are referring to is an older design which has been improved upon over the years... Your questions have been answered several times so you just need to find them... It doesn't make sense to answer the same questions over and over when adequate research will yield a broader sense of the overall craft...

Good luck...
gunner
Novice
Posts: 3
Joined: Tue Feb 03, 2009 1:46 pm

Re: Assembling my first still

Post by gunner »

How do you form the coils for a 2" pipe with out putting a bad ben in it.
Thank you
Paul
rad14701
retired
Posts: 20865
Joined: Wed Dec 19, 2007 4:46 pm
Location: New York, USA

Re: Assembling my first still

Post by rad14701 »

gunner wrote:How do you form the coils for a 2" pipe with out putting a bad ben in it.
Thank you
Paul
Condenser coil winding has been documented several times here in the forums... Some use salt, a few use a jig, others use sand, and still others use patience and finesse... Take a poke around and you'll discover that there's more than one way to do it...
xx7777xx
Novice
Posts: 79
Joined: Sun Nov 30, 2008 6:08 am

Re: Assembling my first still

Post by xx7777xx »

gunner wrote:How do you form the coils for a 2" pipe with out putting a bad ben in it.
Thank you
Paul
As per Rad's advice, there are indeed several discussions on this that I found helpful. That said I had great luck just using the spring stype tubing bender and wrapping arounf a PVC pipe.

x7
Good spirits are like the weather, some like it clear and some like cloudy...
FeralPig
Swill Maker
Posts: 228
Joined: Thu Jan 15, 2009 8:53 pm
Location: Dixie

Re: Assembling my first still

Post by FeralPig »

gunner wrote:How do you form the coils for a 2" pipe with out putting a bad ben in it.
Thank you
Paul

I am a novice at this but we used sand. Due to advice from these guys, we baked the sand to remove moisture, used a torch on the pipe for the same reason. You want low moisture to prevent sticking as you fillthe copper tube with sand. Then we filled the pipe with sand and slowly wrapped it round a 1 1/2 inch pvc pipe to form it. Worked perfectly.
This is so much fun it ought to be illegal..wait..never mind.

51" LM and a 24" Pot still with 62" Liebig with turbulator and spiral coolant swirler thingy. Both running on an unmodified keg with Tri-clover clamp attachment.
kronicd
Novice
Posts: 21
Joined: Wed Jan 21, 2009 4:08 am

Re: Assembling my first still

Post by kronicd »

Thanks for all the assistance so far, I'm currently aquiring a heating element & dimmer to control the element.

I've had a look for dimmers and this one seems good:

Code: Select all

LUTRON N-2000 NOVA 2000W SINGLE-POLE DIMMER SLIDE-TO-OFF

Lutron Nova. The original rugged linear-slide dimmer with over 25 years of proven reliability in the most demanding commercial applications.

FEATURES:
-  Intuitive operation - easy to use
-  Voltage compensation
-  Surge protection and heavy-duty components for a long product life
-  Electrostatic discharge protection
-  Captive linear slider
-  Mechanical air gap switch to disconnect load power
-  Radio frequency interference suppression circuitry
-  Power failure memory
-  UV stable color
-  Wallplate included

TECHNICAL DETAILS:
-  Max. Wattage:  2000
-  Voltage:  120
-  Lamp Type:  Halogen/Incandescent
-  Part Number:  N-2000-WH
The only thing I'm not too sure about is that it specifies a voltage of 120V, We work off 240V here in Australia and whilst the wattage would be 2000W the voltage here is higher, I'm wondering if that will cause the dimmer to fail. If anyone has used a dimmer like this with 240V and can advise me that would be greatly appreciated!
HookLine
retired
Posts: 5628
Joined: Sun May 13, 2007 8:38 am
Location: OzLand

Re: Assembling my first still

Post by HookLine »

kronicd wrote:The only thing I'm not too sure about is that it specifies a voltage of 120V, We work off 240V here in Australia and whilst the wattage would be 2000W the voltage here is higher, I'm wondering if that will cause the dimmer to fail. If anyone has used a dimmer like this with 240V and can advise me that would be greatly appreciated!
Don't use 120 v gear with our 240 v mains supply, it will blow up or burn out real fast.

Use one of Pintoshine's 240 v controller kits, or something like this which I use. You can find it at RS Components (look for 'Regulators - Burst Firing', RS Stock No. 346-592).
Be safe.
Be discreet.
And have fun.
Shine-on
Novice
Posts: 19
Joined: Wed Oct 22, 2008 6:00 pm
Location: Somewhere on Copperhead Road

Re: Assembling my first still

Post by Shine-on »

Just a quick note to the guy trying to bend his coil to fit inside of the 2" .

Like the other more experienced guys have stated, filling the tubing with some type of medium will help reduce the chances of kinking.

But also, there are 2 different types of tubing. Look for "annealed copper" on the package. It is much softer and easier to bend. But again, use some type of medium in the tubing if you are not used to bending any kinds of pipe.

IMHO
Shine-on
gunner
Novice
Posts: 3
Joined: Tue Feb 03, 2009 1:46 pm

Re: Assembling my first still

Post by gunner »

Thank you for the info on benning the copper tubing. I used salt and it work just fine. It was .250
Now I have a 48" towner for my still, I see were some say you should have 3 or 4 coils and other say 8 or 9 coils.
On the coils should I go with just 4 or should I go with 9 coils. My coils will be about 5or 6 inch down in the tube.
Thank you
Paul
Hawke
retired
Posts: 2471
Joined: Tue Mar 25, 2008 1:39 am

Re: Assembling my first still

Post by Hawke »

Gunner,
You want close to 8 inches of coil length, very small gap between coils. This will require between 6 and 8 feet of tubing. (I buy Ice maker hook-up kits, cheaper than buying just the 1/4" tubing in my area)
It is the very things that we think we know, that keep us from learning what we should know.
Valved Reflux, 3"x54" Bok 'mini', 2 liebig based pots and the 'Blockhead' 60K btu propane heat
rad14701
retired
Posts: 20865
Joined: Wed Dec 19, 2007 4:46 pm
Location: New York, USA

Re: Assembling my first still

Post by rad14701 »

I have found that incorporating an air gap between the coils in the range of 1/8" to 3/16" definitely helps with turbulence therefore reducing the amount of coolant flow required... I just recently modified one of my condensers that had the coils touching and there was a very distinct improvement... An air gap equal to or greater than the tubings OD might have a negative impact, however, due to wasted space...
HookLine
retired
Posts: 5628
Joined: Sun May 13, 2007 8:38 am
Location: OzLand

Re: Assembling my first still

Post by HookLine »

I just recently modified one of my condensers that had the coils touching and there was a very distinct improvement...
Interesting.

I agree that a 1/8-3/16" (3-4 mm) gap between the successive coil winds is about right. Any more than that is just wasting condenser space.
Be safe.
Be discreet.
And have fun.
kronicd
Novice
Posts: 21
Joined: Wed Jan 21, 2009 4:08 am

Re: Assembling my first still

Post by kronicd »

Well an update is well overdue...

I've been busy with work but that is finally over and I was able to head back to the scrapyard. I managed to get:

1x 2M of 2" copper pipe
2x 1.2M of 2" copper pipe
1x 1.2M of 54mm copper pipe
More than enough copper plate
4KGs of stainless steel shavings (to pack the column with)

All up that cost me $29 AUD :)

I've decided to go with a mini-boka design using the slant plates, I might build a VM still later on if I feel so inclined (I have enough pipe, thats for sure!, maybe a pot still next?).

Currently I'm waiting on a heating element and temperature controller, aside from that I'm ready to put things together. A trip to my local brew shop resulted in me getting the valve, thermometer, alcometer and hydrometer I needed as well as 25KGs of sugar.

My column design will be something like this:

Image

The idea behind using 54mm copper piping for the top half is that it will allow a tiny bit more room for the condenser. If anyone can see any problems with what I'm planning here please let me know :)
Hawke
retired
Posts: 2471
Joined: Tue Mar 25, 2008 1:39 am

Re: Assembling my first still

Post by Hawke »

Only thing I see is moving the thermo port, and packing the column to just below the lower plate. Also shorten the takeoff tube and add a vent tube just after the valve. I used a 90* ell and drilled a hole in the top of it (This will keep it from syphoning.You want the valve close to the column and almost horizontal)
Image
It is the very things that we think we know, that keep us from learning what we should know.
Valved Reflux, 3"x54" Bok 'mini', 2 liebig based pots and the 'Blockhead' 60K btu propane heat
draco
Novice
Posts: 72
Joined: Sun Dec 07, 2008 8:47 am

Re: Assembling my first still

Post by draco »

With my Bok still I found the output was too hot. Rad suggested it would need a condenser after the valve. Sure enough that did the trick and improved my abv to 94%. I figure just a little more experience with driving it will get that extra 1%.
20 Liter boiler
1 1/2 in Bok 36in tall with Graham condenser
Pot still head.
I make Absinthe using Wineos "Plain Ol Sugar Wash" and Nigel's "best absinthe so far" recipe.
Post Reply