The KYChemist Boka Still Build... "Boiler #2"

Post your builds here.

Moderator: Site Moderator

User avatar
The KYChemist
Rumrunner
Posts: 733
Joined: Sat Apr 27, 2013 11:25 am
Location: The Ville

The KYChemist Boka Still Build... "Boiler #2"

Post by The KYChemist »

I know what all of you are going to say... "Not even finished with the first still, and already starting a second still?!" Yep, that would be an astute observation. I have never been one to just leave well enough alone. This build is under way, and I was waiting until I had something to post. Here are some of the features this build will incorporate. 1) 15.5 gal keg boiler. It is a legally sourced, brand new 304ss sanke keg. I will not disclose the cost, but cost a pretty penny. Shipping added on a nice chunk. Anything I could find on Craigslist, etc., just seemed too sketchy. I would rather pay the little extra, and have a legal virgin keg. 2)2.5" 304ss column will be made in two pieces. 42" column, with an 18" head. The head will house a 10" double coil condensor, comprised of 1/4" copper tubing, and the twin slant plates. All connections will be made via tri-clamps, and teflon gaskets. The Mechanic is once again involved on this build, and I cant wait to get pics of the column up. His tig-welding is second to none. 3) It will be powered electrically, via a 5500w element. Yada-yada-yada... We all know enough about this area. 4) Leibig condensor. I realise its probably not neccesary, but I wanted to add one. Here's my reasoning. First, it can act as a heatsink, to help cool the water coming from the resevoir, before it hits the condensing coils. Second, all I've read, states that the product coming off a Boka can be on the hot side. It would help to cool it, before it hits the Mason Jar. Third, I just really wanted to build one. Finally, if I ever want to add a few things, to run in pot-still mode, I'll already have it. Those are the basics, so I guess I'll show off some pics.

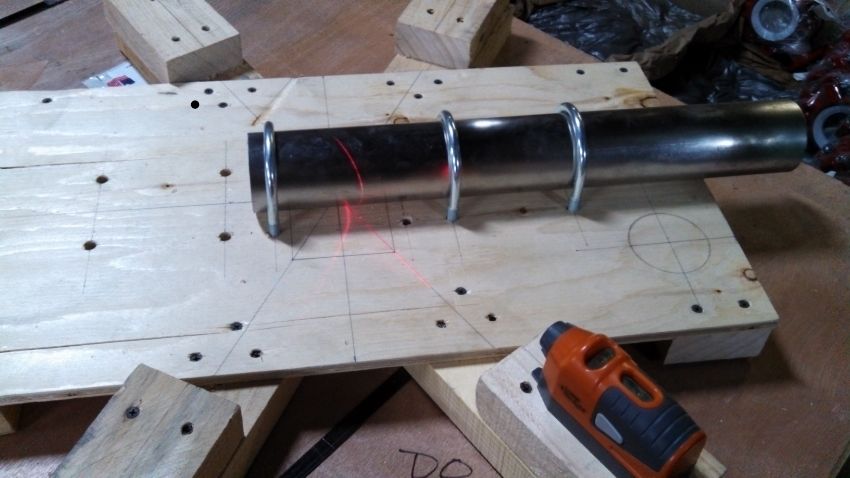
I realise there is probably an easier way to do this, but here's how I did it. My hour long lunch gives me more than enough time to brainstorm, and dream. I therefore get to do a lot of "pleasure" work, during my lunch. Besides, I just like to build stuff. This was my solution, to drawing the cuts, for the 30 degree slant plates. They haven't been drawn, or cut, as Im about 90% done with my Liebig condensor. Those pics will be up soon. Everything I used to build this jig was "free". I already had the laser level, and I temporarily borrowed the u-bolts, from work. The wood is from old pallets, and the screws were liberated from being put to work, holding crates together. I also doubled checked, my double checks, and this thing is as accurate as anybody could ask for.
Image

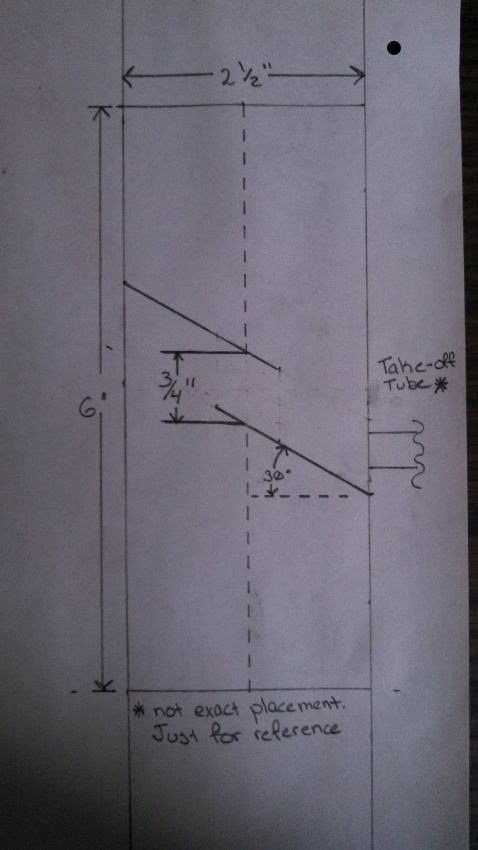
Here is the scary part, for me. Where I ask for advice and criticism, of the wise ones. This drawing shows the proposed placement, of the plates, in the lower third section of the head. There will be another twelve inches of tube, above this. Those 12" will house the 10", double wound, condensor coil. Tell me what y'uns think.
Image

This will be a slow build thread, updated as often as I can. Stay tuned, though. The Liebig pics should be up before the end of the weekend.
Whiskey is rays of sunshine, held together with water.
User avatar
pfshine
Master of Distillation
Posts: 3106
Joined: Thu Jan 19, 2012 10:59 pm
Location: Vegas

Re: The KYChemist Boka Still Build... "Boiler #2"

Post by pfshine »

There is a template for the boka head in the boka thread. It is sized for two inch but all you have to do is blow it up a little on the printer.
Life is a journey you take alone. Make sure you do what you what makes you happy
User avatar
The KYChemist
Rumrunner
Posts: 733
Joined: Sat Apr 27, 2013 11:25 am
Location: The Ville

Re: The KYChemist Boka Still Build... "Boiler #2"

Post by The KYChemist »

pfshine wrote:There is a template for the boka head in the boka thread. It is sized for two inch but all you have to do is blow it up a little on the printer.
Ehh... I know. Didn't feel like playing with it, though. I also could've put a metal blade in a dual bevel sliding compound mitre saw, as well. I killed time and had fun, doing it my way.
Whiskey is rays of sunshine, held together with water.
pounsfos
Distiller
Posts: 1131
Joined: Sun Nov 13, 2011 1:46 am
Location: lost in the bush with the rest of the kiwis

Re: The KYChemist Boka Still Build... "Boiler #2"

Post by pounsfos »

with such a massive element, I would make the distance between the plates at least 1' otherwise you will get flooding
User avatar
The KYChemist
Rumrunner
Posts: 733
Joined: Sat Apr 27, 2013 11:25 am
Location: The Ville

Re: The KYChemist Boka Still Build... "Boiler #2"

Post by The KYChemist »

pounsfos wrote:with such a massive element, I would make the distance between the plates at least 1' otherwise you will get flooding
Oh really?! With the 3/4" gap, I figured I would get told that is too much. Would it be more beneficial to increase the gap, or lower the wattage of the element. I'm looking for a good balance between speed, and quality.
Whiskey is rays of sunshine, held together with water.
User avatar
Cardinalbags
Swill Maker
Posts: 409
Joined: Tue Mar 26, 2013 2:35 pm
Location: Nova Scotia, Canada

Re: The KYChemist Boka Still Build... "Boiler #2"

Post by Cardinalbags »

yep. i went with 1" gap with 4500W element on my boka head. glad I did.
User avatar
The KYChemist
Rumrunner
Posts: 733
Joined: Sat Apr 27, 2013 11:25 am
Location: The Ville

Re: The KYChemist Boka Still Build... "Boiler #2"

Post by The KYChemist »

First off, thank you for the replies, advising to go to 1 inch of gap, between the plates. This will be implemented. Next, as promised, here are pics of the Liebig condensor. I was able to finish it up, on my lunch break, on Friday. All in all, it turned out as well as I hoped it would. It currently still needs some polishing, but is 95% done. I did my best to get it to a mirror finish, but was only able to get close. It is constructed of 3/8" tubing, and 3/4" pipe.The fittings coming off the tees are 1/2", and the threaded connectors are 3/8". Unions will be attached to the tees, for water line connections, which will consist of MNPT x barbed connectors. I'm a little busy, at the moment, so I don't have time to go into too much detail. Any questions will be answered, if you have them. Here's the pics

Image

Image

Image
Whiskey is rays of sunshine, held together with water.
User avatar
The KYChemist
Rumrunner
Posts: 733
Joined: Sat Apr 27, 2013 11:25 am
Location: The Ville

Re: The KYChemist Boka Still Build... "Boiler #2"

Post by The KYChemist »

And the Christmas gifts just keep on coming! Got this box in, at work, today. Now we can start construction of the column. I plan on getting the slits, for the plates, cut this weekend. The plan is to go 1 and 1/8" between the cuts. If I cut right on the line, this should give me about 1" between the bottom of the top plate and the top of the bottom plate. If its a little more, it shouldn't hurt much.

Image
Whiskey is rays of sunshine, held together with water.
User avatar
The KYChemist
Rumrunner
Posts: 733
Joined: Sat Apr 27, 2013 11:25 am
Location: The Ville

Re: The KYChemist Boka Still Build... "Boiler #2"

Post by The KYChemist »

Not too much has been going on here. Lately, we've been able to get a little more work done, on the "Boka". Plates have been tack-welded into place, as well as most of the ferrules. There are one, or two more pieces, to be fitted up, and then the final welds can be put into place. The condensing coil is the biggest thing, to be fabbed, once the welding is completed. Then, its just buying the remaining pieces, and putting them in place. Most of which will be plug-and-play. One of the things, I'll be most proud of, will be my keg stabilization system. I won't go into a lot of explanation, right now, but it will be simple and pretty cool, if I say so myself.

Anyhow... Picture time!

Here, we have The Mechanic, putting some welds on the main part of the column. It looks a lot longer, in the pic, but the column is only 3.5' long.
Image

Here, is an example, of some of The Mechanic's work. I couldn't have found anyone better to team up with, for these projects. Both in ability, and as a friend. Sounds corny, but its true.
Image

Here, I just stood-up the column and head, on top of the keg. I did this to get an idea of how tall it would actually be. Comes in around 7'4".
Image

One of the fringe benefits, of my job... Every once in awhile, I get hooked up, with some free stuff. This is going to make it easier, to spend money on some of the other stuff I want, for this build. This is going to be the drain valve, for the bottom of the keg. I also picked up an awesome thermometer, for free, for under the upper plate. The fitting for this can be seen, in the pic of the column on the keg.
Image
Whiskey is rays of sunshine, held together with water.
User avatar
The KYChemist
Rumrunner
Posts: 733
Joined: Sat Apr 27, 2013 11:25 am
Location: The Ville

Re: The KYChemist Boka Still Build... "Boiler #2"

Post by The KYChemist »

Hmph... I thought my last post was not as recent, as it is. We are making head way, on the build. Column is done. Head is all welded up, as well. We still have to coil the reflux condensor for it, though. Plus, the keg still needs it's modifications. All in all, I'd conservatively say we have it about 80% complete. There is probably about $100 dollars worth of parts left, to get it to 100%. Just got the SCR controller in the mail, today. I was surprised by the size. I figured it would only be about 66% of the size that it is. I've also been acquiring ingredients for the Gerber wash. Since reading the Gerber thread TWICE, and taking notes, I figured it would be an easy recipe, for a good neutral. Cleaning and sac runs will of course be done. Did a little bit of price checking, and yeast and sugar are cheaper at Sam's Club, than even Amazon. Suger... $18.00 for 50#'s. Yeast... $5 for 2#'s The following pics are for the support system for the liebig arm. It is comprised of 2" and 1/2" clevis hangers, 3/8" all-thread rod, and 3/8" 316 hard tubing. The all-thread was belt-sanded, conical on the ends, then pressed into the tubing. Still have to make the second support strut, as this was just a dry-fit. Enjoy, and criticism always welcome.

Image

Image

Image
Whiskey is rays of sunshine, held together with water.
Litebread
Novice
Posts: 78
Joined: Fri May 10, 2013 8:32 am

Re: The KYChemist Boka Still Build... "Boiler #2"

Post by Litebread »

Beautiful looking rig, its coming along very nicely.

+1 on the Gerber recipe making an excellent neutral, especially when you use the rice flavored cereal as the base. Looking forward to seeing it completed and running.


-Litebread
User avatar
The KYChemist
Rumrunner
Posts: 733
Joined: Sat Apr 27, 2013 11:25 am
Location: The Ville

Re: The KYChemist Boka Still Build... "Boiler #2"

Post by The KYChemist »

Alright, alright, alright... I'm a former, and current ADD kid, so I jump around from one part of this build to the other. The last two days, I've been working on the electric controller for our internal element. I've seen some controllers that look like they were just thrown together. Not that this is a bad thing, as they seem to work well. I wanted something more! I'm a huge fan of the Fallout video game series, so I wanted something that looked like it came from the game. Bearriver, who has the Pip-Boy for an avatar, could probably relate. Basically, I wanted something that looked like it came from the 50's, for those that don't know what I'm talking about. Material list, so far... 8"x8"x4" junction box, from Home Depot. SCR controller from EBay, courtesy of Jimbo and his electric build thread. 2 drawer pull handles from Home Depot. Other parts currently in shipping, or to be ordered soon. Here's some pics and explanations.

Image

I have heard a lot, about the mounting deficiences, of these SCR controllers. I solved the problem with a simple L-bracket, at least for me. The L-bracket mounts to the back off the heat-sink, which already has holes drilled, and tapped. Mine were, can't speak for all.

Image

The bottom screw, in this pic, is the original that holds the circuit board to the heat-sink. You can clearly see the tap marks, after the screw ends. It extended about the same length, for the top. I was able to scrounge some screws, from our shop at work. These are the screws you can see at the top of the heat-sink. I didn't tap the hole any further, just screwed them down tight, which wasn't too hard.

Image

Just a pic, to see what it looks like from the side.

Image

I realise what Jimbo said, about getting the gauges... I'm still getting them anyway. Those two white paper cut-outs are where they'll go. Drawn to scale, as per the ones I ordered. I wish I would've got the two screws, for the L-bracket mount, lined up a little better. I still have a few more things planned, but you will all just have to wait, with baited breath, to see what that is. Enjoy.
Whiskey is rays of sunshine, held together with water.
User avatar
The KYChemist
Rumrunner
Posts: 733
Joined: Sat Apr 27, 2013 11:25 am
Location: The Ville

Re: The KYChemist Boka Still Build... "Boiler #2"

Post by The KYChemist »

Got a couple more things installed on the column, today. Its finally starting to look like something. Thermometer was calibrated with a pot of boiling water, and should be accurate. Has a nifty little screw on the side for accomplishing this. Was a little surprised at how it works. I kinda figured it would tighten the bi-metallic coil inside somehow, but basicaly it just rotates the face inside the housing. Also got the needle valve installed. That was my eBay score, that I suggested to and accidentally posted in someone's classified ad. I realised just what I had done, as soon as I hit submit. Was just trying to help someone out, and had a brain fart. I blame it on some other forums I belong to. Different rules, and whatnot. Sorry... Thermometer was free, and needle valve was $30.00(new). I had our purchasing guy price that same valve, and OUR price was around $70.00. As usual, enjoy!

Image
Whiskey is rays of sunshine, held together with water.
User avatar
The KYChemist
Rumrunner
Posts: 733
Joined: Sat Apr 27, 2013 11:25 am
Location: The Ville

Re: The KYChemist Boka Still Build... "Boiler #2"

Post by The KYChemist »

It's been a long three months, but things are finally starting to snow-ball. We now have the column 90% done. The condensor coil needs to be coiled, and the copper mesh packing still has to be ordered. Other than that, I'm calling it done. We got the keg welded up, after work today. The ferrule for the column, the half coupling for the drain, and the half coupling for the heating element are all done, now. Speaking of the heating element fitting... We kept using a 1" NPT tap, to keep cutting threads, deeper in the fitting. This allowed us to screw the element in,a few extra threads. It doesn't go all the way in, to where the gasket seats, but we were able to get a decent amount of gasket compression. By the gasket seat, I'm referring to where the gasket meets the element, not the half coupling. Thread tape should seal it up just fine. The element gasket will basically act as a last resort back-up. The controller box still needs to be wired up, but needs a few minor parts, to accomplish this. Its amazing how a few cheap parts can hold up a project. I also have a bunch of questions about this. I have a feeling Jimbo wil be annoyed with me, by the end of this weekend/upcoming week. I'm using the SCR controller, and he seems to be the resident expert on these. I don't know what I'm going to do with my myself, when we get this, and our copper pot built. We've been in the building phase for almost a year. I may just have to build another one... I don't know. Anyhow, enjoy the pics.
Attachments
Column Pic #1.jpg
Column Pic #2.jpg
Column Pic #3.jpg
Column Pic #4.jpg
Column Pic #5.jpg
Column Pic #6.jpg
Whiskey is rays of sunshine, held together with water.
User avatar
Jimbo
retired
Posts: 8423
Joined: Wed Oct 10, 2012 1:19 pm
Location: Down the road a piece.

Re: The KYChemist Boka Still Build... "Boiler #2"

Post by Jimbo »

haha, I dont get annoyed that easy, let er rip.
In theory there's no difference between theory and practice. But in practice there is.
My Bourbon and Single Malt recipes. Apple Stuff and Electric Conversion
User avatar
The KYChemist
Rumrunner
Posts: 733
Joined: Sat Apr 27, 2013 11:25 am
Location: The Ville

Re: The KYChemist Boka Still Build... "Boiler #2"

Post by The KYChemist »

All the welding, keg and column, is finally completed. We just got the keg finished up today. All that's left to do, on the keg, is install the element, and install the drain valve. Then, just make sure there are no leaks, wire it up, and check another item off the list. The second pic is where the junction box, for the element, will go. The junction box will house a 4 prong 220v female outlet. The element control box will hook into that.
Attachments
IMG_20140226_125917_581.jpg
IMG_20140226_125902_618.jpg
IMG_20140226_125911_607.jpg
Whiskey is rays of sunshine, held together with water.
User avatar
The KYChemist
Rumrunner
Posts: 733
Joined: Sat Apr 27, 2013 11:25 am
Location: The Ville

Re: The KYChemist Boka Still Build... "Boiler #2"

Post by The KYChemist »

Thank you. We appreciate any, and all feedback. Once we get this one done, we can go back to getting our all copper pot still done.
Whiskey is rays of sunshine, held together with water.
User avatar
The KYChemist
Rumrunner
Posts: 733
Joined: Sat Apr 27, 2013 11:25 am
Location: The Ville

Re: The KYChemist Boka Still Build... "Boiler #2"

Post by The KYChemist »

Wanted to get this post in, before the wifely gets home. I have dishes to do. I have 13.5 gal of Gerber coming down to temp, so I can pitch yeast. Really wish this wasn't for the sacrificial. Starting gravity of 1.6, between all three buckets. We got the coil done today, as well. Should be fully op in two or three weeks. Not to shabby, for a first attempt... It sits at 11" long, and a little over 2" wide. Only took about 25 min.

EDIT: Meant starting gravity of 1.06, not 1.6, for my Gerber wash.
Attachments
IMG_20140227_152735_143.jpg
Whiskey is rays of sunshine, held together with water.
User avatar
The KYChemist
Rumrunner
Posts: 733
Joined: Sat Apr 27, 2013 11:25 am
Location: The Ville

Re: The KYChemist Boka Still Build... "Boiler #2"

Post by The KYChemist »

With a little more hard work, I should have this thing running, in about two weeks or less. Got the power controller completed, late tonight. Its all wired up, and buttoned up. Tomorrow will be the leak test, for the keg. Need to fill it with enough to cover element, and drain. I'll let it sit awhile, then add more water and plug it in, if there are no leaks. Cleaning wash is racked and ready to go. The only thing I'm waiting on is my copper mesh. Should be here, early next week.
Attachments
IMG_20140308_010722_750.jpg
IMG_20140308_010736_079.jpg
IMG_20140308_010802_584.jpg
IMG_20140305_173144_978.jpg
Whiskey is rays of sunshine, held together with water.
User avatar
Jimbo
retired
Posts: 8423
Joined: Wed Oct 10, 2012 1:19 pm
Location: Down the road a piece.

Re: The KYChemist Boka Still Build... "Boiler #2"

Post by Jimbo »

Nice work! Looks like a rocket ship about ready to launch!
In theory there's no difference between theory and practice. But in practice there is.
My Bourbon and Single Malt recipes. Apple Stuff and Electric Conversion
Hound Dog
Master of Distillation
Posts: 3002
Joined: Wed Jul 31, 2013 4:45 pm
Location: Hounds Hollow, VA

Re: The KYChemist Boka Still Build... "Boiler #2"

Post by Hound Dog »

Five..... Four....... Three...... Two......!
LM Still Operating Instructions
Cranky's New Distiller's Advice
Using Google Search

Drinking Rum before noon makes you a Pirate not an alcoholic.
User avatar
The KYChemist
Rumrunner
Posts: 733
Joined: Sat Apr 27, 2013 11:25 am
Location: The Ville

Re: The KYChemist Boka Still Build... "Boiler #2"

Post by The KYChemist »

Hound Dog wrote:Five..... Four....... Three...... Two......!
:lol: :lol: :lol: :thumbup:

Had to work on the Samurai, and low and behold, my copper mesh had shown up. The keg has been sitting for about a day now, with no leaks. Might just have to put the power controller through its paces, today. I have to run to home depot today, and pick up a coolant reservoir, and some electrical connectors. Besides that, there is nothing left to order or pick up, at least that I can see...
Whiskey is rays of sunshine, held together with water.
User avatar
The KYChemist
Rumrunner
Posts: 733
Joined: Sat Apr 27, 2013 11:25 am
Location: The Ville

Re: The KYChemist Boka Still Build... "Boiler #2"

Post by The KYChemist »

Well... Got bored, and decided to build a parrot, to go along with this build. Everything is only dry fit, and will be soldered tomorrow. Base is a 5lb chunk of scrap round stock, we had laying around. Output tube will be shortened to about half or two thirds its current length.
Attachments
IMG_20140311_152933_811.jpg
Whiskey is rays of sunshine, held together with water.
Hound Dog
Master of Distillation
Posts: 3002
Joined: Wed Jul 31, 2013 4:45 pm
Location: Hounds Hollow, VA

Re: The KYChemist Boka Still Build... "Boiler #2"

Post by Hound Dog »

Big :thumbup:
LM Still Operating Instructions
Cranky's New Distiller's Advice
Using Google Search

Drinking Rum before noon makes you a Pirate not an alcoholic.
User avatar
Hawkeye3
Novice
Posts: 90
Joined: Thu May 24, 2012 3:00 pm
Location: South of Bean Town

Re: The KYChemist Boka Still Build... "Boiler #2"

Post by Hawkeye3 »

Beautiful looking piece of equipment Chemist. I'm looking forward to hearing how it runs. Congrats.
PSIIHC and lovin' it.
"The Ultimate Result of Protecting Men From The Acts Of Folly Is To Fill The World With Fools" ...Herbert Spencer
User avatar
The KYChemist
Rumrunner
Posts: 733
Joined: Sat Apr 27, 2013 11:25 am
Location: The Ville

Re: The KYChemist Boka Still Build... "Boiler #2"

Post by The KYChemist »

Okay... So, before I light this baby up, its time for a systems check. Everything goes together the way it should. Before filling the boiler, the only thing left to test, would be the performance of the pump. Upon firing it up, I was pleased. The water flowed easily to the top, and all fittings were staying dry. Next, was just to wait and see what the flow looked like, coming out of my double wound condenser. Here, I was a little less pleased. While I wasn't expecting a full on gusher, I didn't expect the trickle, I got instead. All the clear tubing is 3/8" id. The pump is an Eco-Plus 265gph, mag drive. The condenser is 1/4", and has no kinks. I'm guessing the pump may be underpowered, but will wait for better minds to chime in. Anyhow, this is my last stepping stone, before the cleaning runs.
Attachments
IMG_20140315_163620_584.jpg
IMG_20140315_163557_458.jpg
IMG_20140315_163450_596.jpg
Whiskey is rays of sunshine, held together with water.
rad14701
retired
Posts: 20865
Joined: Wed Dec 19, 2007 4:46 pm
Location: New York, USA

Re: The KYChemist Boka Still Build... "Boiler #2"

Post by rad14701 »

How difficult is it to blow through the cooling circuit...???

You may be causing the pump to cavitate if you aren't running a bypass because there's no way you'll ever get 265 gallons through the cooling circuit in an hour... You only need ~1 liter/quart per minute of flow...
User avatar
The KYChemist
Rumrunner
Posts: 733
Joined: Sat Apr 27, 2013 11:25 am
Location: The Ville

Re: The KYChemist Boka Still Build... "Boiler #2"

Post by The KYChemist »

The double wound condenser does have a fair amount of resistance, but I can blow through it, without getting too red faced. This bypass circuit you speak of, Rad, how would I implement this into my design? I thought mag drive pumps were sort of self regulating.

EDIT: This pump was originally purchased for our copper build. I figured with the height it had to reach, I wouldn't get a true 265gph to the top, and that it should work.
Whiskey is rays of sunshine, held together with water.
Hound Dog
Master of Distillation
Posts: 3002
Joined: Wed Jul 31, 2013 4:45 pm
Location: Hounds Hollow, VA

Re: The KYChemist Boka Still Build... "Boiler #2"

Post by Hound Dog »

It looks like you have to get the air out of the system first. Then the flow should go better. This sounds stupid, but try holding your thumb over the output end until it fills the hose up and let the water rush out. Do this a few times and it might get the air lock out of your coil by the siphoning action. I have a valve at the end of my return line just before the water goes back into the barrel so I can regulate my flow. I find when I first fire up the pump that it just trickles so i just open and close the valve a few times jacking with it and presto, a solid stream starts to flow. Once a solid stream comes back down the siphoning action helps the pump out also.

Won't hurt to try.
LM Still Operating Instructions
Cranky's New Distiller's Advice
Using Google Search

Drinking Rum before noon makes you a Pirate not an alcoholic.
User avatar
The KYChemist
Rumrunner
Posts: 733
Joined: Sat Apr 27, 2013 11:25 am
Location: The Ville

Re: The KYChemist Boka Still Build... "Boiler #2"

Post by The KYChemist »

I was kinda starting to play around with that, HoundDog. Maybe I just didn't do it enough times. Ill have to set back up, today, and give it a try.
Whiskey is rays of sunshine, held together with water.
Post Reply