show us your brewing rig
Moderator: Site Moderator
Re: show us your brewing rig
isn't that a RIMS?
-
bellybuster
- Master of Distillation
- Posts: 4490
- Joined: Tue Dec 18, 2012 5:00 pm
Re: show us your brewing rig
No, a RIMS has wort passing by an elements. Mine is a vessel containing a coil that the wort passes thru. Just like as if it were in my HLT. The liquid in the vessel is temp controlled via PID.
New Distiller's Reading http://homedistiller.org/forum/viewforum.php?f=46
Novice Guide to Cuts http://homedistiller.org/forum/viewtopi ... 40&start=0
Novice spoon feed http://homedistiller.org/forum/viewtopi ... 15&t=52975
Novice Guide to Cuts http://homedistiller.org/forum/viewtopi ... 40&start=0
Novice spoon feed http://homedistiller.org/forum/viewtopi ... 15&t=52975
-
Prairiepiss
- retired
- Posts: 16571
- Joined: Sat Dec 18, 2010 7:42 am
- Location: Somewhere in the Ozarks
Re: show us your brewing rig
Not sure what you mean by external heat exchanger?bellybuster wrote:I use an external heat exchanger for my HERMS anyone else doing the same?
It'snotsocoldnow.
Advice For newbies by a newbie.
CM Still Mods
My Stuffs
Fu Man
Mr. Piss
That's Princess Piss to the haters.
Advice For newbies by a newbie.
CM Still Mods
My Stuffs
Fu Man
Mr. Piss
That's Princess Piss to the haters.
-
bellybuster
- Master of Distillation
- Posts: 4490
- Joined: Tue Dec 18, 2012 5:00 pm
Re: show us your brewing rig
Instead of having my HERMS coil inside my HLT, I have a separate smaller vessel that has the coil in it with a PID controlled element. I can now make temp ramps quickly and only have to heat a couple gallons of water instead of my entire HLT. The wort passes thru the coil and the temp is controlled by the temp of the wort returning to the mash. It circulates throughout the entire mash and holds temp to 1 degree.
I can raise my mash temp as fast as I could with direct fire and stirring like a mad man. Now no stirring, just touch a button
I'll get a pic later for you.
I can raise my mash temp as fast as I could with direct fire and stirring like a mad man. Now no stirring, just touch a button
I'll get a pic later for you.
New Distiller's Reading http://homedistiller.org/forum/viewforum.php?f=46
Novice Guide to Cuts http://homedistiller.org/forum/viewtopi ... 40&start=0
Novice spoon feed http://homedistiller.org/forum/viewtopi ... 15&t=52975
Novice Guide to Cuts http://homedistiller.org/forum/viewtopi ... 40&start=0
Novice spoon feed http://homedistiller.org/forum/viewtopi ... 15&t=52975
-
Prairiepiss
- retired
- Posts: 16571
- Joined: Sat Dec 18, 2010 7:42 am
- Location: Somewhere in the Ozarks
Re: show us your brewing rig
OK gotcha. I've been wanting to build something similar.
It'snotsocoldnow.
Advice For newbies by a newbie.
CM Still Mods
My Stuffs
Fu Man
Mr. Piss
That's Princess Piss to the haters.
Advice For newbies by a newbie.
CM Still Mods
My Stuffs
Fu Man
Mr. Piss
That's Princess Piss to the haters.
-
bellybuster
- Master of Distillation
- Posts: 4490
- Joined: Tue Dec 18, 2012 5:00 pm
Re: show us your brewing rig
It really is superior to having it in the HLT AFAIK. Ramp times are quick and mash temps are rock steady. Add a bit of bling too.
New Distiller's Reading http://homedistiller.org/forum/viewforum.php?f=46
Novice Guide to Cuts http://homedistiller.org/forum/viewtopi ... 40&start=0
Novice spoon feed http://homedistiller.org/forum/viewtopi ... 15&t=52975
Novice Guide to Cuts http://homedistiller.org/forum/viewtopi ... 40&start=0
Novice spoon feed http://homedistiller.org/forum/viewtopi ... 15&t=52975
-
Prairiepiss
- retired
- Posts: 16571
- Joined: Sat Dec 18, 2010 7:42 am
- Location: Somewhere in the Ozarks
Re: show us your brewing rig
I have came up with plans for one. The way it will be built. It will be able to be used for a RIMS, HERMS, and wort chiller. I just need to collect the materials. And set them with all the other materials for all the other builds. I have going on. And one day might get it done.
It'snotsocoldnow.
Advice For newbies by a newbie.
CM Still Mods
My Stuffs
Fu Man
Mr. Piss
That's Princess Piss to the haters.
Advice For newbies by a newbie.
CM Still Mods
My Stuffs
Fu Man
Mr. Piss
That's Princess Piss to the haters.
-
bellybuster
- Master of Distillation
- Posts: 4490
- Joined: Tue Dec 18, 2012 5:00 pm
Re: show us your brewing rig
I've considered trying mine as a wort chiller too but I have a plated chiller that works incredibly well....when it's not clogged. My whole rig is in the middle of an extended rebuild. I'm adding in some automation and actually considering a whole new design. The 3 vessel system takes up allot of room.
I'm working on drawing up a 2 vessel system with one keg above the other. All clean in place. I have a stack of crayon drawings and ideas.
This is the idea for my new stand except only 2 tiers. Will copy Morebeer's "tippy dump" for mash tun and no propane...all electric.
I'm working on drawing up a 2 vessel system with one keg above the other. All clean in place. I have a stack of crayon drawings and ideas.
This is the idea for my new stand except only 2 tiers. Will copy Morebeer's "tippy dump" for mash tun and no propane...all electric.
New Distiller's Reading http://homedistiller.org/forum/viewforum.php?f=46
Novice Guide to Cuts http://homedistiller.org/forum/viewtopi ... 40&start=0
Novice spoon feed http://homedistiller.org/forum/viewtopi ... 15&t=52975
Novice Guide to Cuts http://homedistiller.org/forum/viewtopi ... 40&start=0
Novice spoon feed http://homedistiller.org/forum/viewtopi ... 15&t=52975
Re: show us your brewing rig
Might be a lot easier to use a well insulated pot for a tun negating the need for rims or herms input to maintain a steady mash temp. a keg might look ghetto or kewel but its about as practical to use for a tun as a chocolate teapot. also if u do ever need to step a mash u can use a much smaller herms pot think 2-3pint not gallons, to effect any required temp rise.bellybuster wrote:I've considered trying mine as a wort chiller too but I have a plated chiller that works incredibly well....when it's not clogged. My whole rig is in the middle of an extended rebuild. I'm adding in some automation and actually considering a whole new design. The 3 vessel system takes up allot of room.
I'm working on drawing up a 2 vessel system with one keg above the other. All clean in place. I have a stack of crayon drawings and ideas.
This is the idea for my new stand except only 2 tiers. Will copy Morebeer's "tippy dump" for mash tun and no propane...all electric.
Re: show us your brewing rig
My 25 gallon 3 pot rig with twin 1500 watt element RIMS. Propane fired HLT and BK. PIDs for BK and MLT. Standard controllers for HLT and RIMS outlet monitoring.

-
bellybuster
- Master of Distillation
- Posts: 4490
- Joined: Tue Dec 18, 2012 5:00 pm
Re: show us your brewing rig
I've been using an insulated keg for a mash tun for 20+ years. A container is a container.PhatFil wrote: a keg might look ghetto or kewel but its about as practical to use for a tun as a chocolate teapot. also if u do ever need to step a mash u can use a much smaller herms pot think 2-3pint not gallons, to effect any required temp rise.
My external heat exchanger has no problem giving me a degree or better per minute rise for step mashes. Just a different way to skin a cat is all. It is only 2 gallons with my herms coil in it instead of the HLT.
Outstanding rig there ELT, I use 2 pumps as well. Would love to go up to 20 gallons but the pots are expensive. I often do double batches, mashing in my second batch while coming up to a boil on the first.
New Distiller's Reading http://homedistiller.org/forum/viewforum.php?f=46
Novice Guide to Cuts http://homedistiller.org/forum/viewtopi ... 40&start=0
Novice spoon feed http://homedistiller.org/forum/viewtopi ... 15&t=52975
Novice Guide to Cuts http://homedistiller.org/forum/viewtopi ... 40&start=0
Novice spoon feed http://homedistiller.org/forum/viewtopi ... 15&t=52975
-
bellybuster
- Master of Distillation
- Posts: 4490
- Joined: Tue Dec 18, 2012 5:00 pm
Re: show us your brewing rig
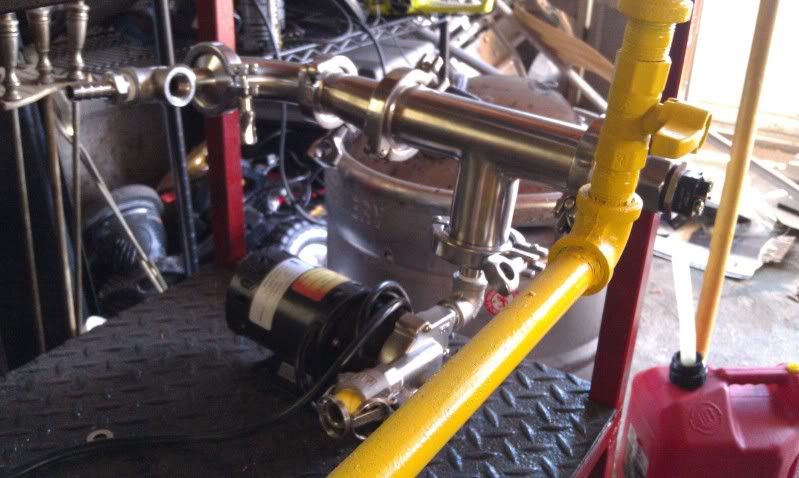
figured Id grab a couple pics of my heat exchanger so I can explain it better.
This shows the container with the HERMS coil in it. It has a PID controlled 2000 watt element in from the bottom.
wort enters from the bottom and the temp is read at the output by a probe. If I want 150 degrees in my mash tun I set the PID for 150 degrees and it continually dumps 150 degree wort back into the mash tun. Stable as a rock. If I want a rise in temp I simply increase the set point on the PID. The first run is the learning run for the PID, after that it knows the rise rate and will never overshoot.
Is it necessary? Nope, neither are the lights I have on my control panel. Works great though.
New Distiller's Reading http://homedistiller.org/forum/viewforum.php?f=46
Novice Guide to Cuts http://homedistiller.org/forum/viewtopi ... 40&start=0
Novice spoon feed http://homedistiller.org/forum/viewtopi ... 15&t=52975
Novice Guide to Cuts http://homedistiller.org/forum/viewtopi ... 40&start=0
Novice spoon feed http://homedistiller.org/forum/viewtopi ... 15&t=52975
Re: show us your brewing rig
thats a monster..  my lil knock up is dwarfed by that
id had a few samples when i had this idea.. resulted in a very bad design due to drilling the plan A element hole thru structural ridges in the ammo case meaning it would never seal without internal machining, so plan B was to mount the element thru the what was bottom.. and wedge it securely for use, so it wont roll the initial element hole is now the fill hole.. 2m x 10mm copper tube in a 3l ( circa 6 pint, or do u have short pints in the US too??) bath, 2.4kw budget kettle element. 1 pint = 568ml
id had a few samples when i had this idea.. resulted in a very bad design due to drilling the plan A element hole thru structural ridges in the ammo case meaning it would never seal without internal machining, so plan B was to mount the element thru the what was bottom.. and wedge it securely for use, so it wont roll
-
bellybuster
- Master of Distillation
- Posts: 4490
- Joined: Tue Dec 18, 2012 5:00 pm
Re: show us your brewing rig
That'll work...
I did all my testing in PVC. My initial design resembled a shotgun condenser. It failed miserably.
I tried to get it smaller and smaller but got to the point where if I want smaller I may as well go RIMS. Didn't want to go there soooo........
I did all my testing in PVC. My initial design resembled a shotgun condenser. It failed miserably.
I tried to get it smaller and smaller but got to the point where if I want smaller I may as well go RIMS. Didn't want to go there soooo........
New Distiller's Reading http://homedistiller.org/forum/viewforum.php?f=46
Novice Guide to Cuts http://homedistiller.org/forum/viewtopi ... 40&start=0
Novice spoon feed http://homedistiller.org/forum/viewtopi ... 15&t=52975
Novice Guide to Cuts http://homedistiller.org/forum/viewtopi ... 40&start=0
Novice spoon feed http://homedistiller.org/forum/viewtopi ... 15&t=52975
Re: show us your brewing rig
well i knocked it up tested, and it worked a treat with 100% water, however 1st run with grain the small 12v solar pump with voltage control which shouldn't suck much managed to suck enough to set the grain bed solid.. indicating an underback would e useful.
thing is i dont loose any temp during the mash as the tun is very well insulated and i dont brew olde worlde beer with exotic unmodified grain so dont ever need to step a mash, so its in the spares box again...
thing is i dont loose any temp during the mash as the tun is very well insulated and i dont brew olde worlde beer with exotic unmodified grain so dont ever need to step a mash, so its in the spares box again...
-
bellybuster
- Master of Distillation
- Posts: 4490
- Joined: Tue Dec 18, 2012 5:00 pm
Re: show us your brewing rig
I seldom do step mashes but its nice to have the ability.. I have found my beers to be better since going to constant recirc.
Clearer wort going into the boiler. I use rice hulls if using grains known to be sticky.
My MT is well insulated too but it does lose a few degrees over the mashing time. can make a difference in outcome when using malty grains. I could insulate more but where's the fun in that?
Clearer wort going into the boiler. I use rice hulls if using grains known to be sticky.
My MT is well insulated too but it does lose a few degrees over the mashing time. can make a difference in outcome when using malty grains. I could insulate more but where's the fun in that?
New Distiller's Reading http://homedistiller.org/forum/viewforum.php?f=46
Novice Guide to Cuts http://homedistiller.org/forum/viewtopi ... 40&start=0
Novice spoon feed http://homedistiller.org/forum/viewtopi ... 15&t=52975
Novice Guide to Cuts http://homedistiller.org/forum/viewtopi ... 40&start=0
Novice spoon feed http://homedistiller.org/forum/viewtopi ... 15&t=52975
Re: show us your brewing rig
My Brewery: Almost done, Cool to see other brew sculptures here
My Brewery:

My Brewery:


-
bellybuster
- Master of Distillation
- Posts: 4490
- Joined: Tue Dec 18, 2012 5:00 pm
Re: show us your brewing rig
nice rig Elf, would love some details on your keg spear sight glasses.
New Distiller's Reading http://homedistiller.org/forum/viewforum.php?f=46
Novice Guide to Cuts http://homedistiller.org/forum/viewtopi ... 40&start=0
Novice spoon feed http://homedistiller.org/forum/viewtopi ... 15&t=52975
Novice Guide to Cuts http://homedistiller.org/forum/viewtopi ... 40&start=0
Novice spoon feed http://homedistiller.org/forum/viewtopi ... 15&t=52975
-
Prairiepiss
- retired
- Posts: 16571
- Joined: Sat Dec 18, 2010 7:42 am
- Location: Somewhere in the Ozarks
Re: show us your brewing rig
Wish I could see it. Can you upload them to HD. Instead of offsite hosting.
It'snotsocoldnow.
Advice For newbies by a newbie.
CM Still Mods
My Stuffs
Fu Man
Mr. Piss
That's Princess Piss to the haters.
Advice For newbies by a newbie.
CM Still Mods
My Stuffs
Fu Man
Mr. Piss
That's Princess Piss to the haters.
Re: show us your brewing rig
Please refer to the Image Uploading and Posting Etiquette topic regarding images...
Re: show us your brewing rig
OK i'll see if I can shrink them down and use the HD up-loader. I'll get some more pics of the keg spear sight glasses and explaine that tomorrow as well
-
Anemephistus
- Novice
- Posts: 38
- Joined: Mon Apr 30, 2012 10:14 pm
Re: show us your brewing rig

This is the filter rig I put together for mead and wine, yes the spray bottle is food safe. I kept the tip for bottle filling
 .
.Another shot with some sweet mead we were working up

I just ordered some more addatives, I found a good box to keep it all strait
These shots are of my spring simple mead. Came out perfectly filtered, mild yellow and perfectly clear. It tastes great!


And of course what makes it all worthwhile...

I skipped all the 5 gallon buckets and stuff that we use for wine and mead y'all have seen enough of those I'm sure. The filter works really well. The overall rig has five plastic carboys (I don't bother with metal or glass for wine or mead) and eight primary fermenters. I've never had it all going at once though
I'd better add that since this thread was in the beer and wine I figured that's the equipment I'd post, I have nothing on these beautiful rigs the guys and gals are posting here, my pot is still under re work.

Re: show us your brewing rig
just had a look at the photos. some of those rigs are beautiful
-
BrooklynTech
- Swill Maker
- Posts: 459
- Joined: Sun Feb 20, 2011 2:50 pm
- Location: Somewhere out West
Re: show us your brewing rig
Yea been to a YardHouse or two. Very impressive number of kegs and brews.King Of Hearts wrote:Here is a real mans cooler. http://www.yardhouse.com/default.aspx" onclick="window.open(this.href);return false;" rel="nofollow
-
DFitz
- Rumrunner
- Posts: 564
- Joined: Wed Feb 29, 2012 10:16 am
- Location: Sleeping under a bridge near you
Re: show us your brewing rig
BB, I'm putting my HERMS HLT together this week. It's a 25 gal capacity aluminum kettle. I had planned to use a stainless coil. Would you think that 50' would be too much?bellybuster wrote:figured Id grab a couple pics of my heat exchanger so I can explain it better. This shows the container with the HERMS coil in it. It has a PID controlled 2000 watt element in from the bottom.
wort enters from the bottom and the temp is read at the output by a probe. If I want 150 degrees in my mash tun I set the PID for 150 degrees and it continually dumps 150 degree wort back into the mash tun. Stable as a rock. If I want a rise in temp I simply increase the set point on the PID. The first run is the learning run for the PID, after that it knows the rise rate and will never overshoot. Is it necessary? Nope, neither are the lights I have on my control panel. Works great though.
-
Fills Jars Slowly

- Bootlegger
- Posts: 107
- Joined: Wed Feb 26, 2014 11:07 am
Re: show us your brewing rig
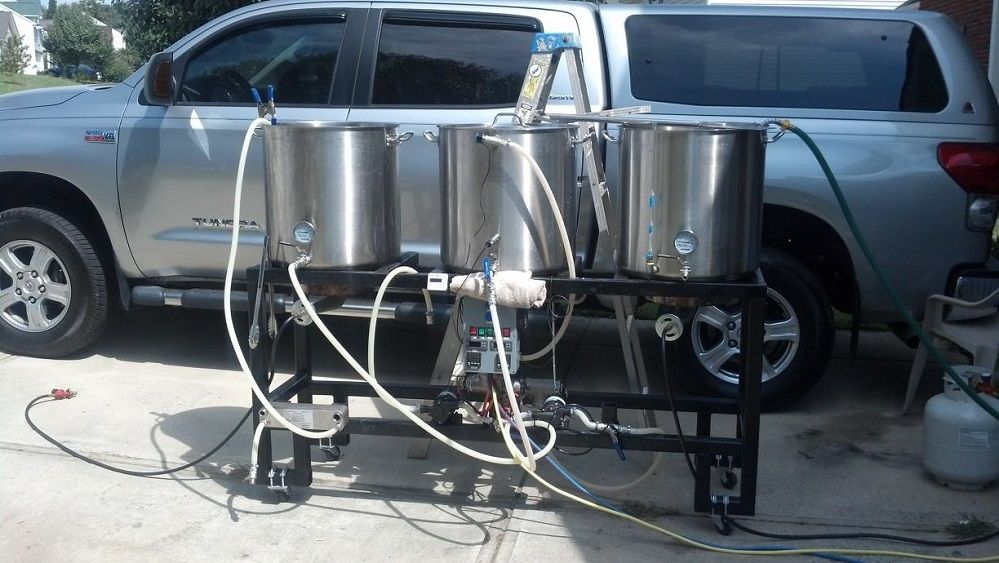
My brewing rig is a propane fueled 3 burner single tier recirculating system with a PID controlled RIMS tube.
2 pumps move things around. Connections are camlock style with the exception of the RIMS tube mount which is tri-clamp.
I recirculate and sparge through a slotted 1/2" copper tubing manifold in the bottom of the mash tun. The slots face down in this photo.
Brew day. A nice dark brown ale wort can be seen recirculating from the mash tun through the RIMS tube and back into the mash tun. When it is time to sparge, each of the two lids moves over one pot to the left and the wort is drained to the boil pot while the sparge water is pumped into the top of the mash tun.
I typically use this rig to cook my whiskey mashes too. Recently I built a steam injection system that has an adaptor to push steam through my sparging manifold as well as into my still boiler. That will allow me to use steam on all grain mashes as an alternative to no-boil methods.
2 pumps move things around. Connections are camlock style with the exception of the RIMS tube mount which is tri-clamp.
I recirculate and sparge through a slotted 1/2" copper tubing manifold in the bottom of the mash tun. The slots face down in this photo.
Brew day. A nice dark brown ale wort can be seen recirculating from the mash tun through the RIMS tube and back into the mash tun. When it is time to sparge, each of the two lids moves over one pot to the left and the wort is drained to the boil pot while the sparge water is pumped into the top of the mash tun.

Re: show us your brewing rig
Here's the link to the Nov 2009 BYO article on my system. Two vessel, no-sparge, plus integrated pump / counterflow chiller. Perfect for kitchen brewing. Over the years, I've upgraded to a larger mash tun and kettle, but it's largely unchanged from the original design.
-
bellybuster
- Master of Distillation
- Posts: 4490
- Joined: Tue Dec 18, 2012 5:00 pm
Re: show us your brewing rig
DFitz,,, 50 feet is more than enough Personally, I'd go copper for the better heat transfer but SS is fine. 1/2" is great but I'm sure 3/8 would work fine. Mine is 1/2" and about 18 feet of coil. Works like a charm.
I am selling my rig now and moving to a single vessel system. I need the room
I am selling my rig now and moving to a single vessel system. I need the room
New Distiller's Reading http://homedistiller.org/forum/viewforum.php?f=46
Novice Guide to Cuts http://homedistiller.org/forum/viewtopi ... 40&start=0
Novice spoon feed http://homedistiller.org/forum/viewtopi ... 15&t=52975
Novice Guide to Cuts http://homedistiller.org/forum/viewtopi ... 40&start=0
Novice spoon feed http://homedistiller.org/forum/viewtopi ... 15&t=52975
-
humbledore

- Trainee
- Posts: 898
- Joined: Tue Apr 16, 2013 1:12 pm
- Location: The third coast
Re: show us your brewing rig
Nice work 3d0g I definitely either read that article or saw your build thread on homebrewtalk. A couple of years ago inspired by it I tried to make my own "CFC and pump inside a bucket". I don't use it much anymore but I liked your thinking.
I brew 5 and 10 gallon batches on a three tier gravity stand fueled with NG and use an immersion chiller, no pumps. Less fuss and cleanup. I brew outside though so space isn't a problem.
Filling Jars, that is a sweet rig for sure.
I brew 5 and 10 gallon batches on a three tier gravity stand fueled with NG and use an immersion chiller, no pumps. Less fuss and cleanup. I brew outside though so space isn't a problem.
Filling Jars, that is a sweet rig for sure.
Re: show us your brewing rig
Fills Jars Slowly wrote:My brewing rig is a propane fueled 3 burner single tier recirculating system with a PID controlled RIMS tube.
2 pumps move things around. Connections are camlock style with the exception of the RIMS tube mount which is tri-clamp.
I recirculate and sparge through a slotted 1/2" copper tubing manifold in the bottom of the mash tun. The slots face down in this photo.
Brew day. A nice dark brown ale wort can be seen recirculating from the mash tun through the RIMS tube and back into the mash tun. When it is time to sparge, each of the two lids moves over one pot to the left and the wort is drained to the boil pot while the sparge water is pumped into the top of the mash tun. I typically use this rig to cook my whiskey mashes too. Recently I built a steam injection system that has an adaptor to push steam through my sparging manifold as well as into my still boiler. That will allow me to use steam on all grain mashes as an alternative to no-boil methods.